|
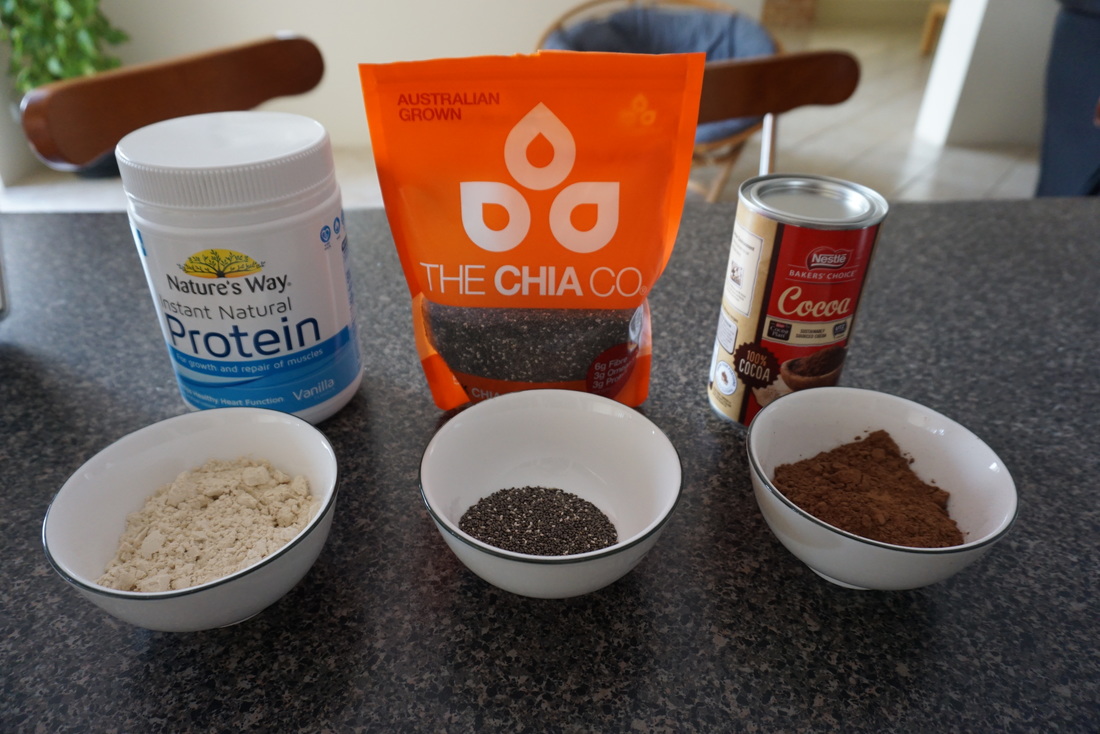
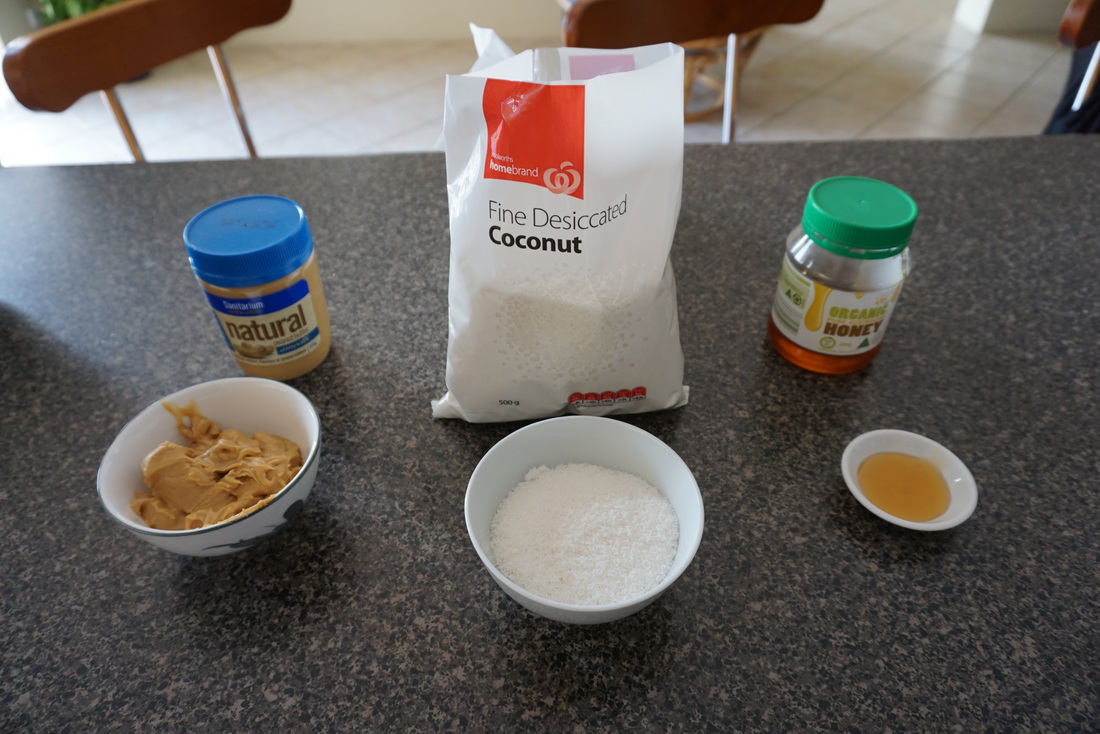
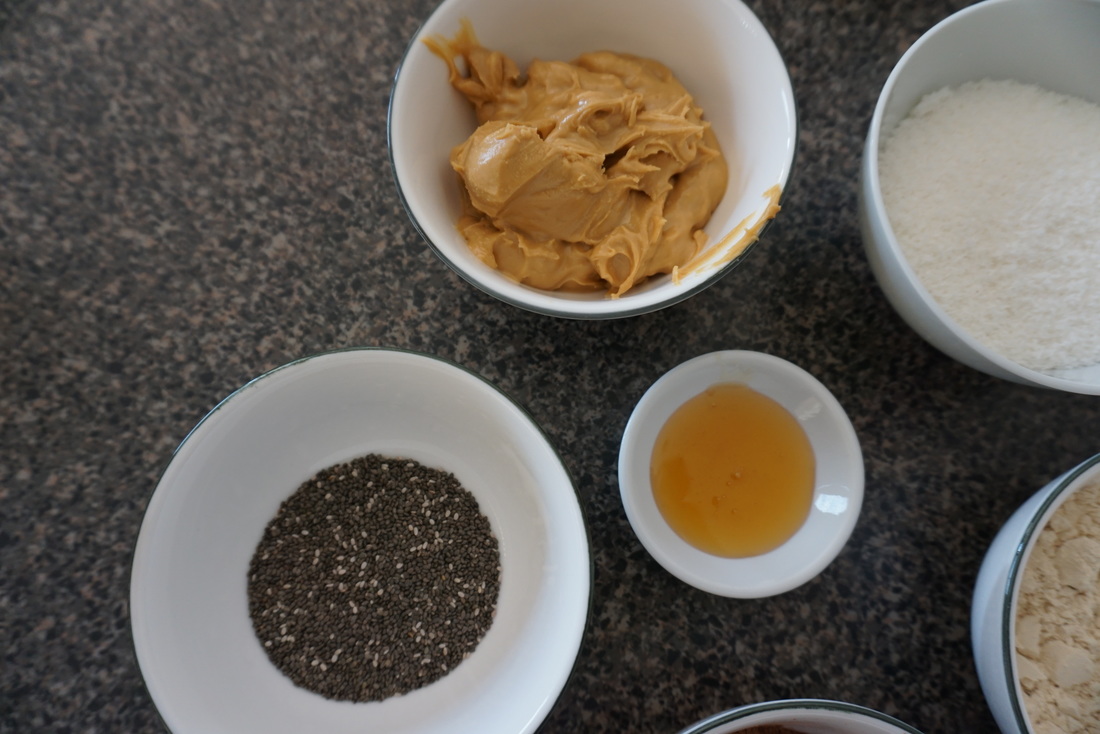
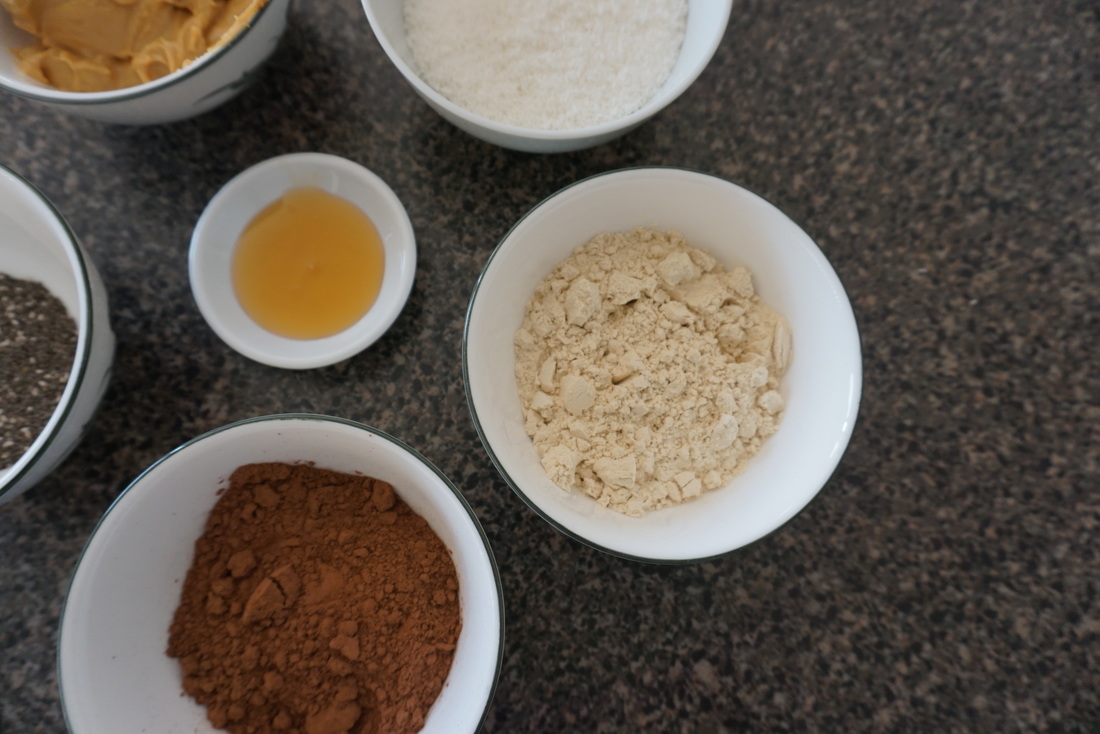
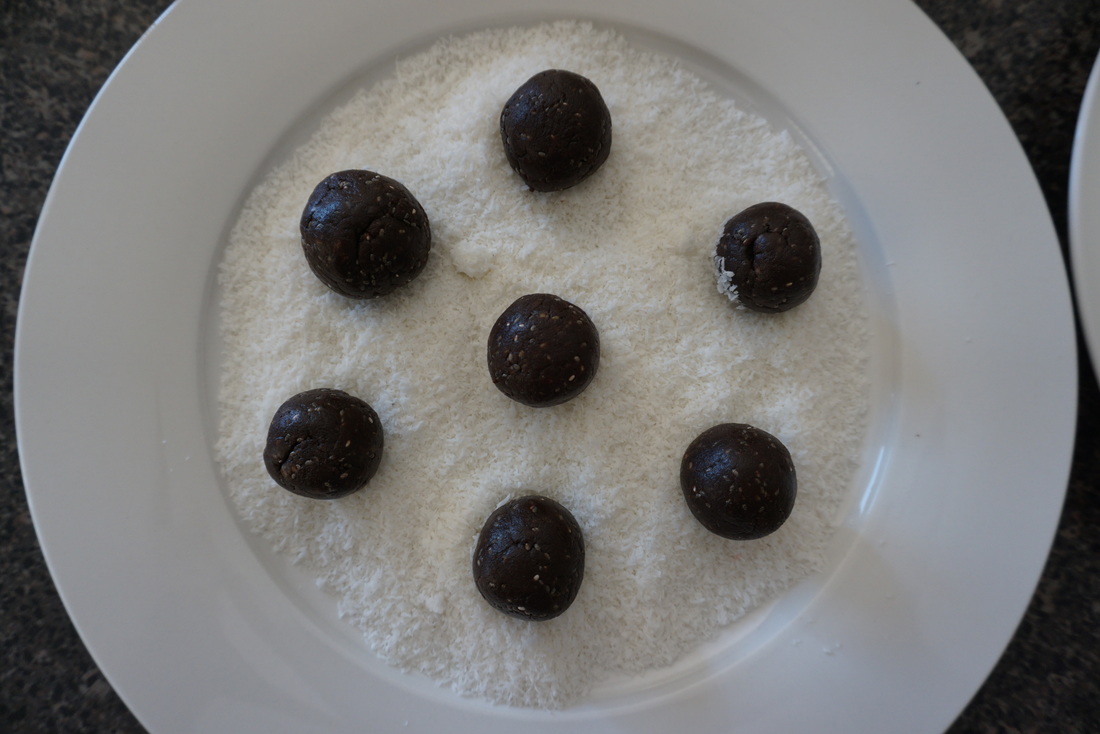
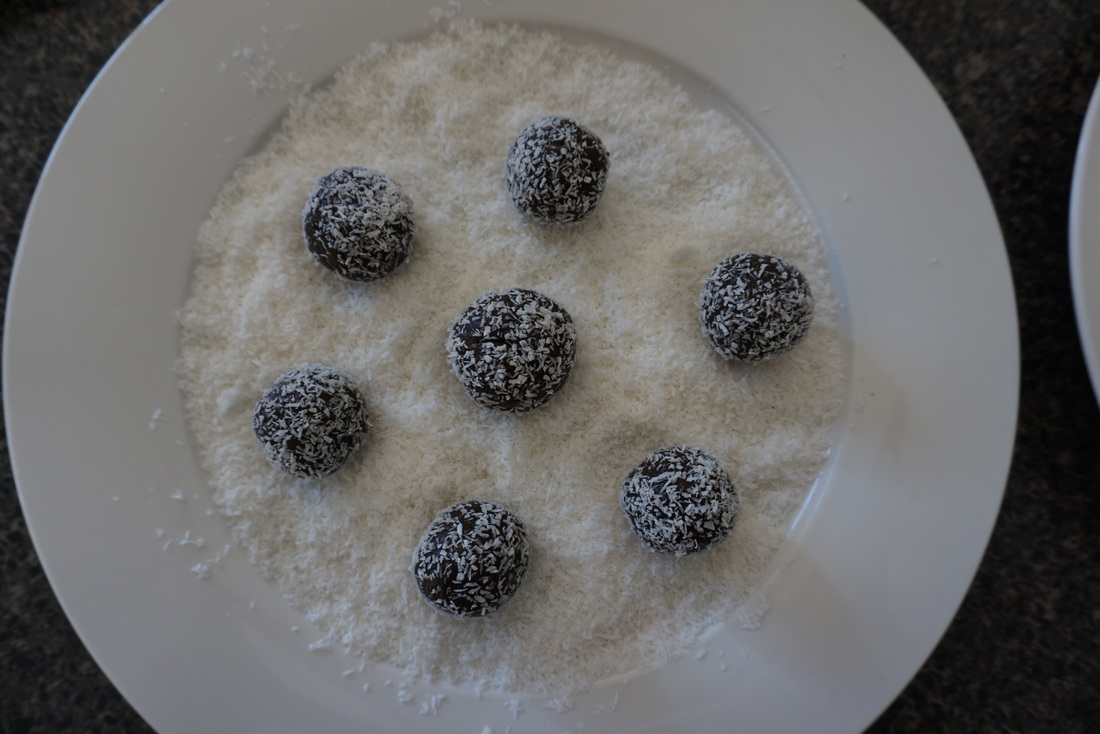
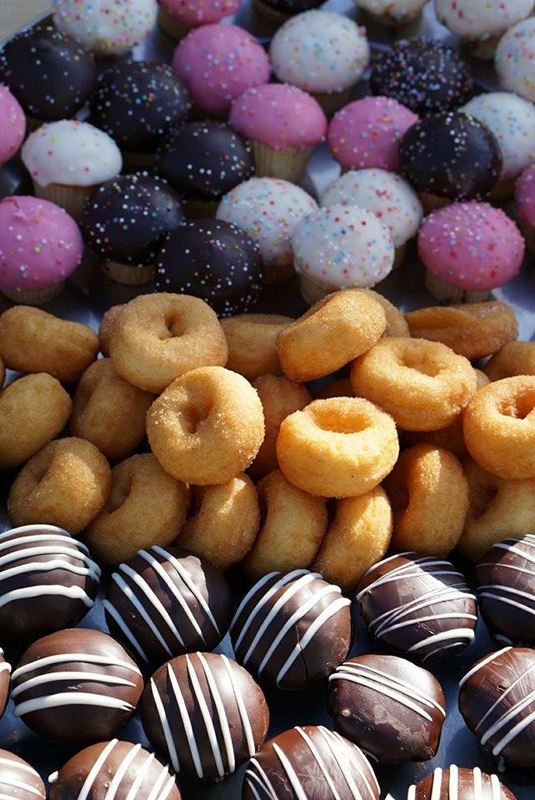
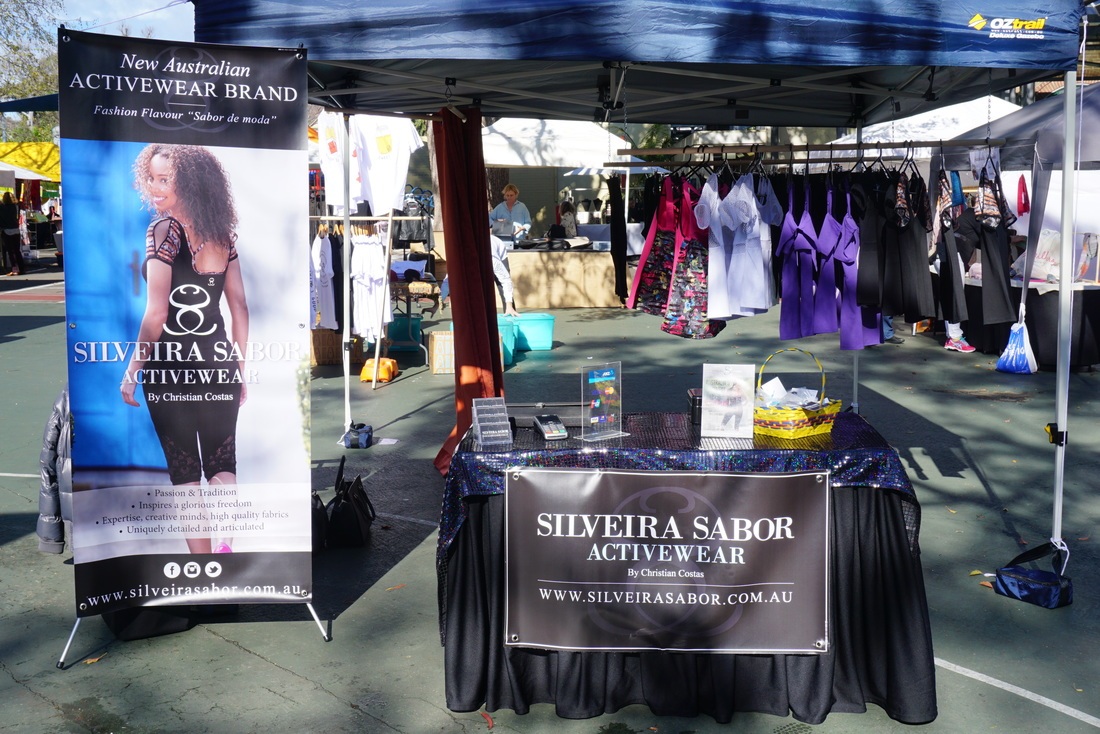
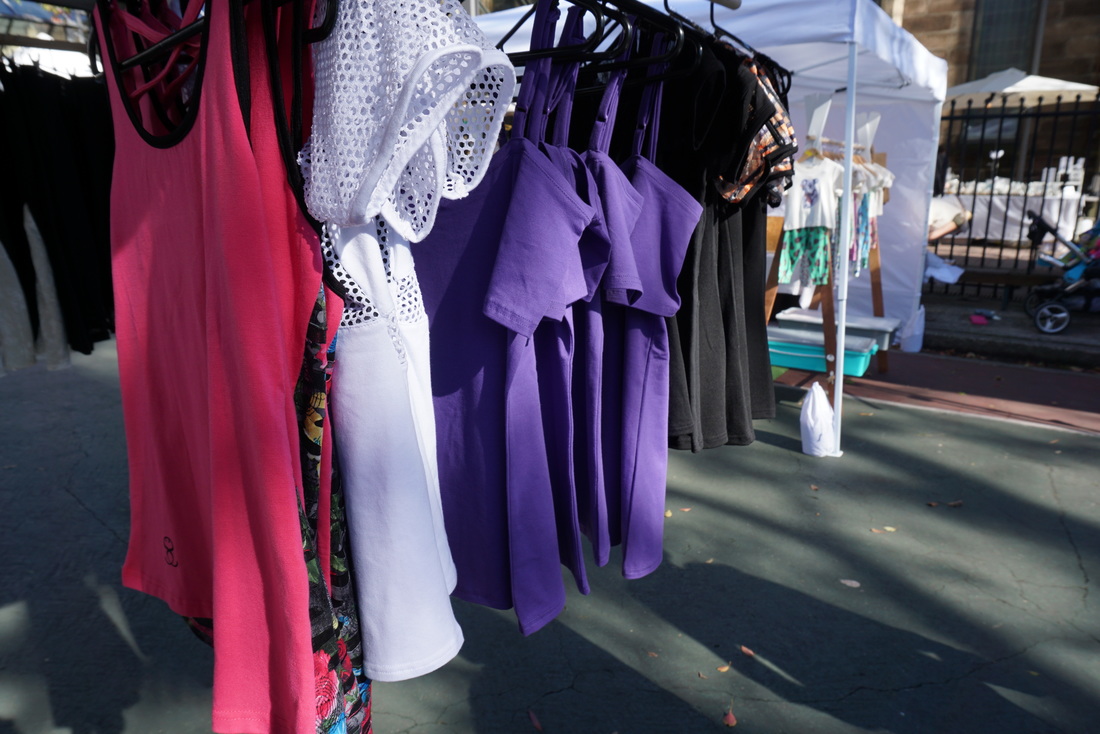
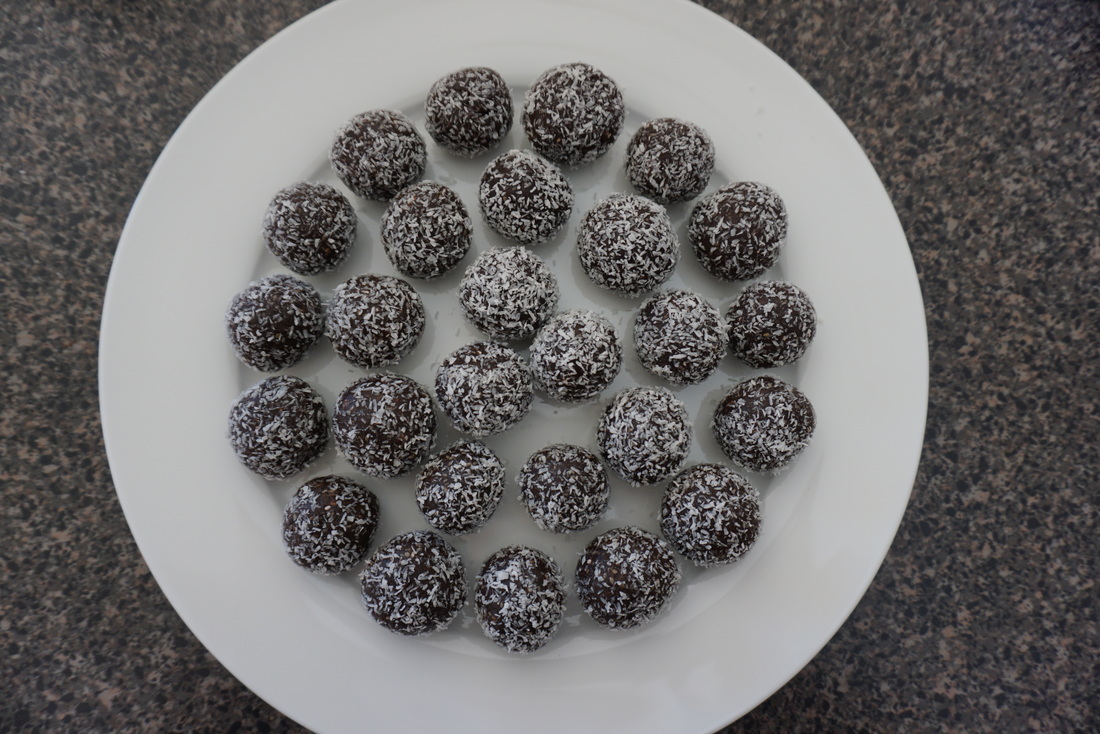
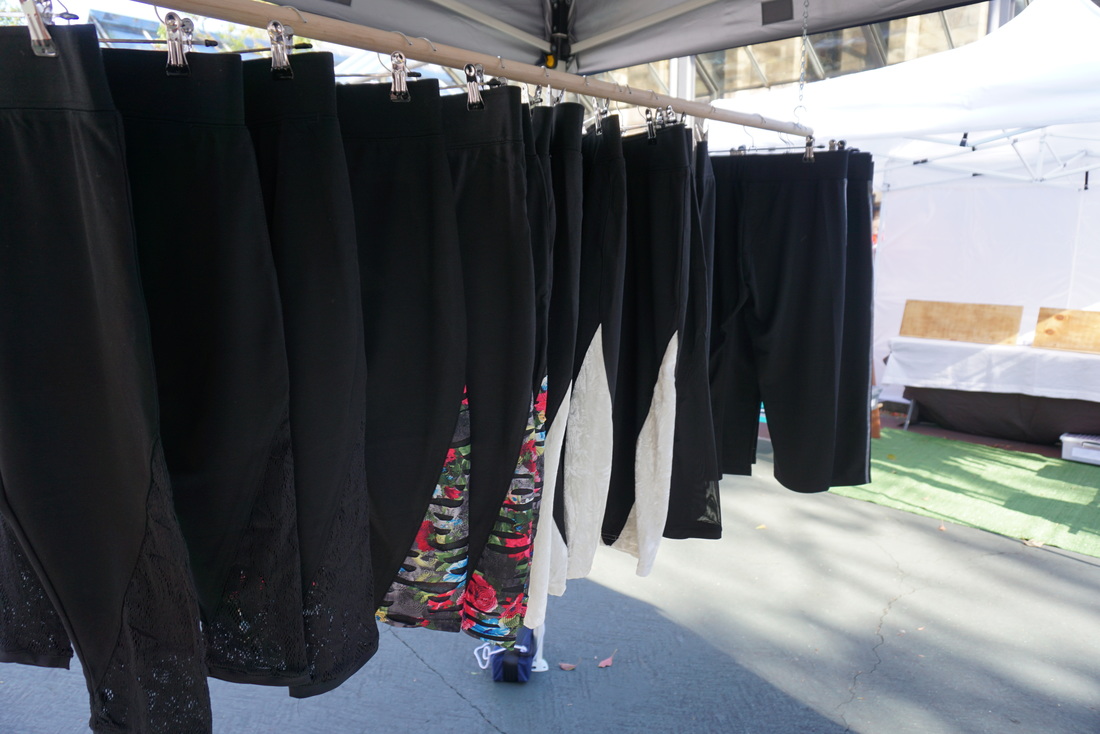
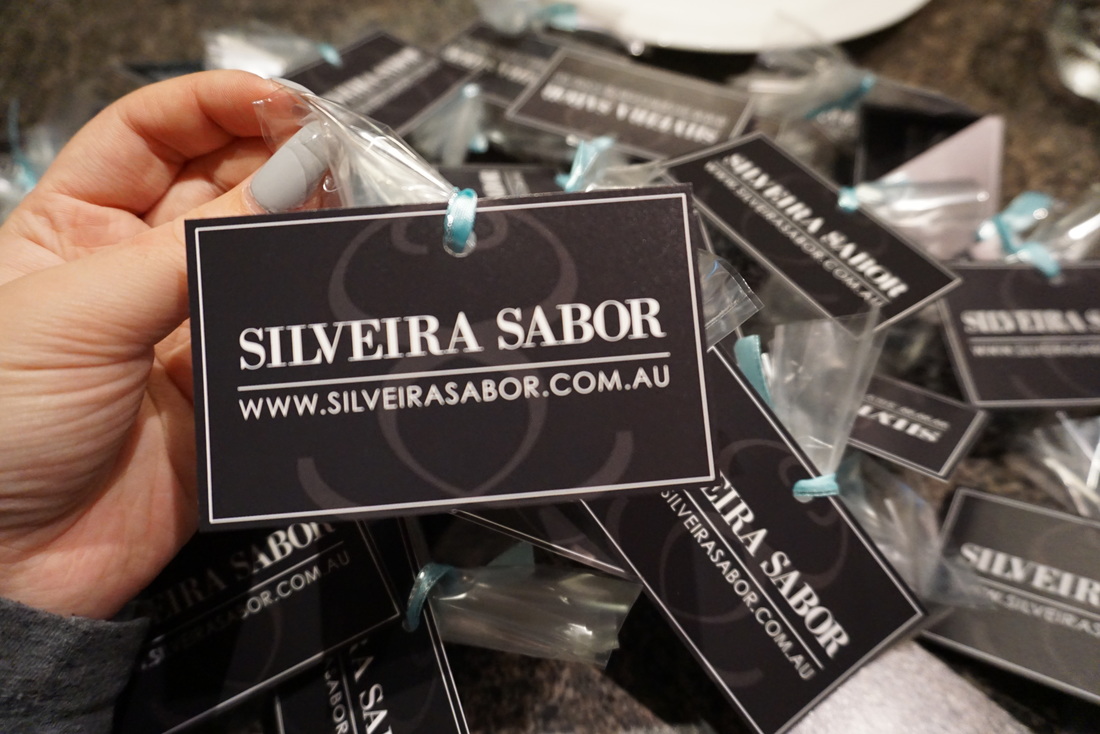
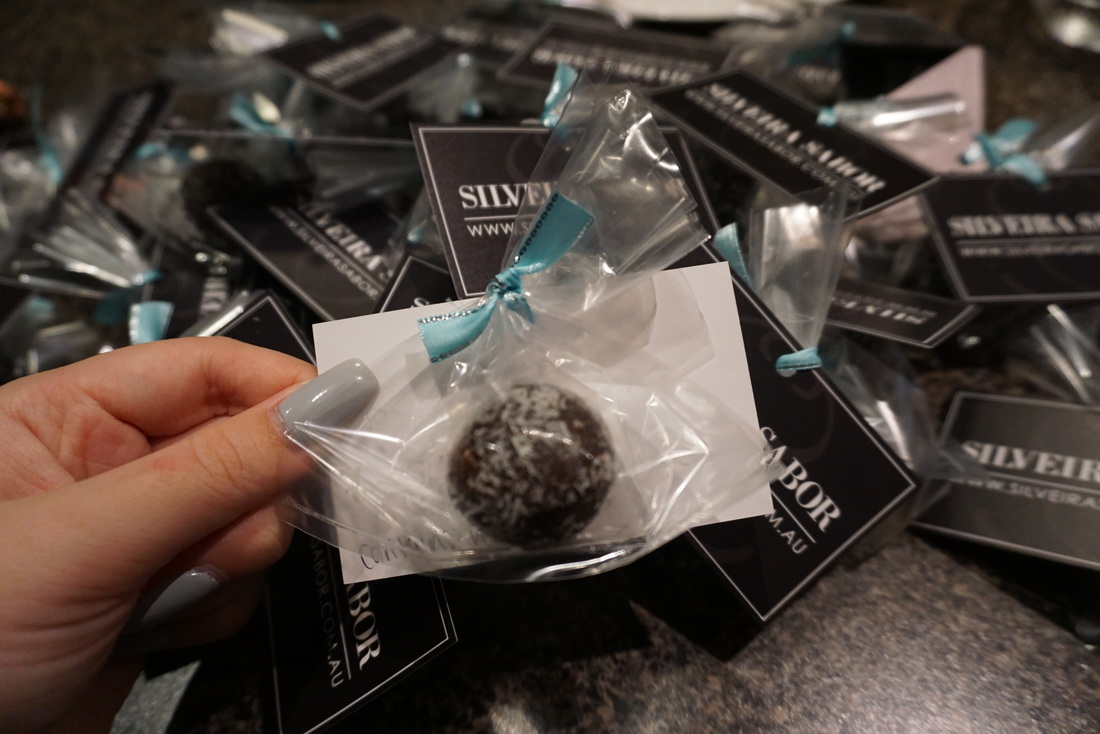
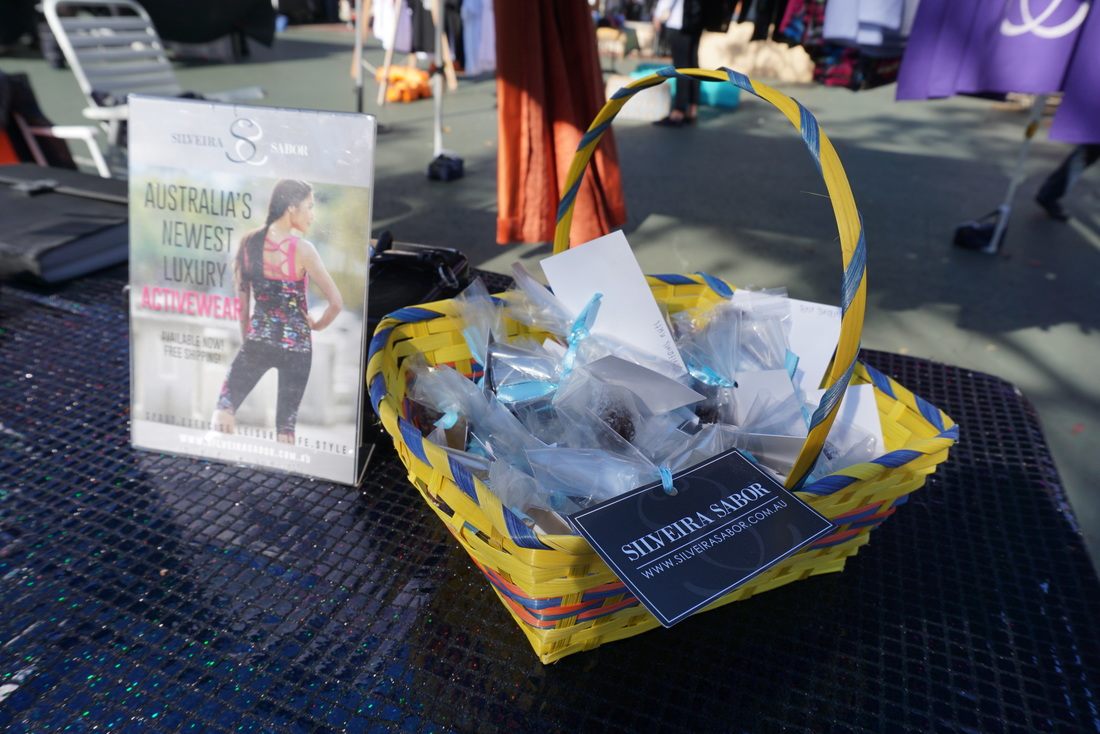
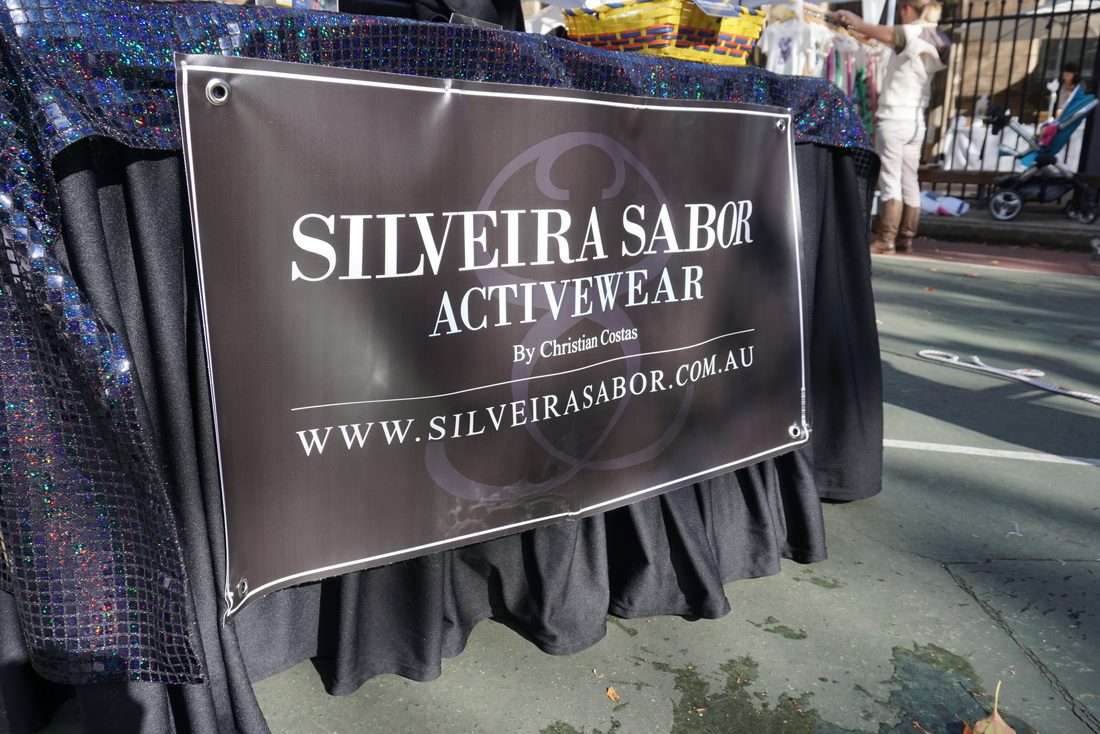
What started with a 5am wakeup... yes you read right...5am, turned out to be such a long but exciting and interesting day at Sydney's iconic Paddington Markets located on Oxford Street. You're probably wondering why I was there in the first place... Well, a good friend of mine, Zumba instructor and designer opened up a stall at these iconic markets and I got asked to make protein balls as a little treat to customers and oncoming visitors. I honestly didn't know what to expect coming into this but everyone was so nice and cheerful and the overall vibe was amazing! The process of the protein balls started a about 2 days before market day and it was super simple and healthy. Ingredients included Cocoa powder, Honey, Protein powder, Chia seeds, Peanut or Almond butter, desiccated coconut and a few tablespoons of water to bring it all together. I would recommend using a food processor but if you don't have one, not to worry, good old wooden spoon and mixing bowl works just as well. Being someone who pays attention to details, placing each protein ball into an individual pack alongside a Silveira Sabor business card sealed off with a ribbon gave not only myself but I'm sure customers feel like it was a little gift to them, which it essentially was. Selling luxury activewear which is super comfortable and unique, Silveira Sabor showed off their stuff and is definitely flattering on everyone and anyone! If you are interested in these garments or company itself, click here. They now do worldwide shipping so there is no excuse! Walking around and talking to neighbouring stalls, everyone was so friendly and welcoming and passionate about their product as well as the markets. Not only was the company good, the food was to amazing and again the vibe and atmosphere despite a crazy amount of wind was incredible and definitely a place worth visiting. This day was a total success and I could not be more happy that owner and designer of Silveira Sabor, Christian Costas got a spot at Paddington Markets. Silveira Sabor will be at Paddington Markets from 10am to 4pm for the next few weeks so be sure to pay them a visit and check out what all the hype is about! Phoebe xx 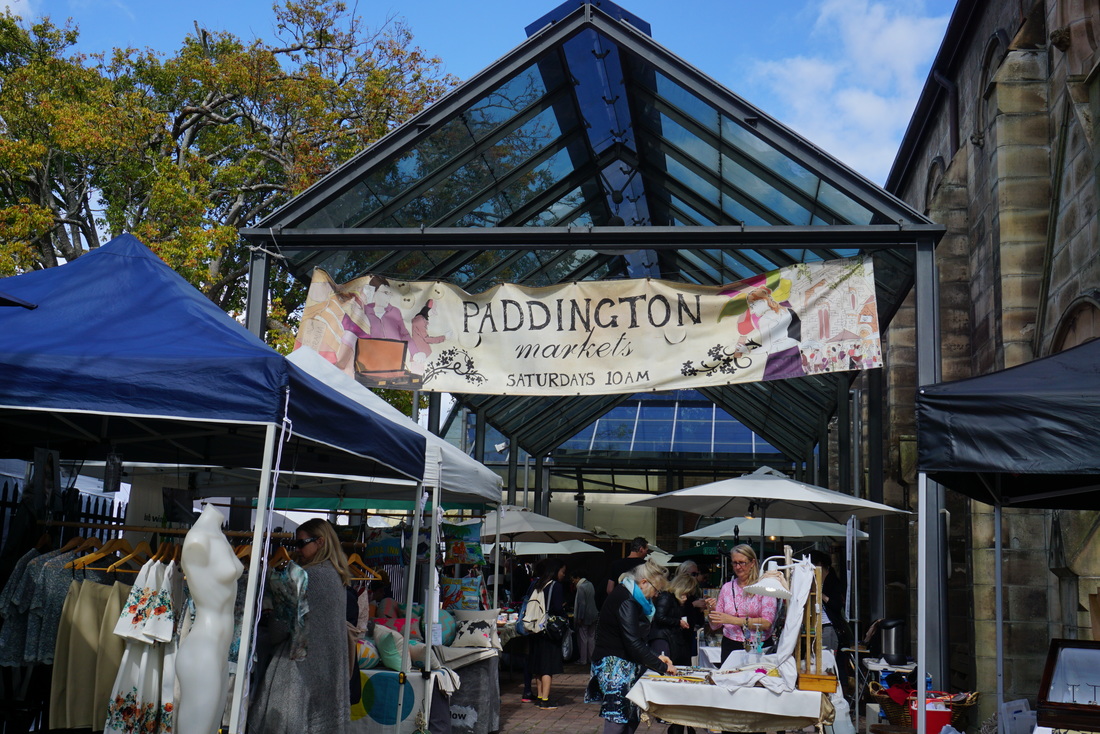 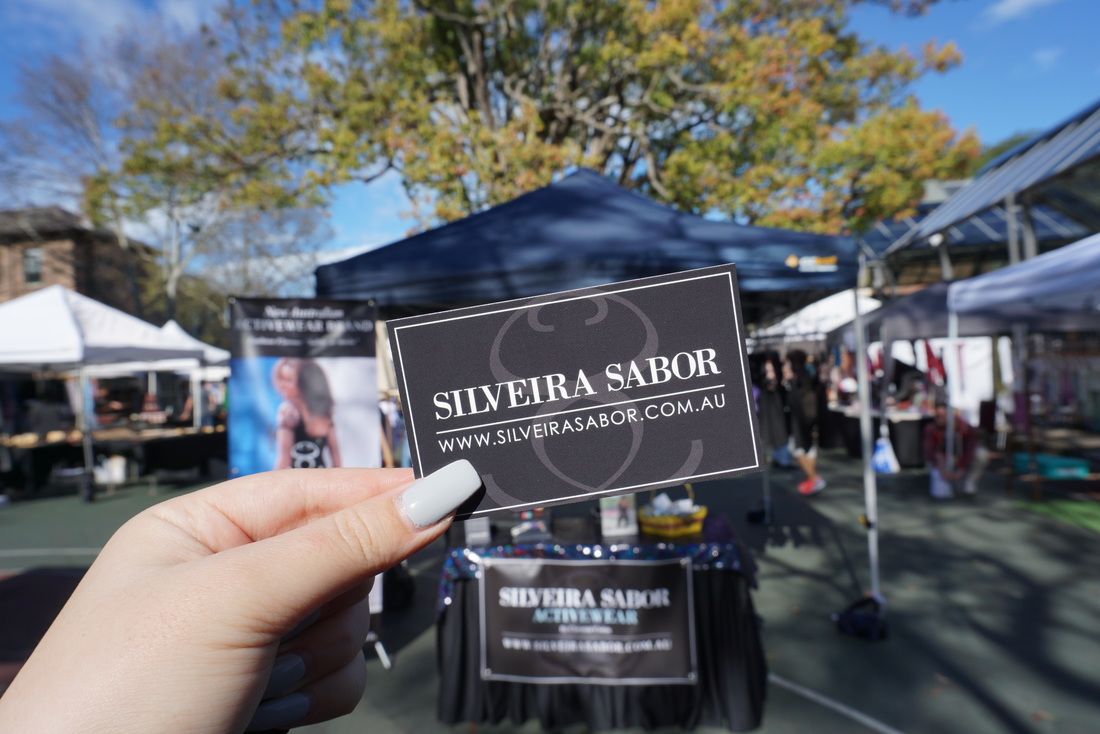
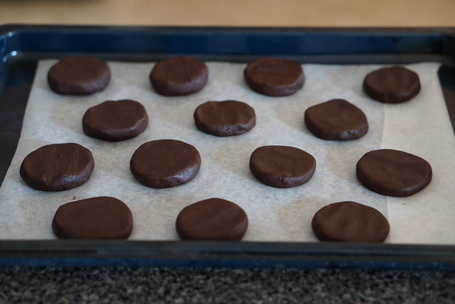
1 Comment
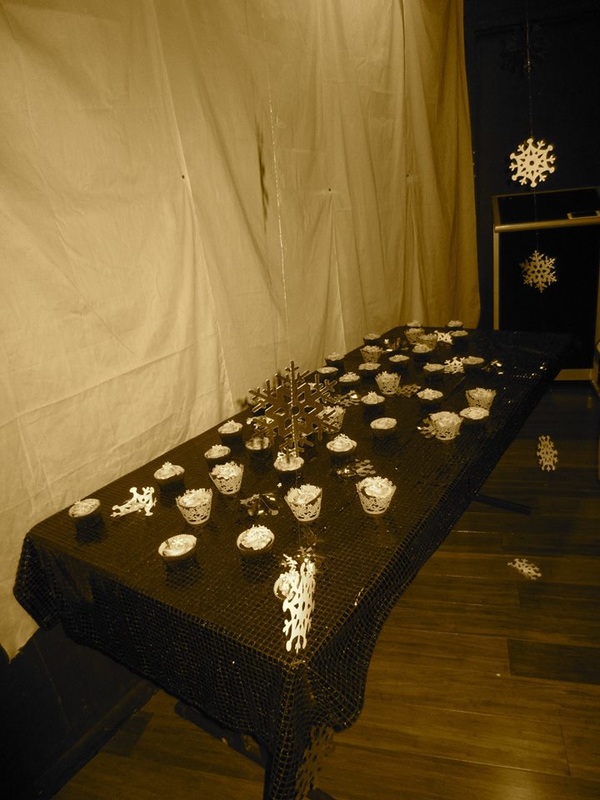
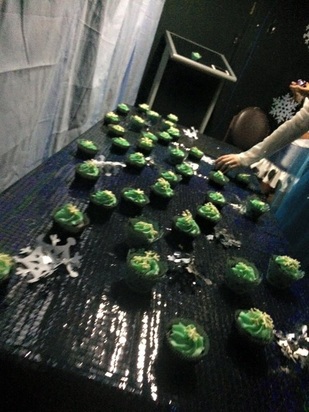
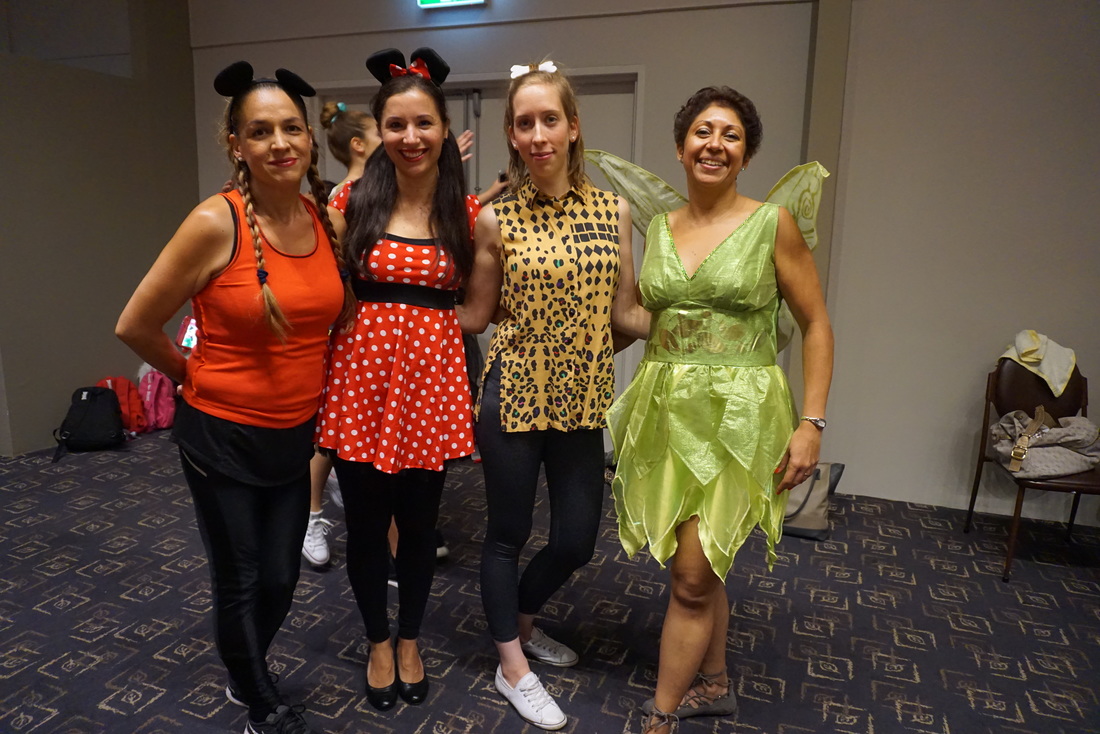
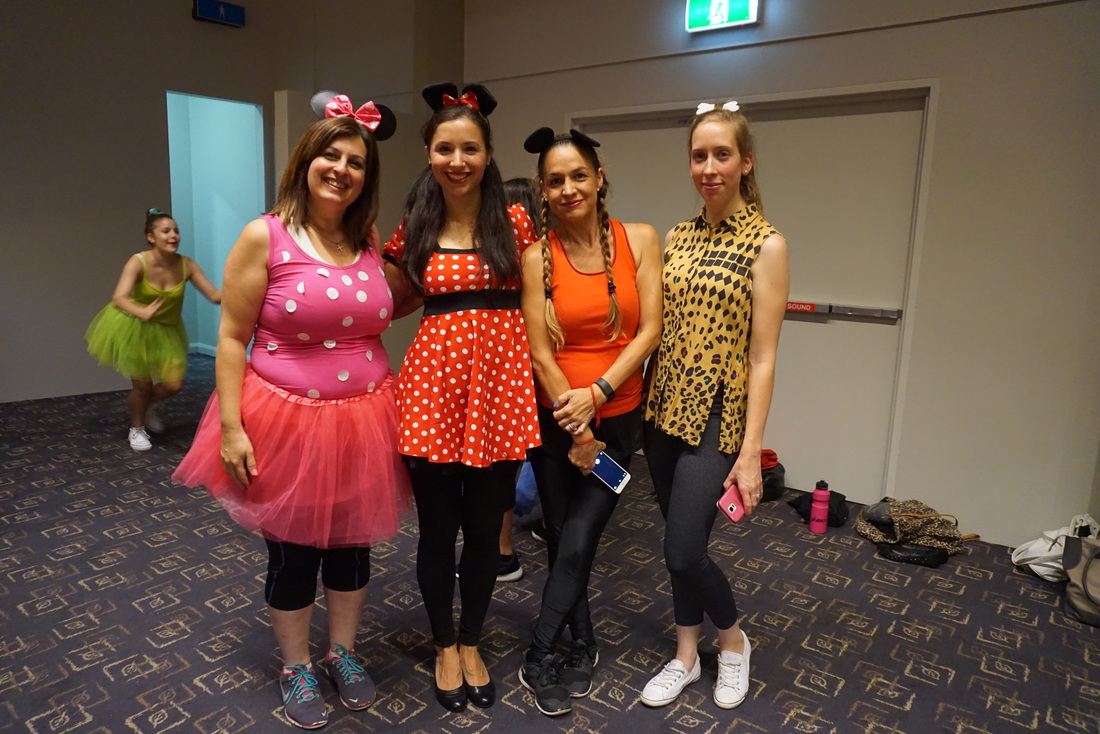
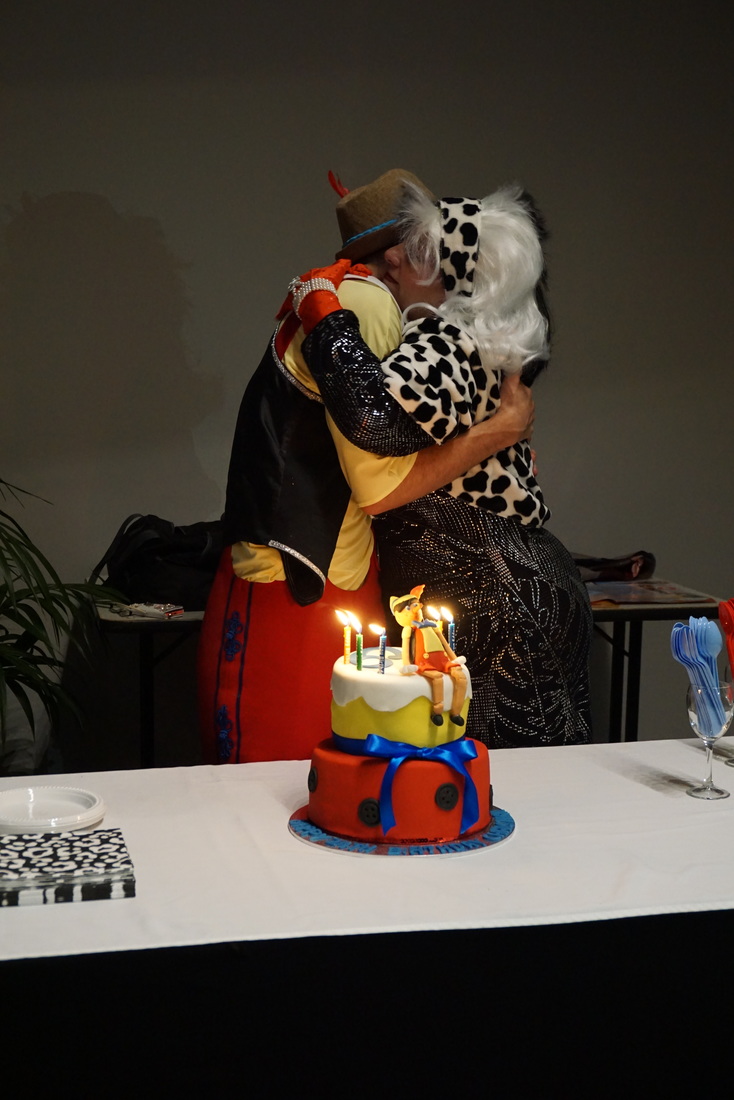
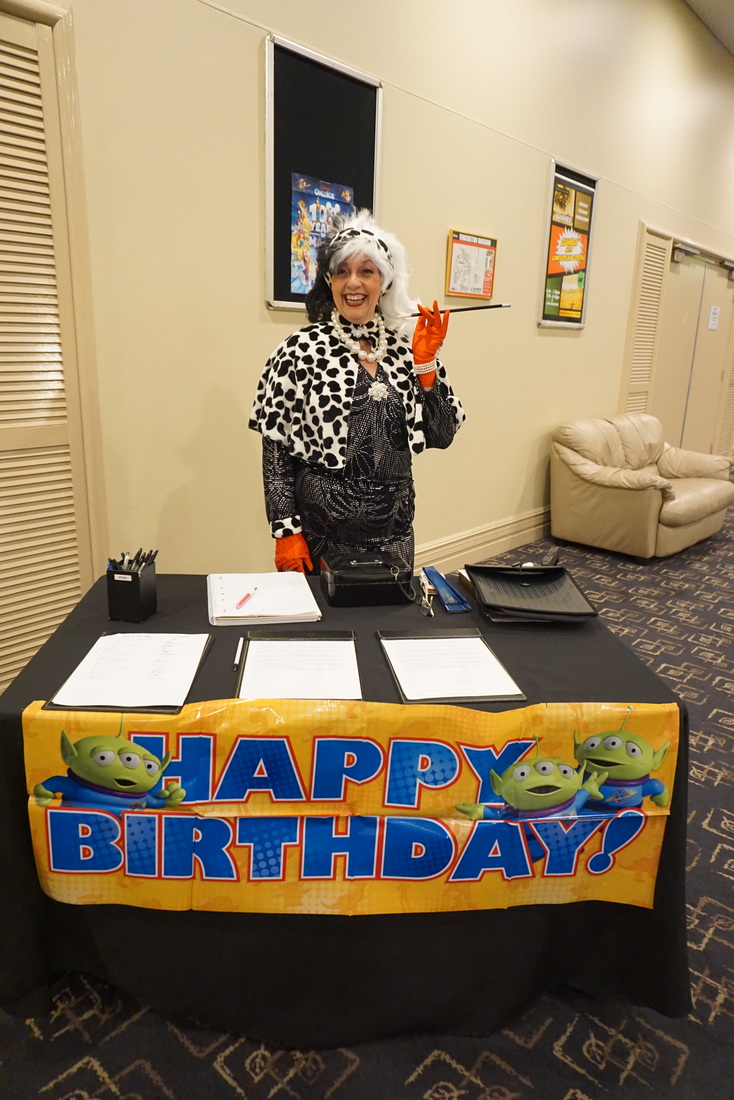
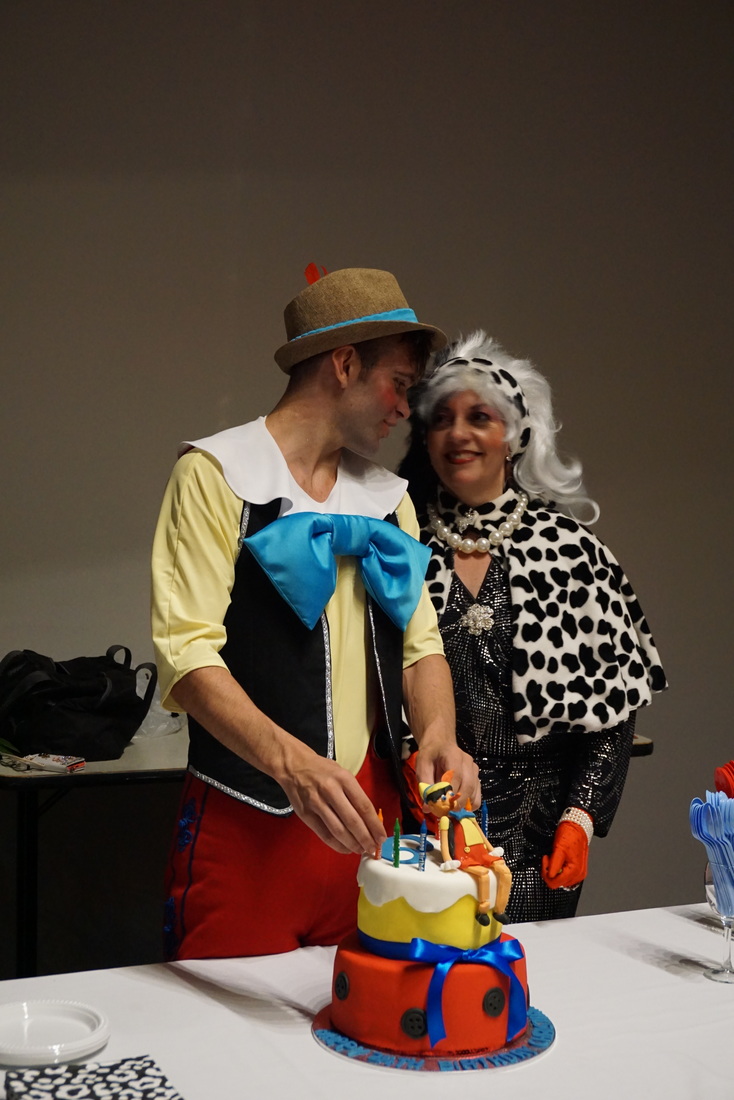
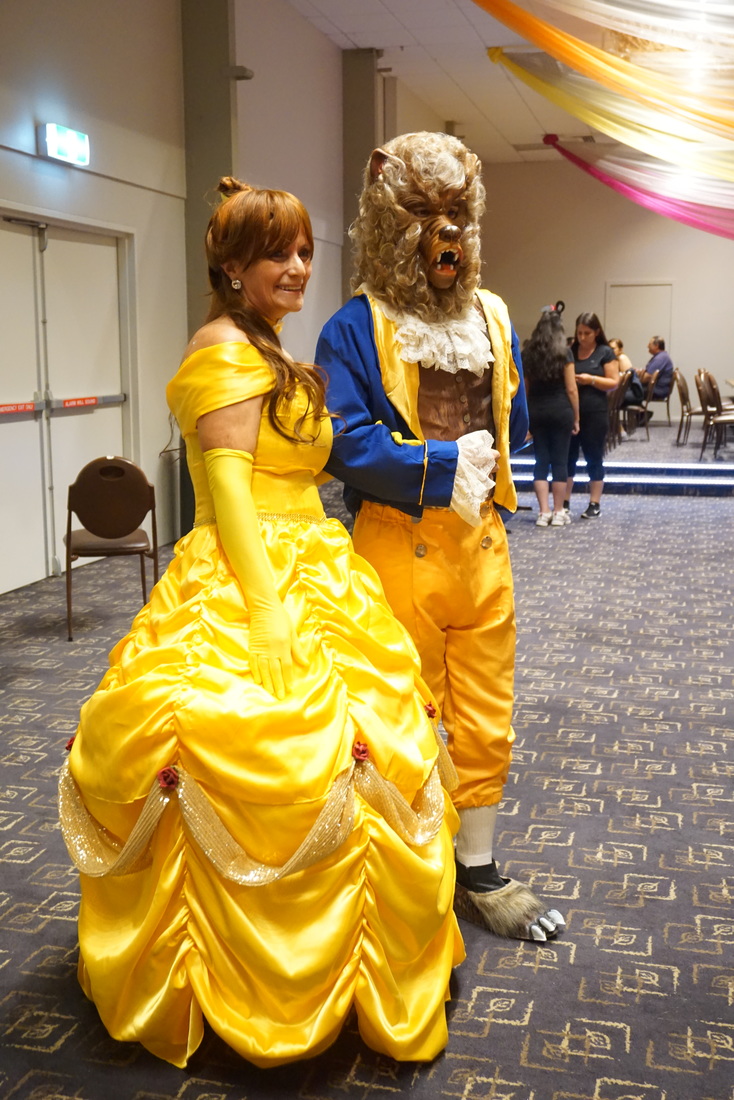
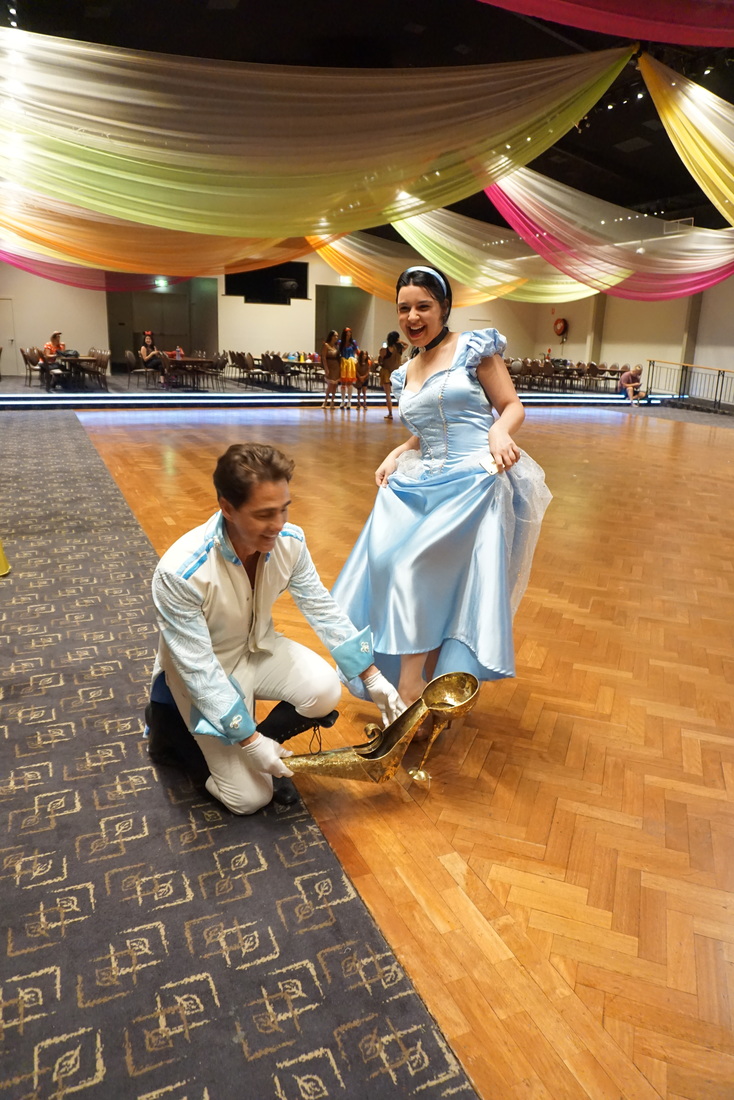
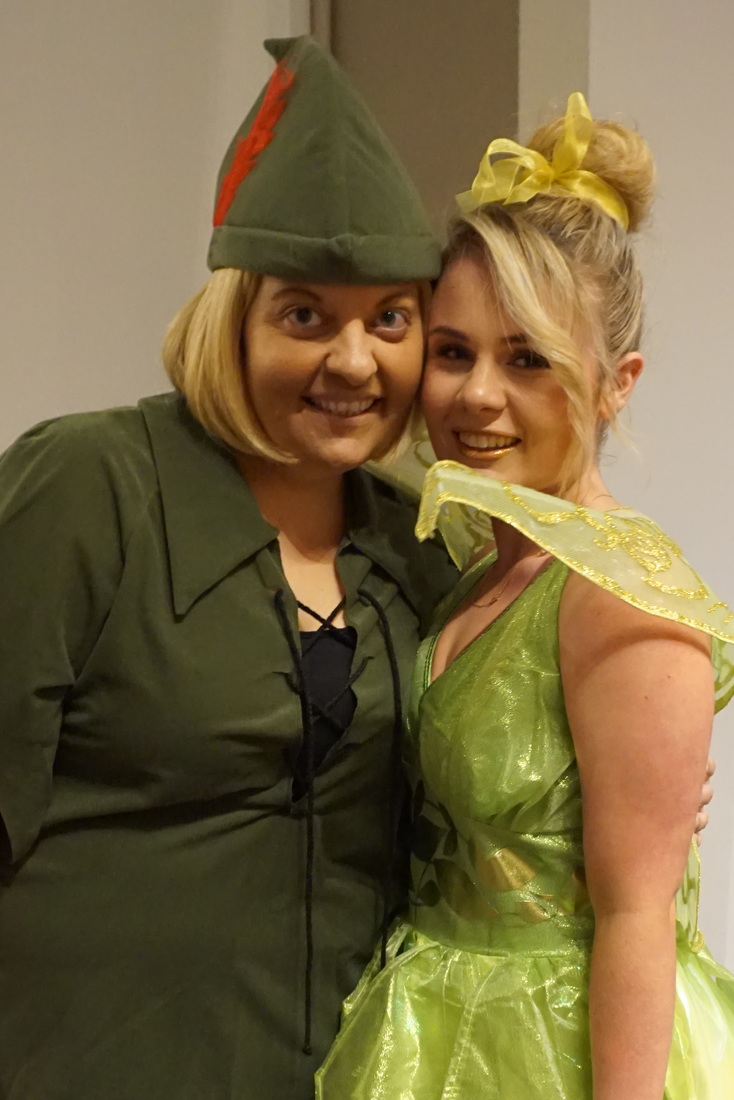
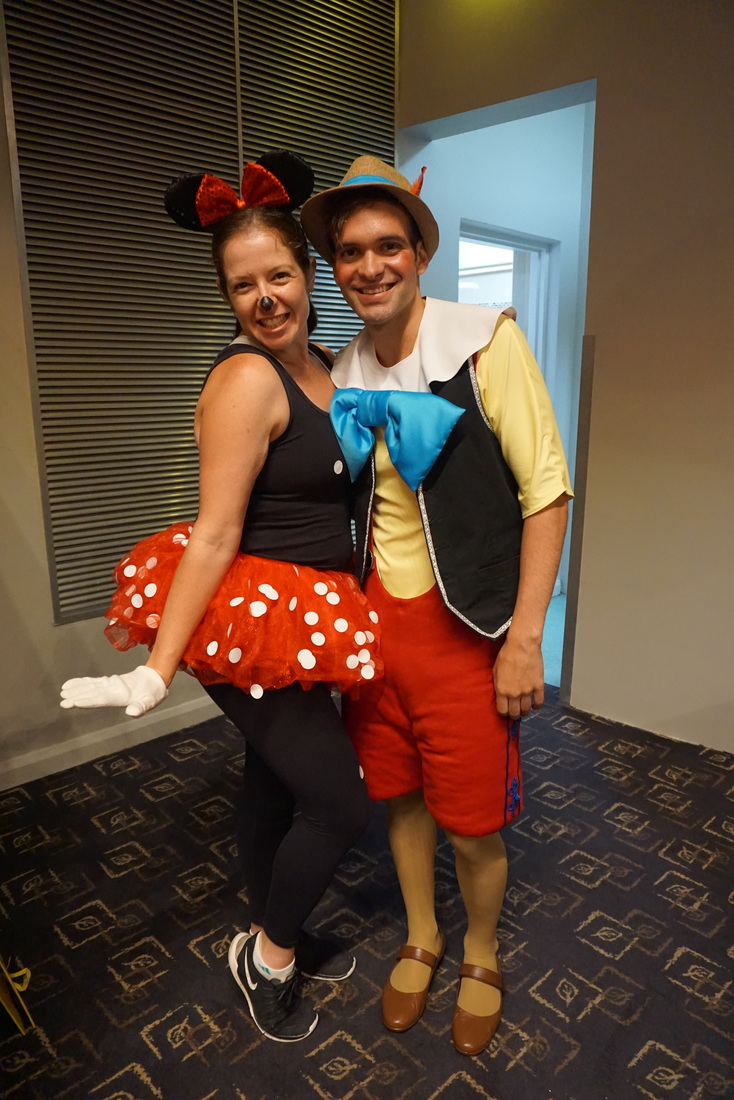
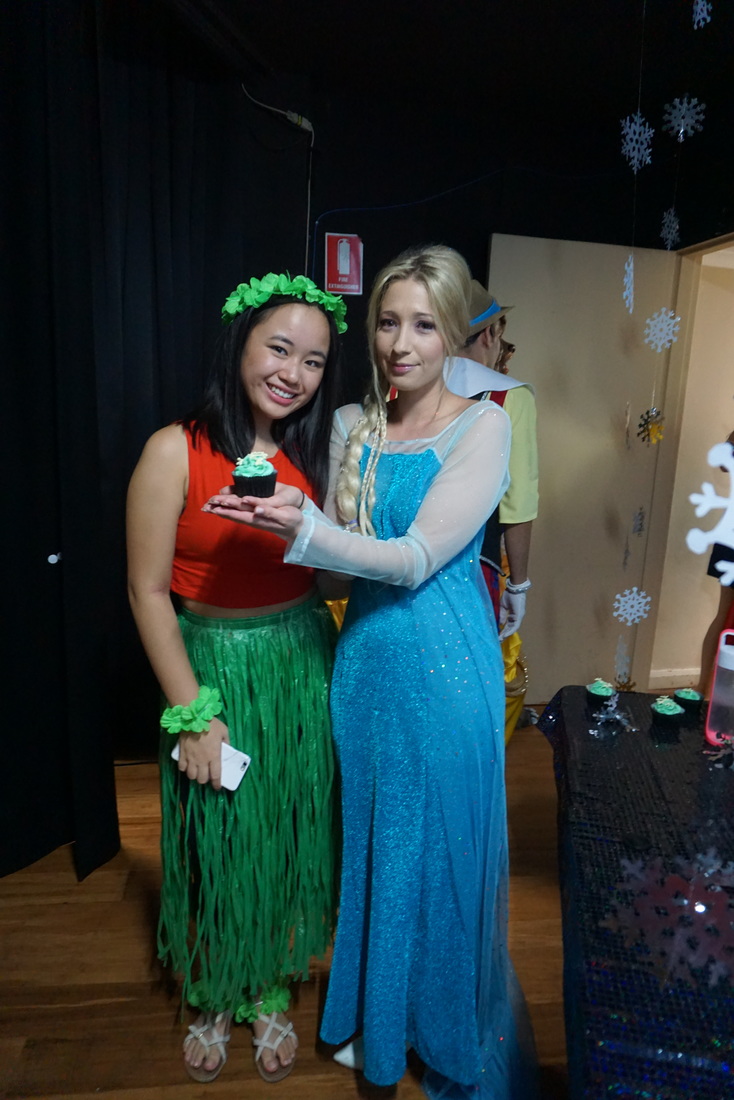
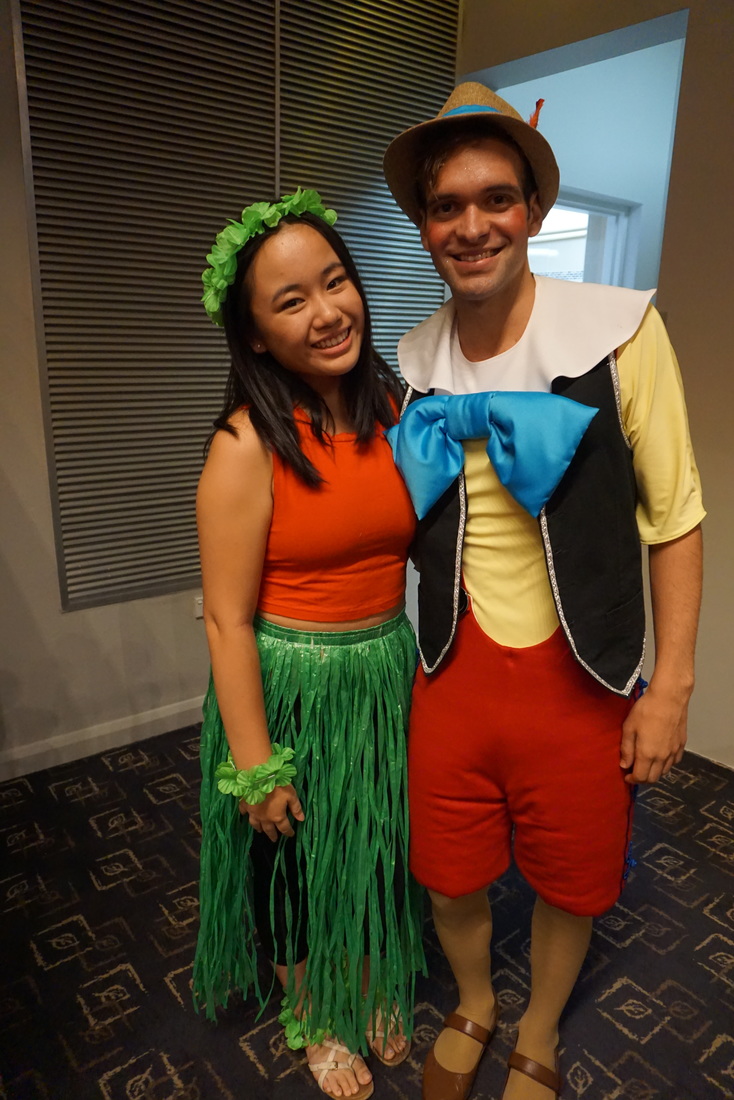
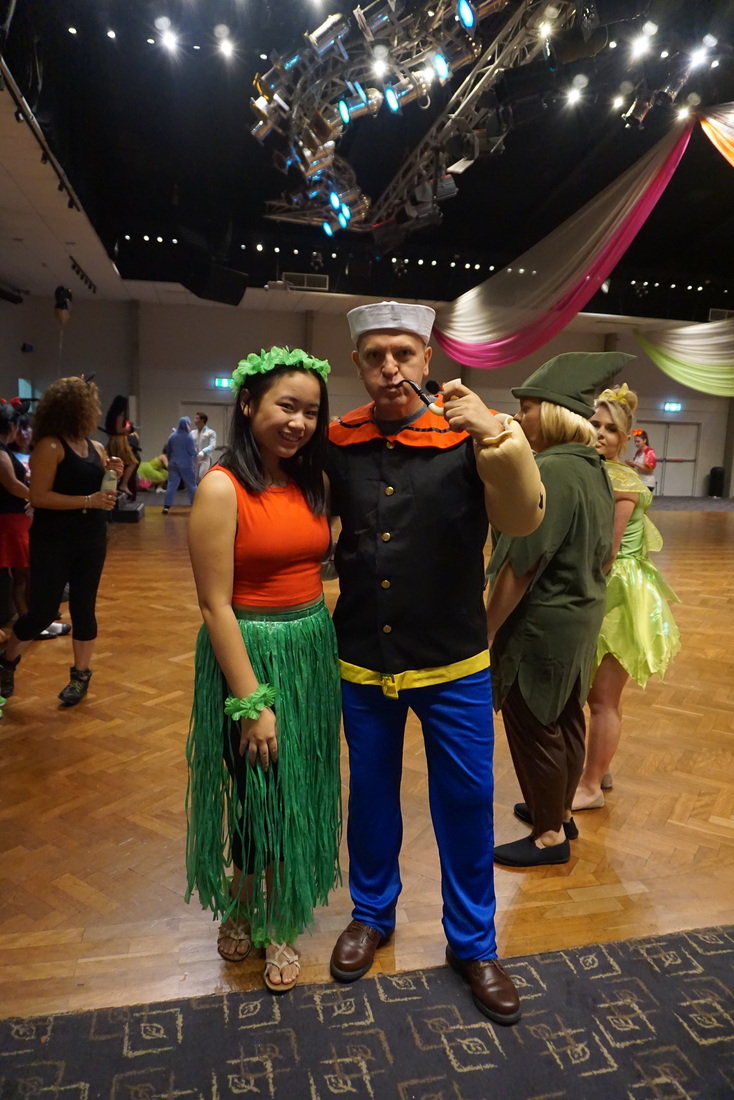
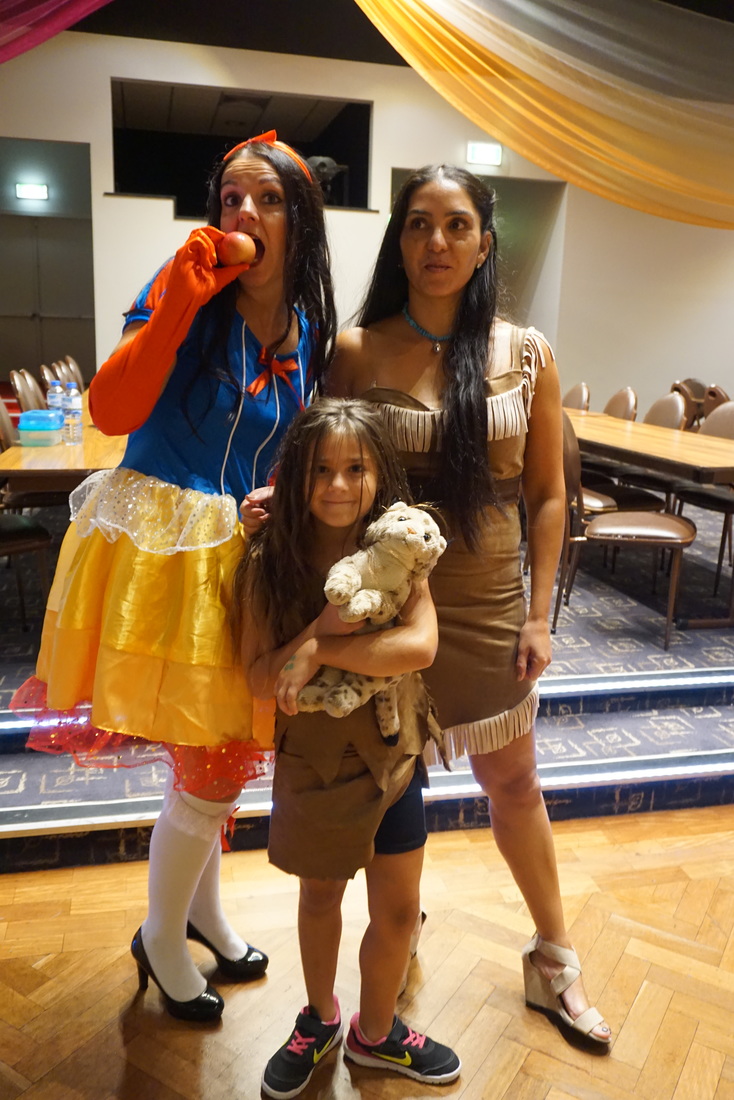
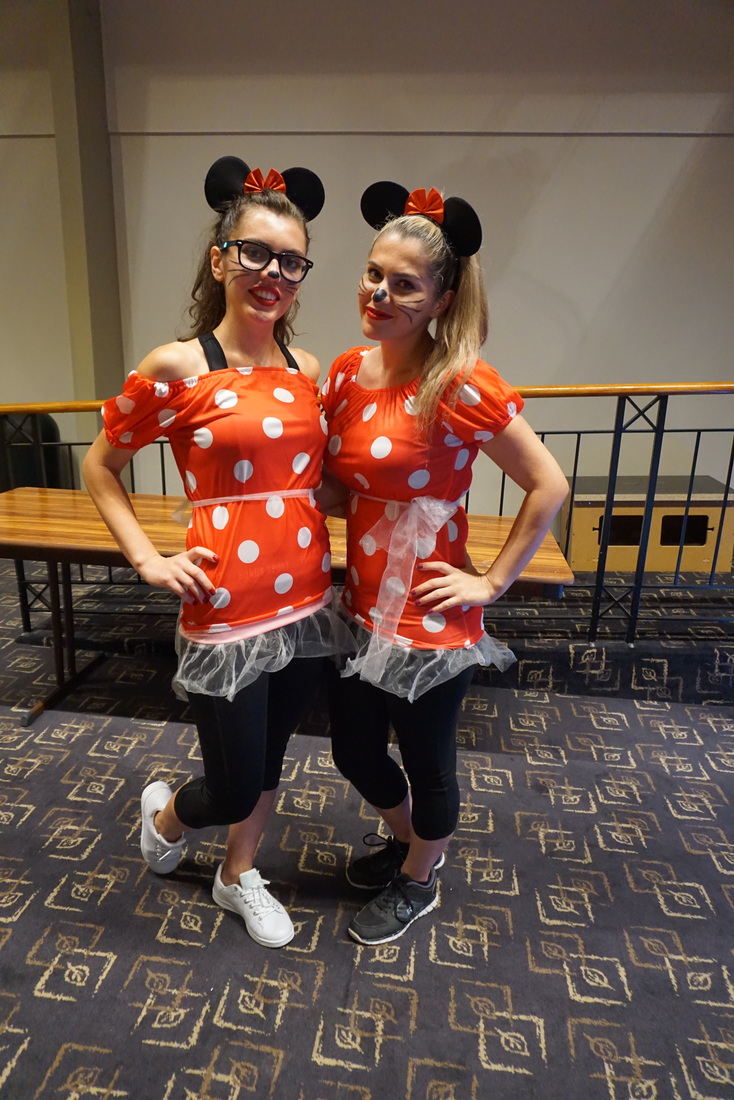
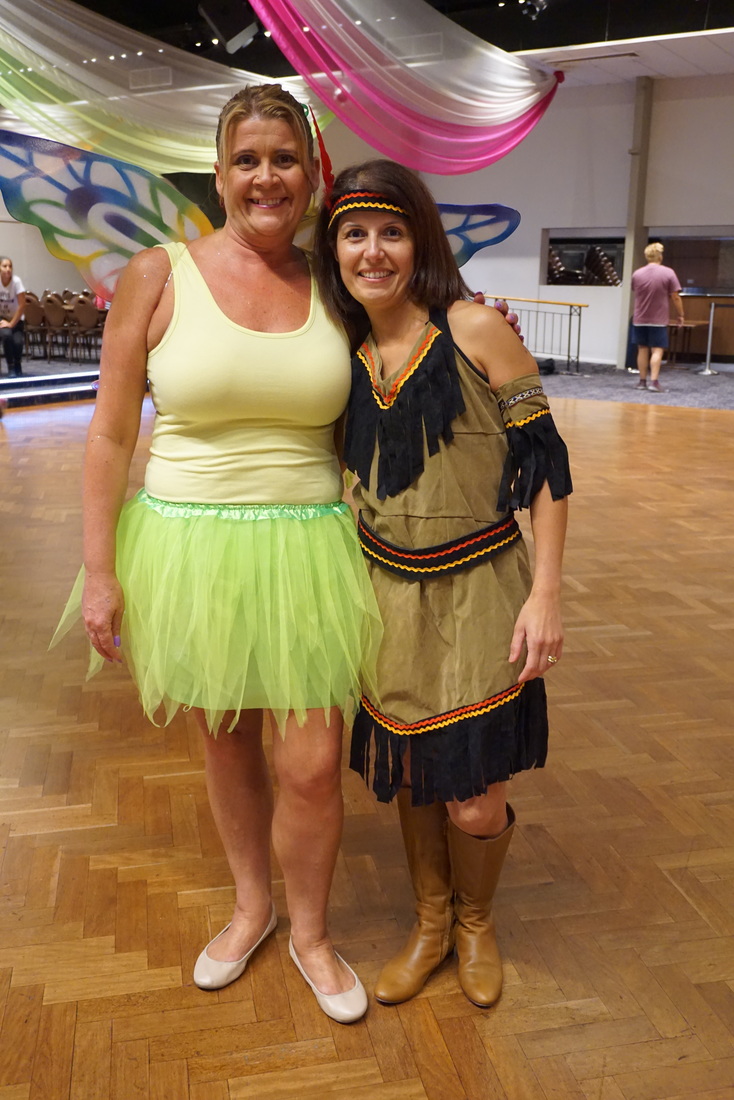
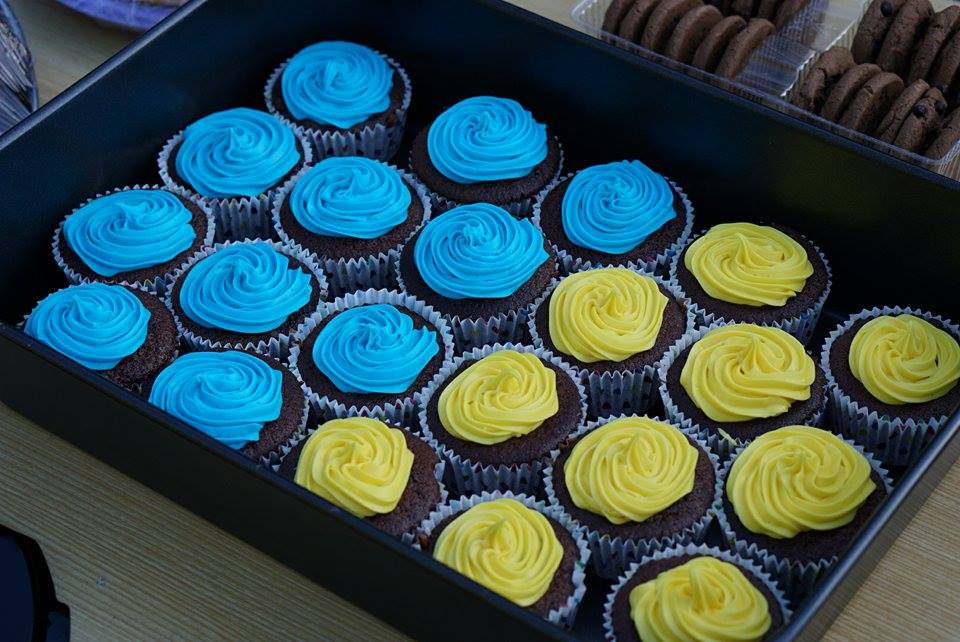
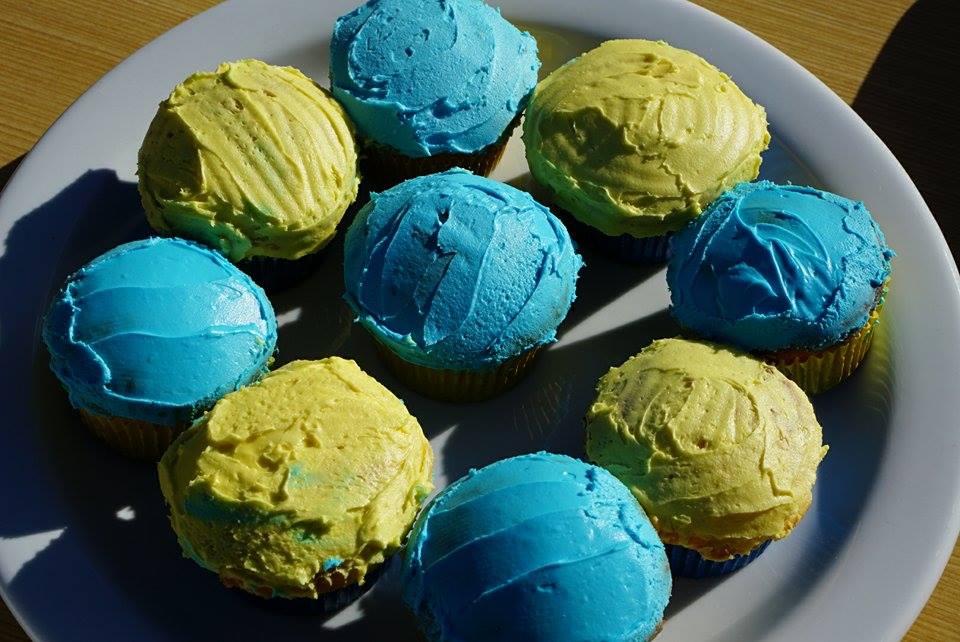
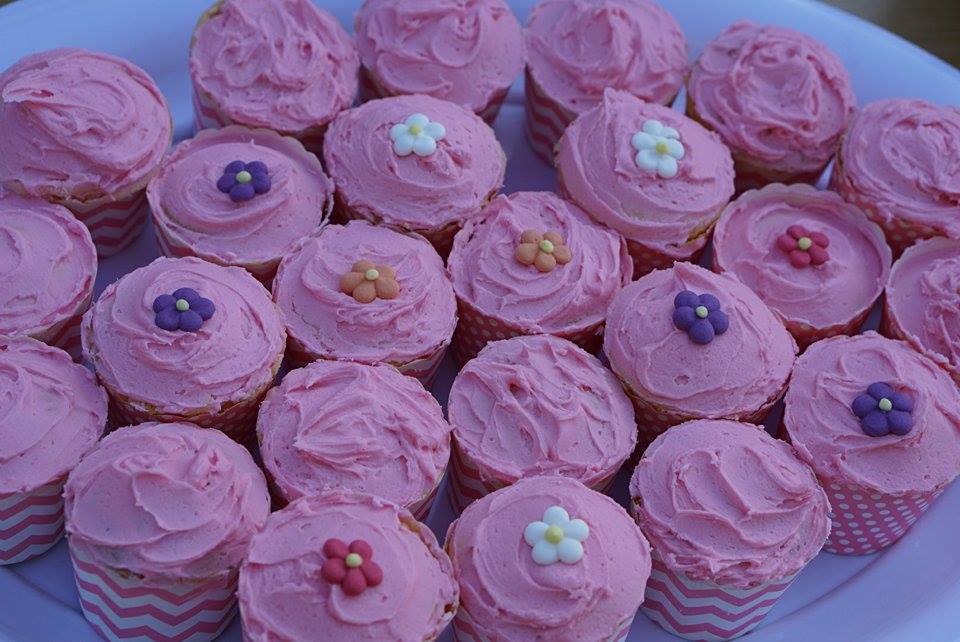
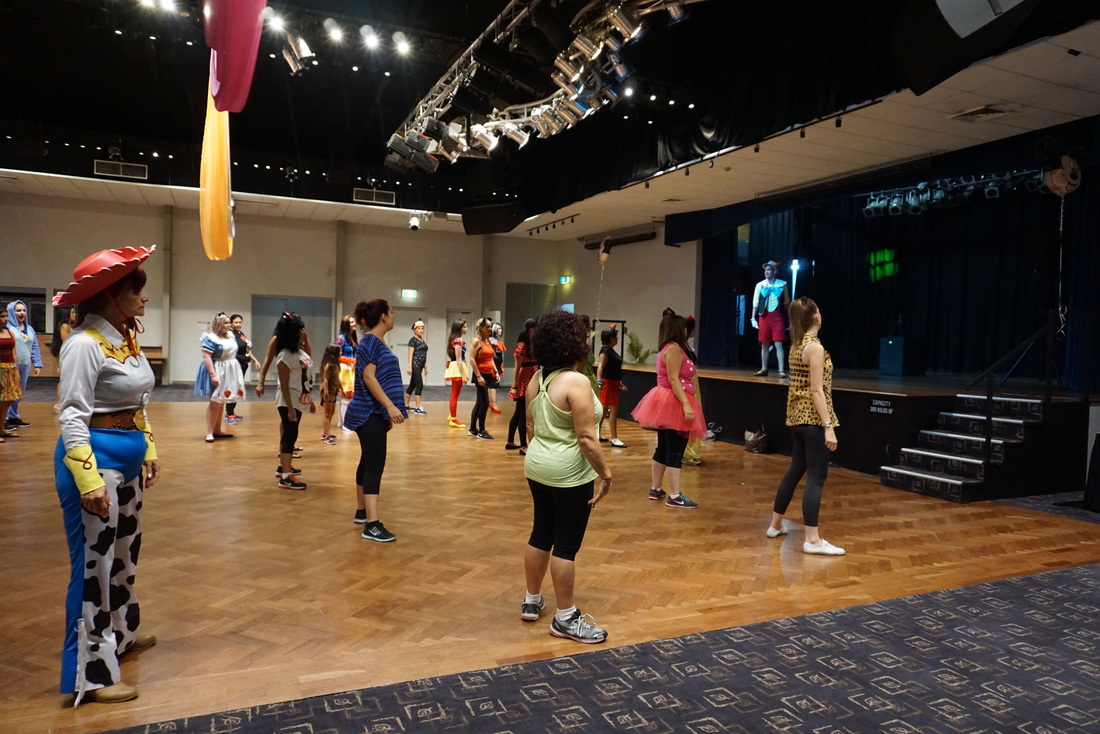
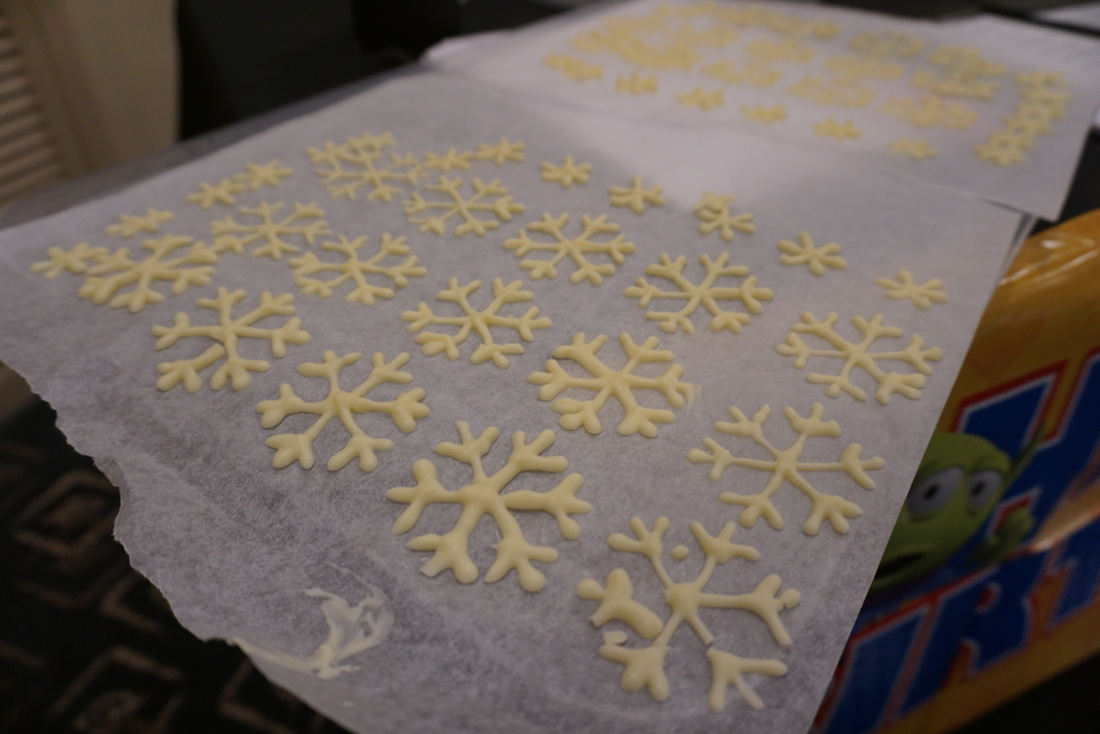
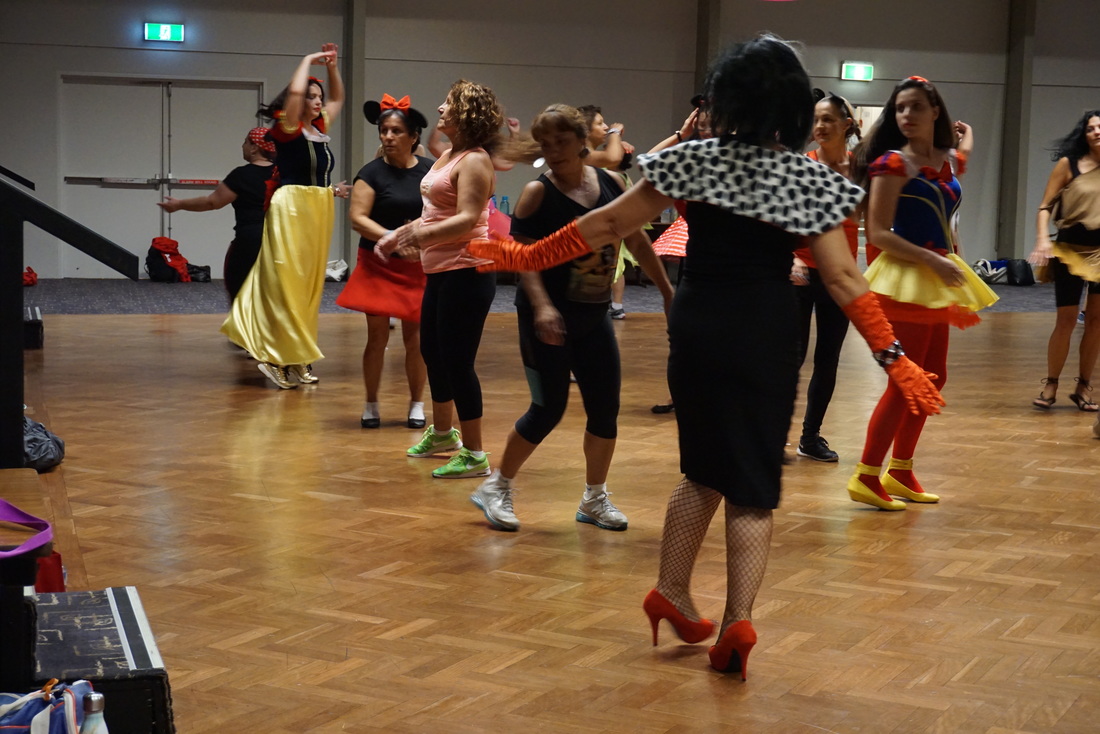
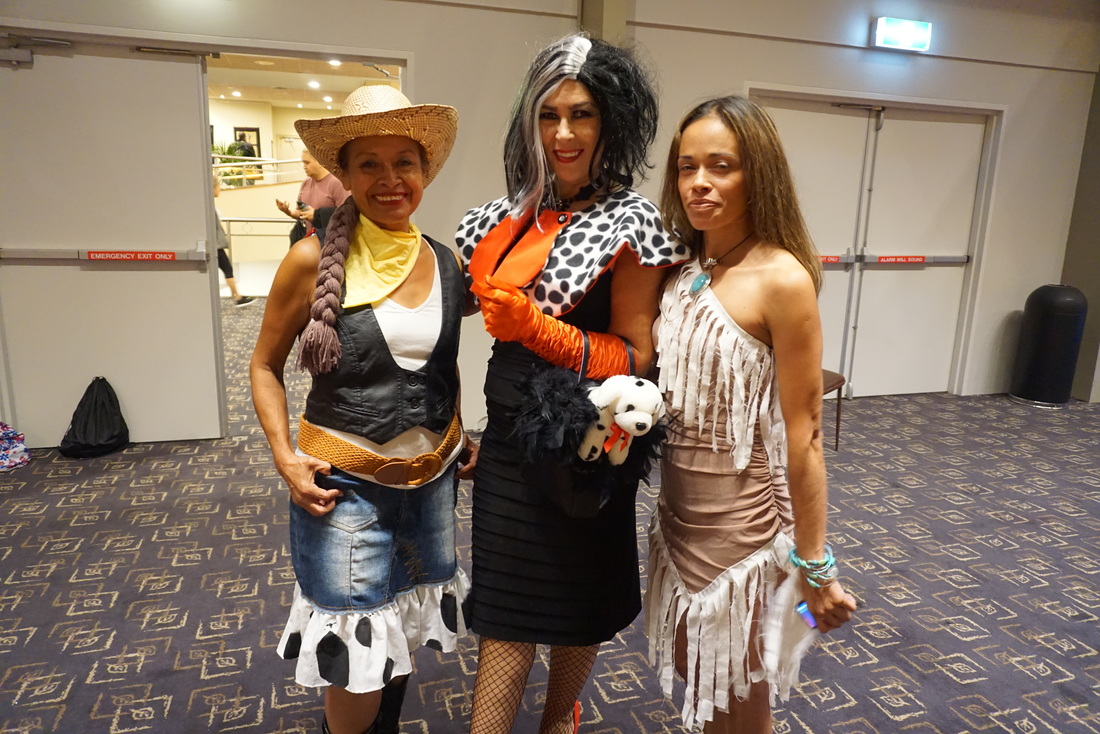
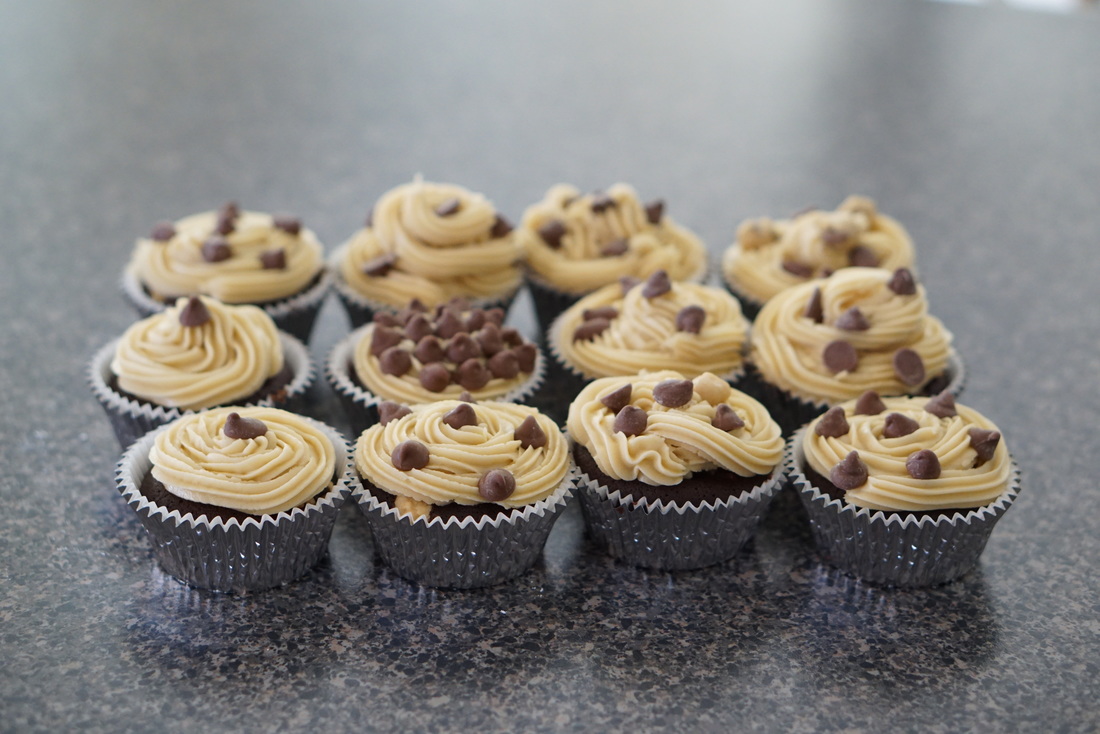
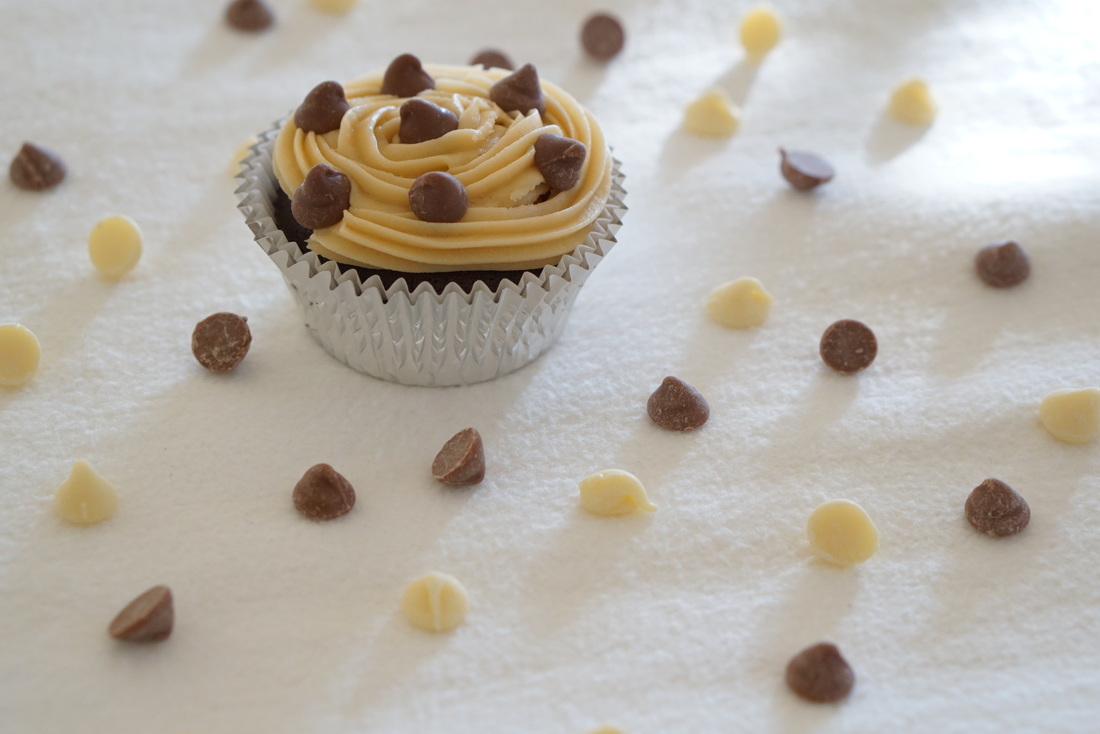
From Princesses to Princes and from Minnie Mouse to Tinkerbell, Disney will always be a favourite and being a huge Disney fan myself, being told that there was going to be a Disney Themed birthday party was probably the best thing ever! I was so so so extremely excited for this night as I’m sure everyone else was that I kind of found my outfit a day after it was announced.. Haha There aren’t many leap year babies I know but lucky for me one of them is a friend and zumba instructor Christian Costas. On Monday the 29th of February, Christian turned 6!! And off course how did he celebrate? In style, obviously. About a week before leading up to this day, I was asked to make ‘Frozen themed’ cupcakes as a little bit of a surprise for the guests. I’m not going to lie it was hard keeping it from everyone as so many were asking about his cake and having been an organizer of his gift it was near impossible to keep both the gift from Christian, and the cupcakes from everyone! Regardless it was so much fun being in between and seeing the reaction of guests and then Christian when we presented his gift! The cupcakes started with the flavour and having never been a chocolate cupcake kind of girl I knew I was going to be a mission regardless if I found an easy recipe or a rather difficult one. Thank goodness for fellow bloggers and youtubers who have a passion for baking, which is where I found a simple enough recipe to follow with easy ingredients, which were also readily available. Baring in mind that I have never made chocolate cupcakes.. ever.. I didn’t know what to expect. Although I personally wasn’t happy with them as they were a lot more dense than I would usually make cupcakes, they were a hit at the party and I received such amazing feedback from everyone who attended which made me so exceptionally happy! We added finishing touched with a frozen themed cupcake wrappers, ice blue buttercream and a white chocolate snowflake which just made it that extra special! ;) Moving on to the night itself… Everyone dressed and definitely impressed! The atmosphere overall was amazing and I had an absolute blast singing and dancing to every Disney hit played! And yes I danced during the intermission and got laughed at as well as laughed with! I managed to snap a few pics of the majority of the costumes and the night and I could not be happier with these photos! Overall, Thankyou to Christian from Zumba-with Christian Costas for trusting me with these cupcakes and for hosting yet another incredible theme night! Happy 6th Bithday!! Phoebe xx  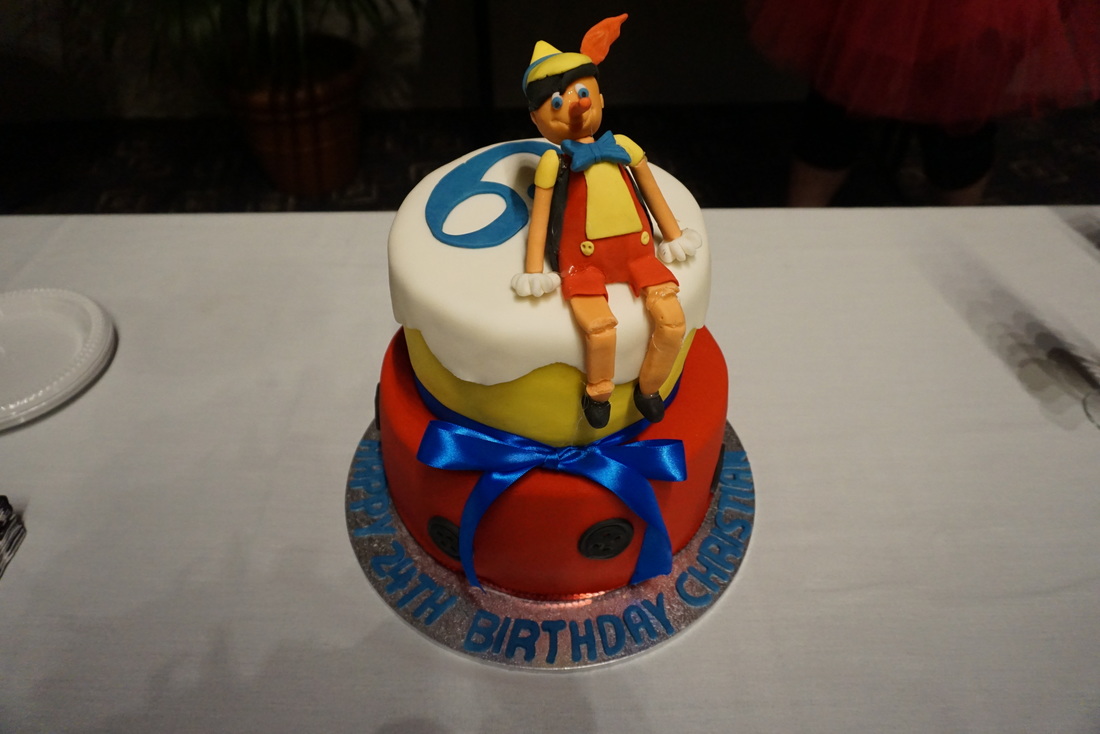 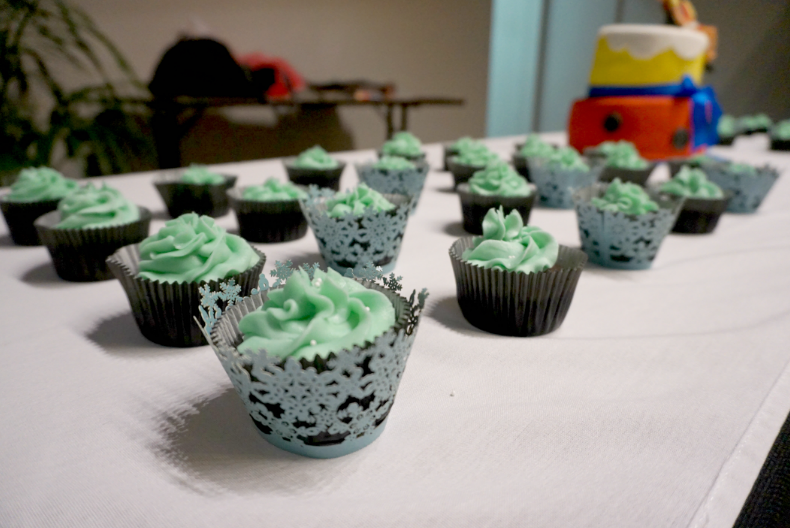
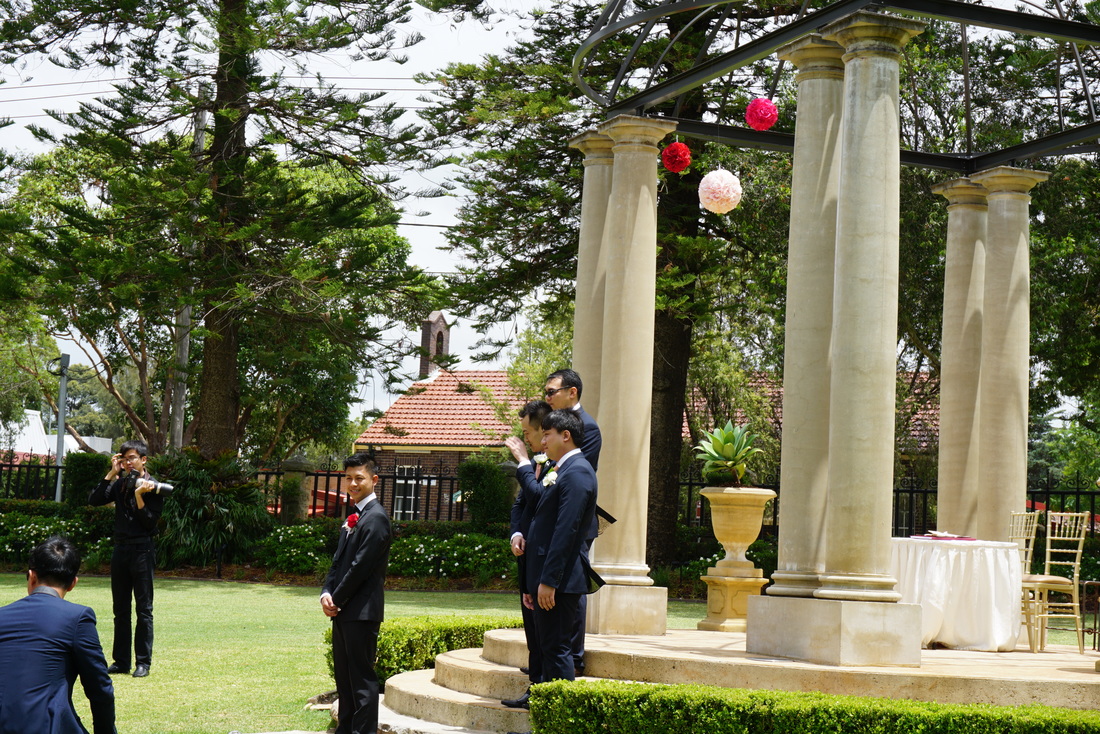
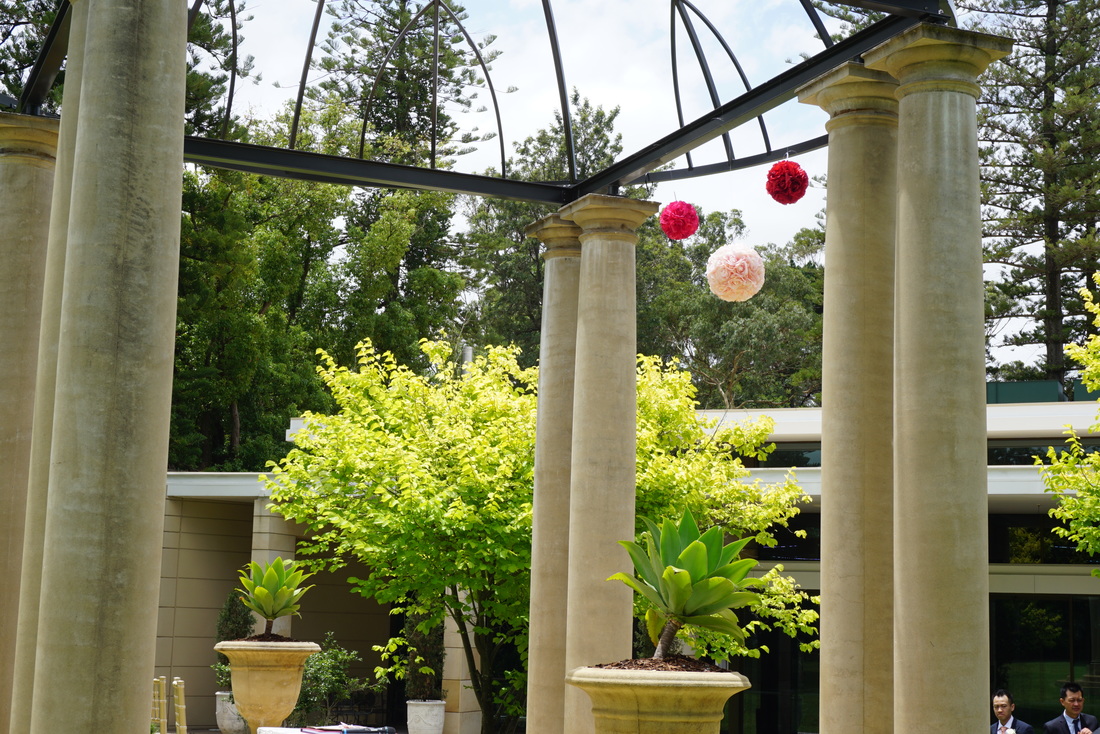
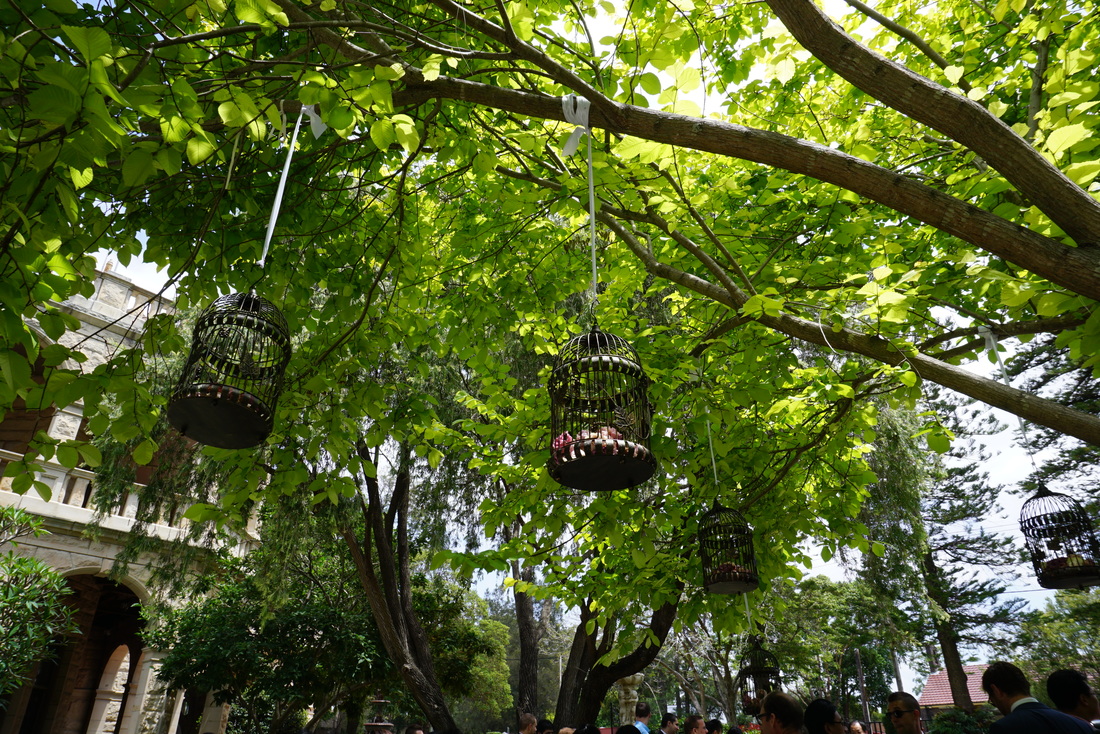
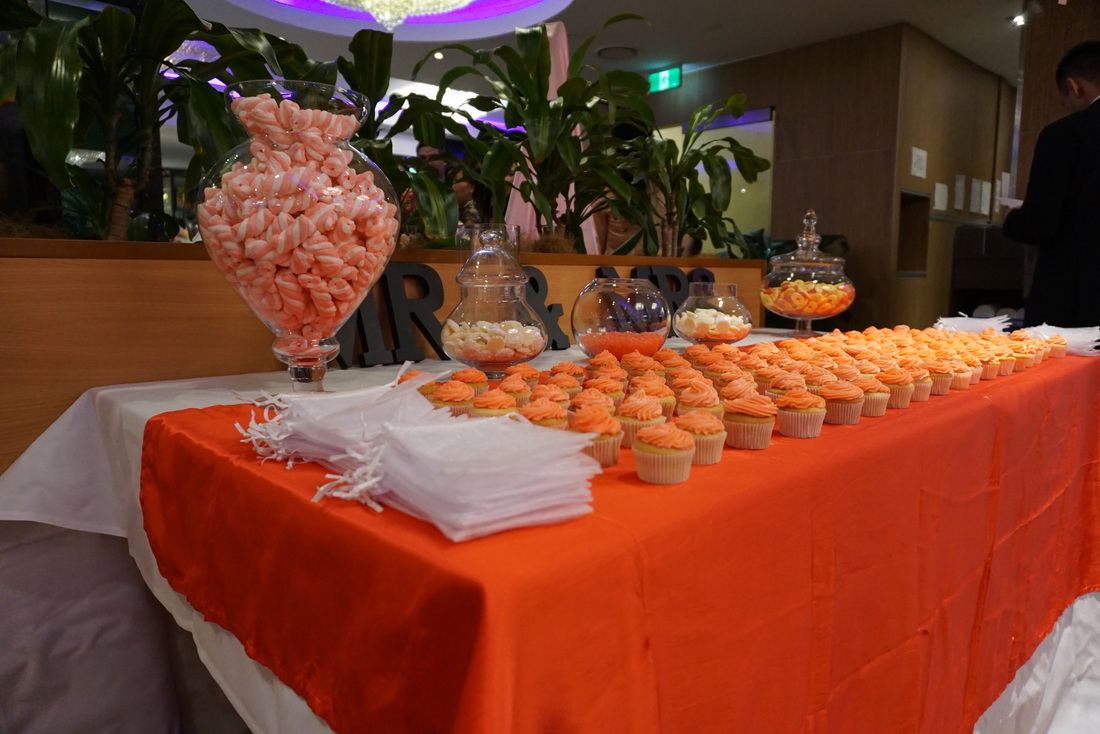
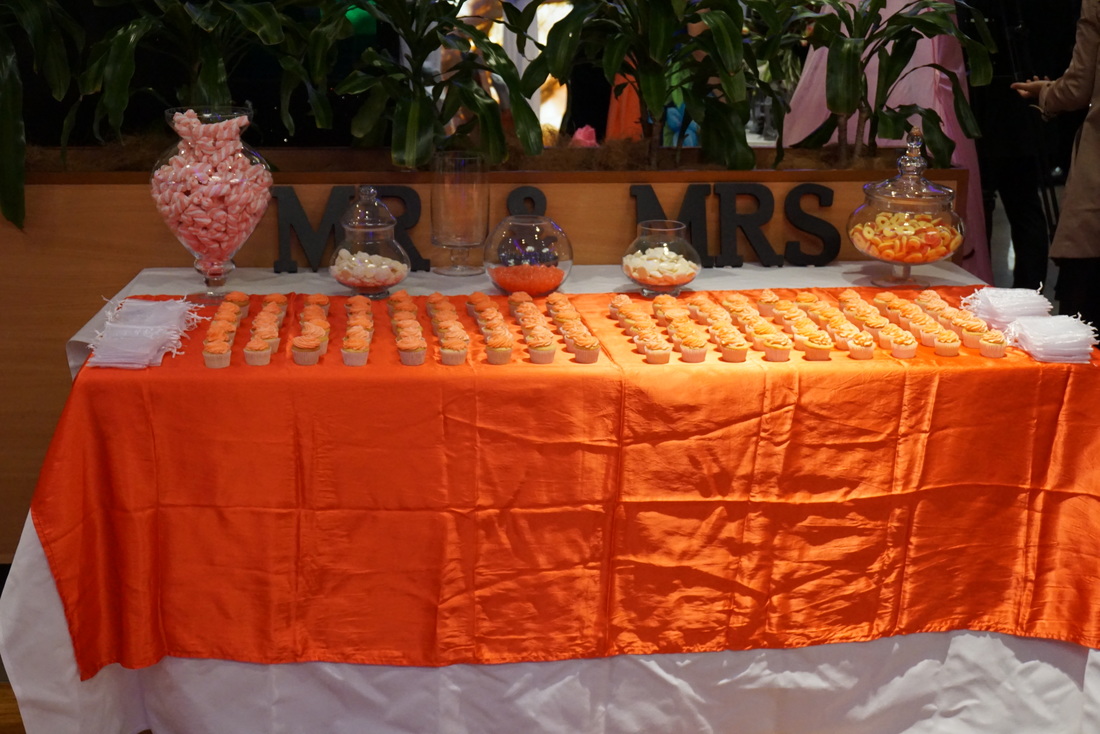
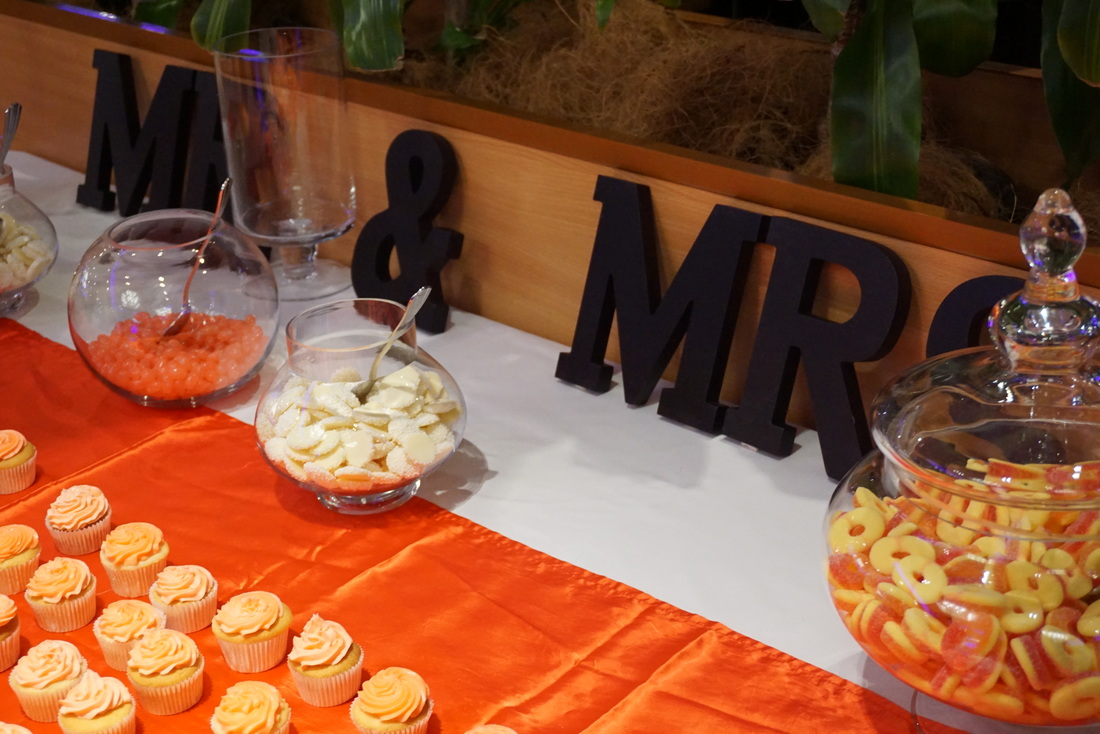
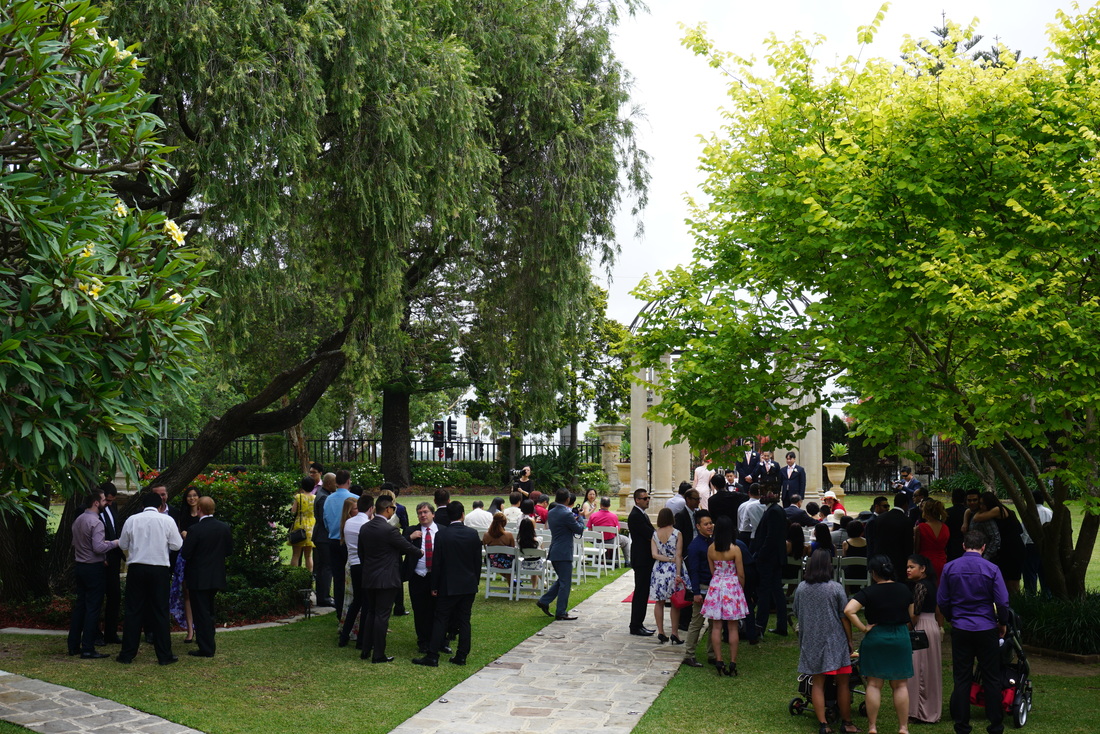
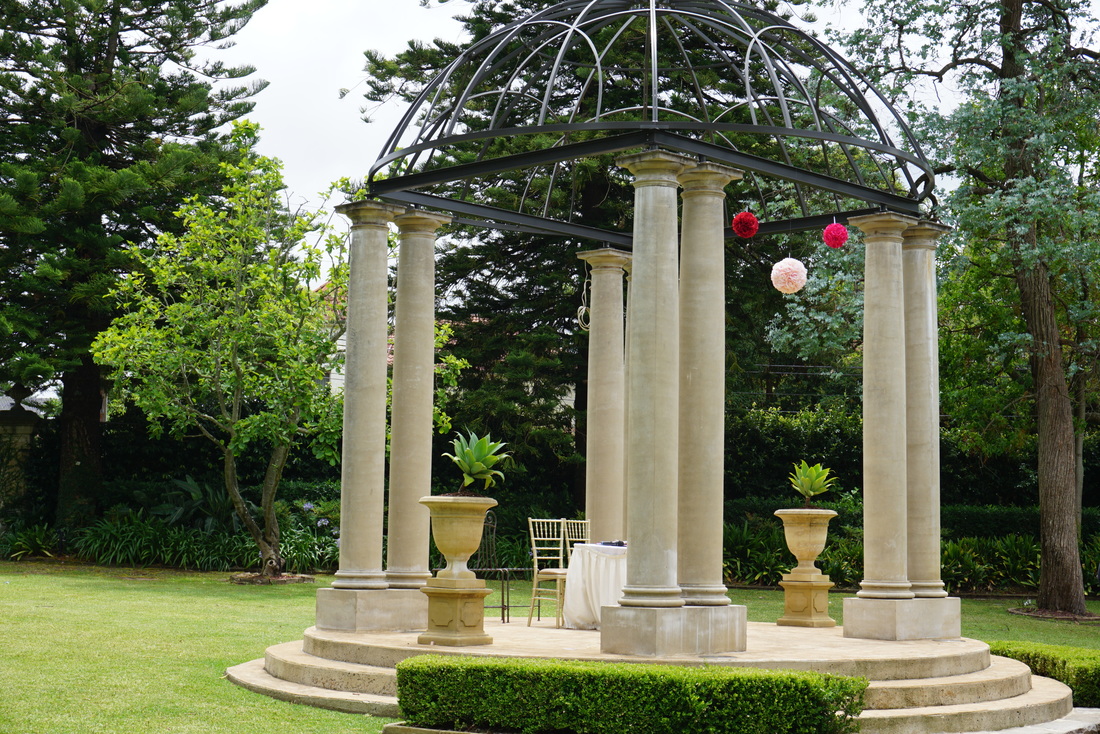
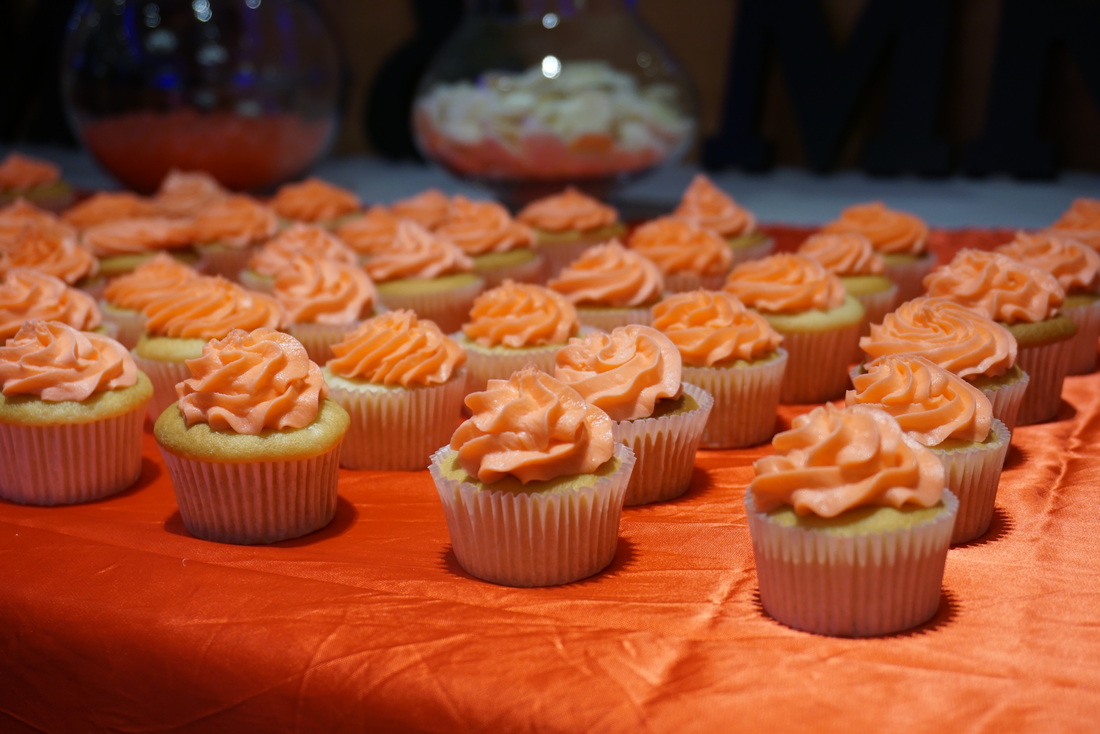
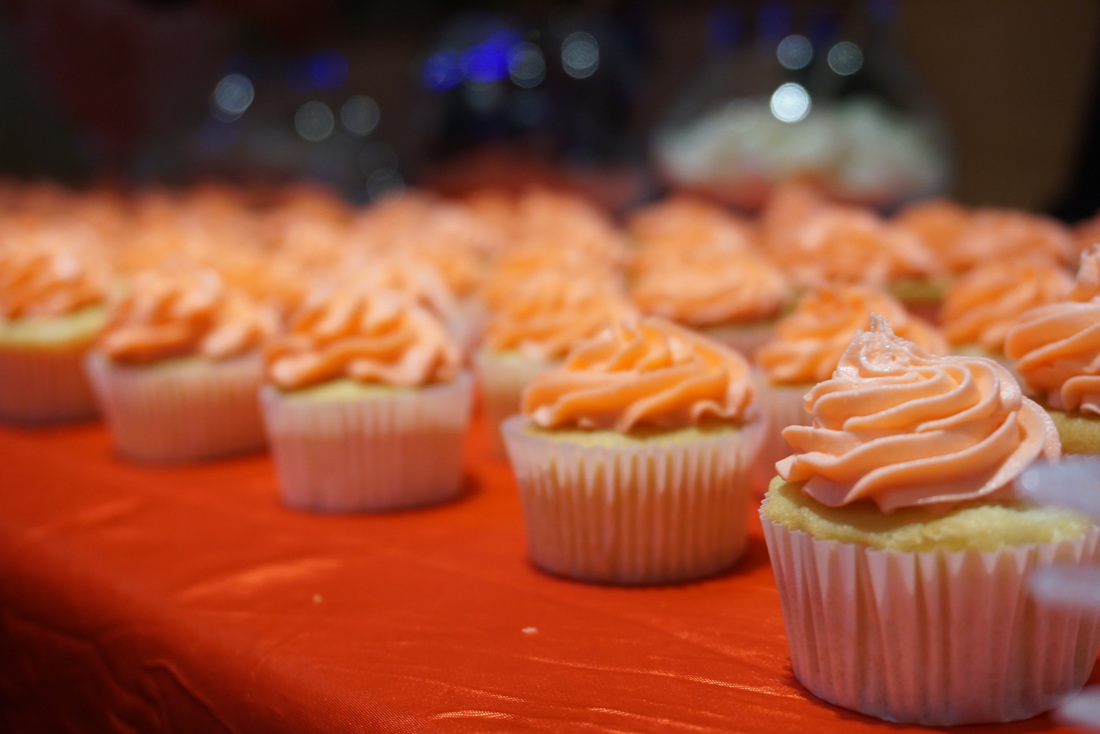
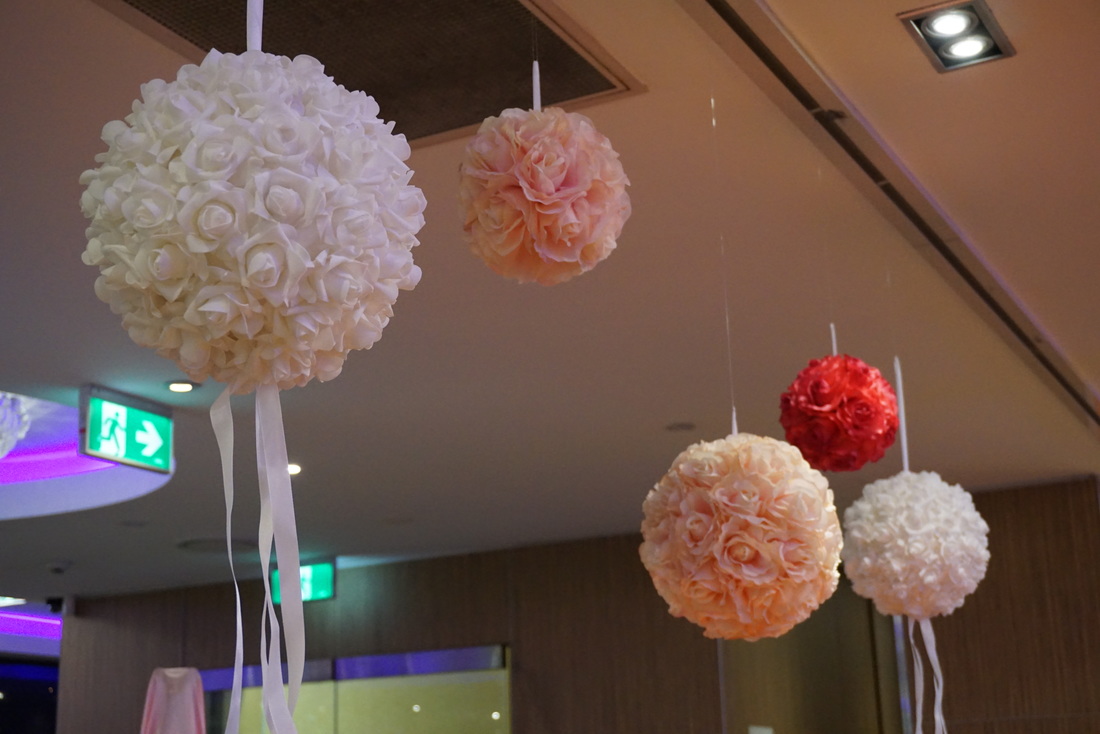
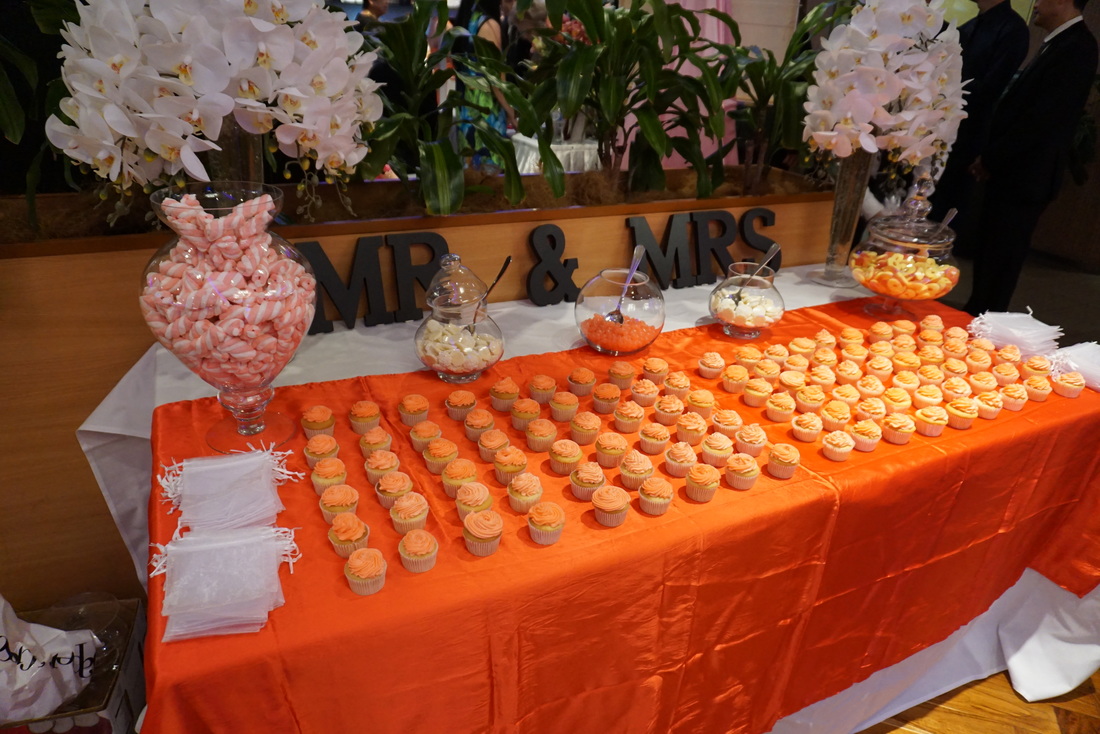
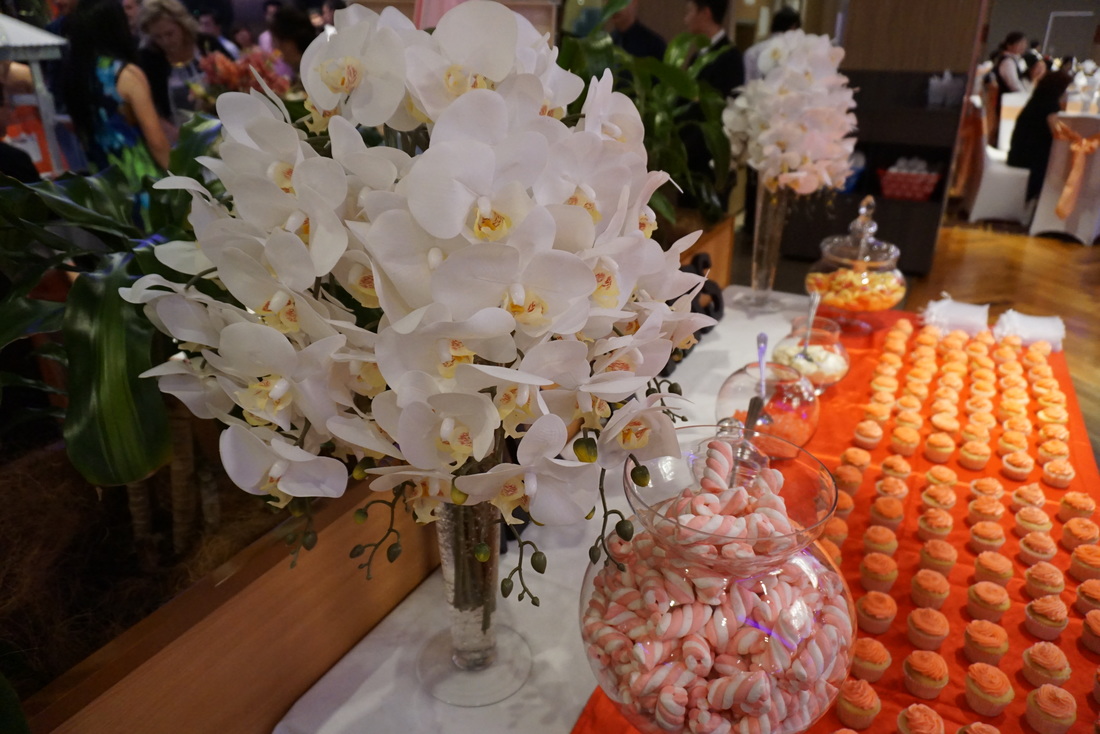
First of all… HAPPY NEW YEAR! I hope you all welcomed 2016 in the best way possible and here’s to a year filled with happiness, joy and success! Now on with the blog post… So on the 12th of December 2015, my oldest cousin got married to now cousin-in-law and food blogger Jannet (TheFoodieHitlist). Having been asked to decorate the garden ceremony and make a candy buffet at their reception it was a full on week leading up to it, even the past few months leading up to it shopping for decorations and looking for the best deals was quite stressful for me as I am such a perfectionist but in the end it was honestly a huge success and the candy buffet literally vanished by the end of the night! Having already purchased the decorations and candy a few weeks beforehand, it all started with baking what was supposed to be 200 vanilla cupcakes but turned into about 270… hahah oops. In saying that though by the end of the night there was only about 10 left so I guess it was good that I baked extra. After about 2 days baking it was the day before the wedding and it was also time to make the buttercream. Not gonna lie I was somewhat petrified to make it as it involved a lot of butter and an excessive amount of icing sugar but I faced it and ended up making about 1kg of buttercream which may not seem like that much but it has been the most buttercream I have made in one go! Cupcakes boxed and ready to go and icing mixed with coral food colouring placed in piping bags with a star tip it became real that my cousin was getting married which was so surreal to see. THE DAY HAS ARRIVED! It was the morning of the wedding and having had a traditional tea ceremony in the morning, my trusty design team (cousins) and I scheduled the day to the absolute second to make sure we were on time to the garden ceremony to decorate the Romanesque sandstone columns and circular elevation. Simple but pink and peach floral ball bouquets tied in the ceremony and garden venue perfectly. By about 5 o’clock it was time to head to the reception to set up the candy table! To be completely honest I didn’t really know what it was going to look like and I didn’t exactly have a vision in my head on where everything was going to be placed but working with where the table was placed my cousins and I kind of just went with it which in the end I was super proud of even though I was piping cupcakes like a crazy lady while guests started to arrive. We hung up the floral ball bouquets above the table, which gave it the perfect finishing touch. Overall the whole day was emotional and heartfelt and I honestly could not have been happier with how the candy table turned out! A big thank you to my oldest cousin Andy and now cousin-in-law Jannet for trusting me to design the candy table and trusting my input leading up to the day. And off course a massive thanks to my trusty design team for the help throughout the day because it honestly would not have been a success without you guys! Phoebe xx
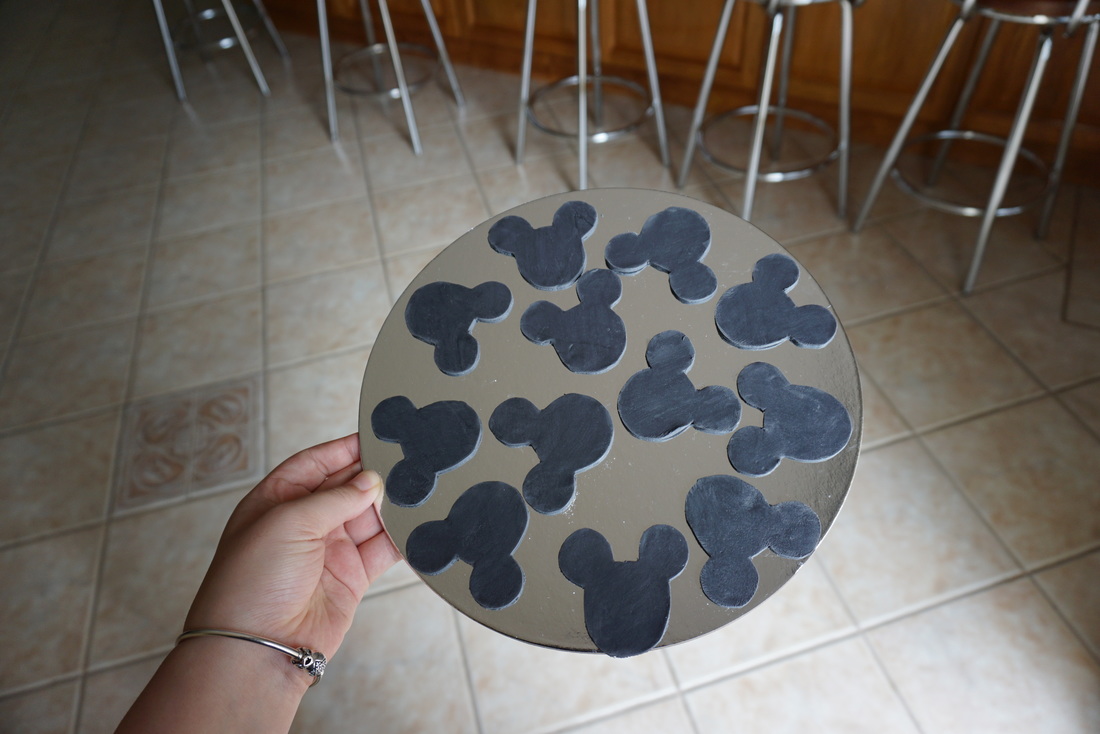
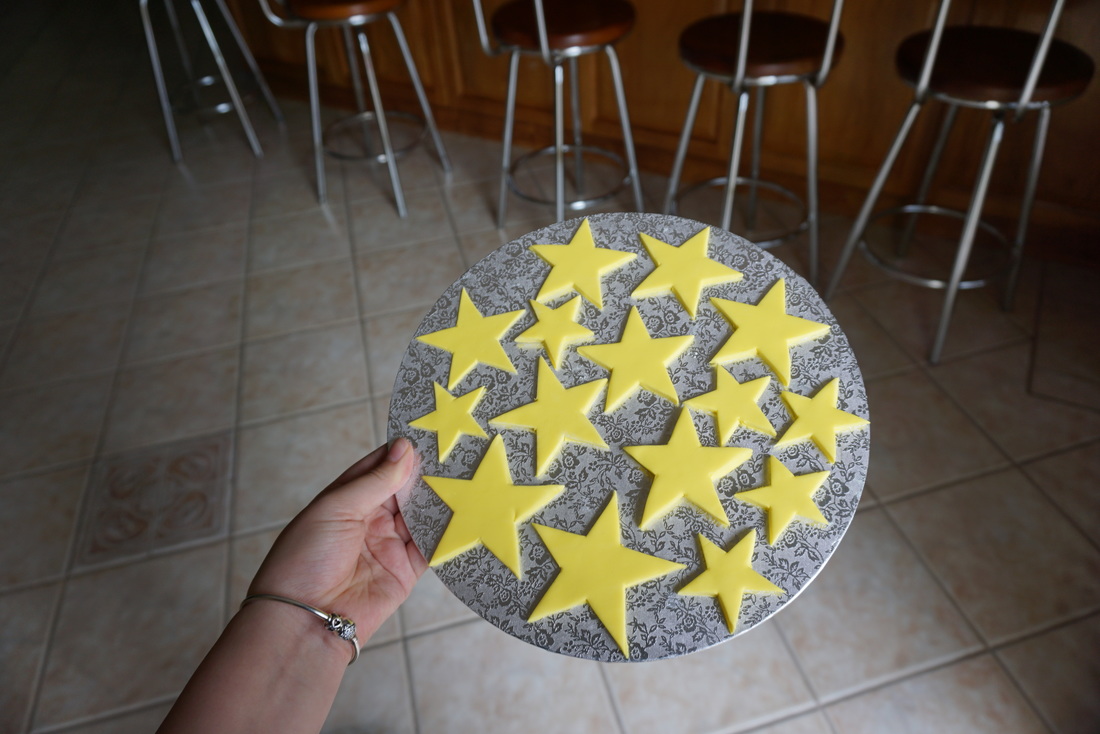
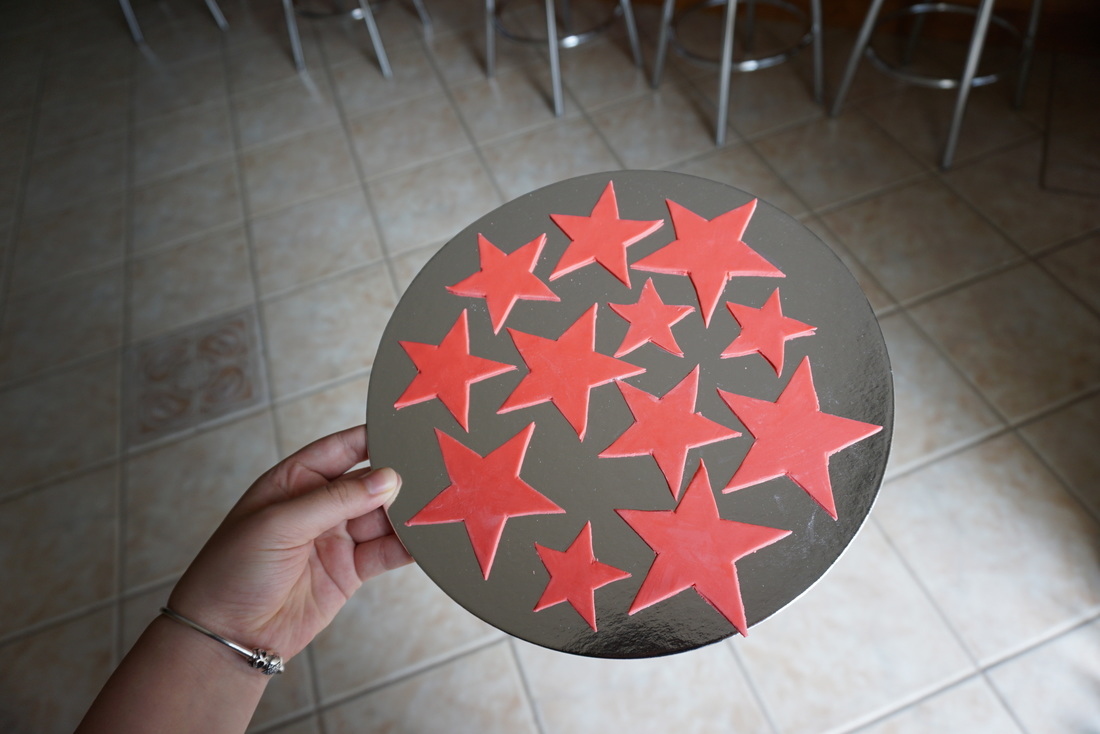
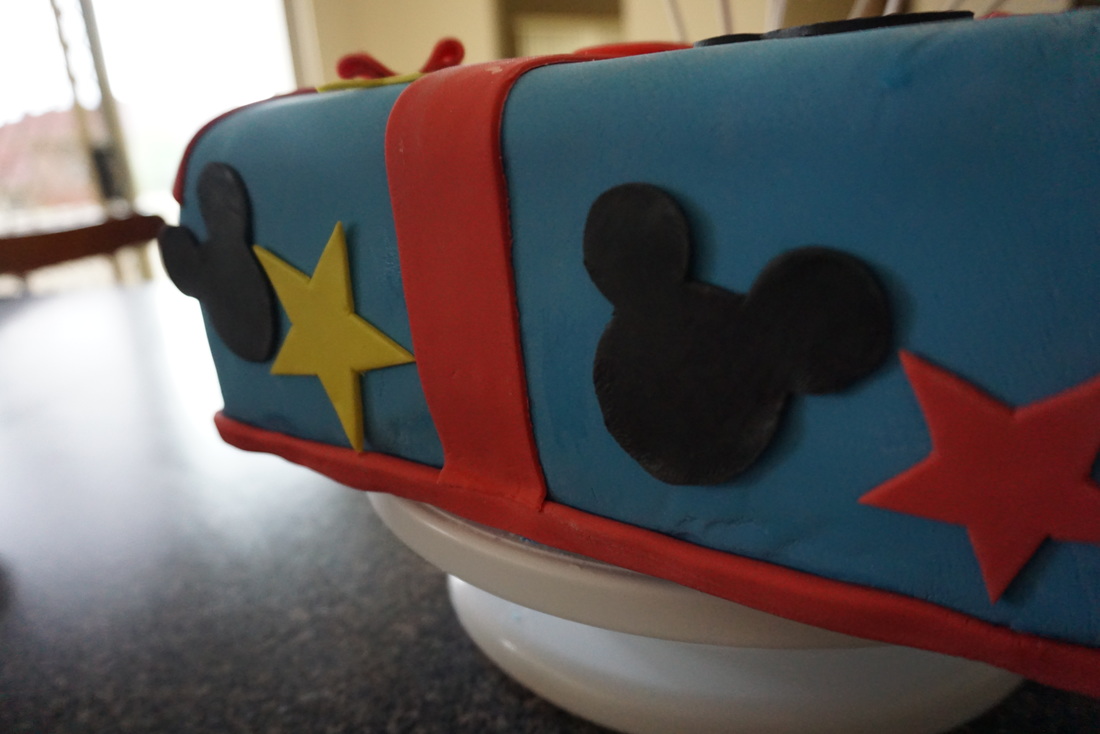
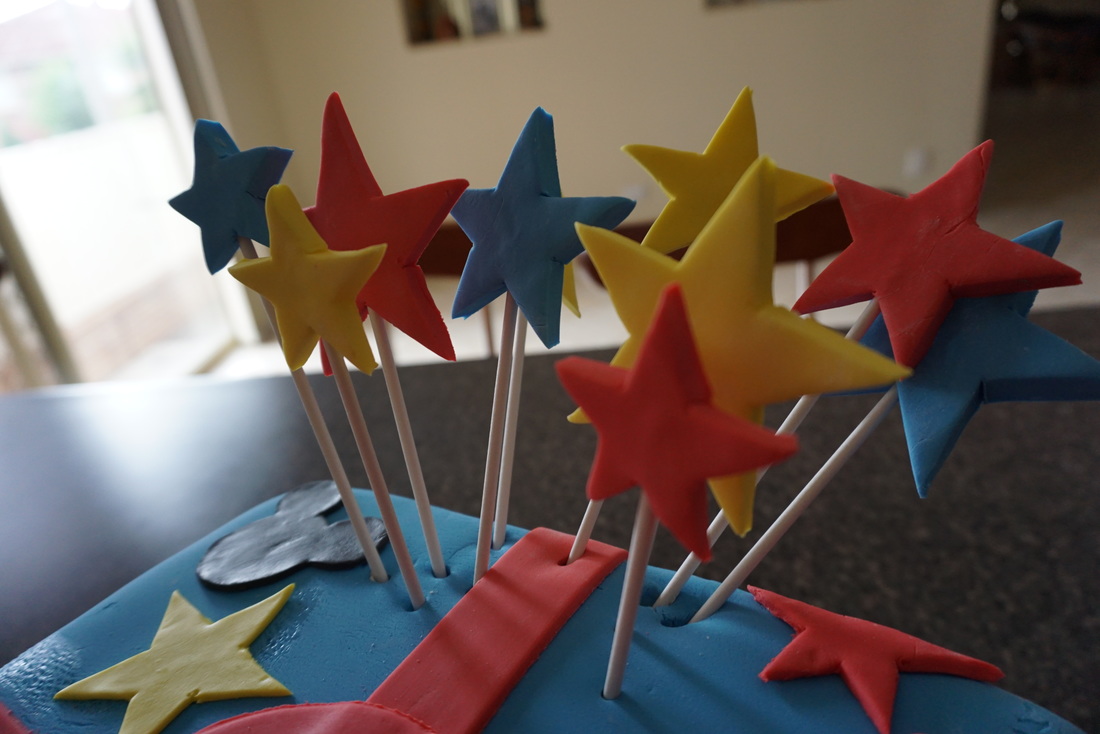
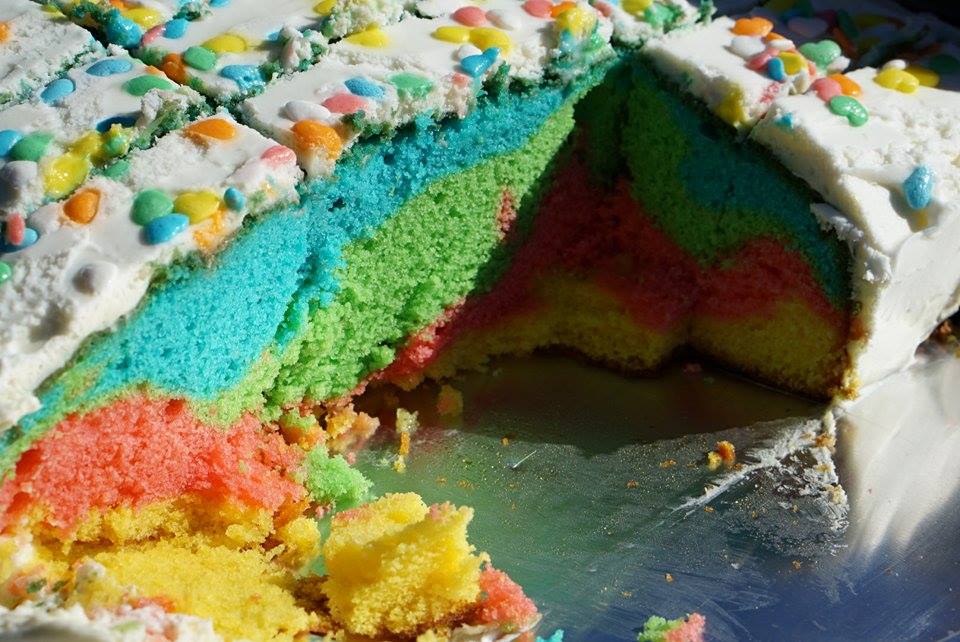
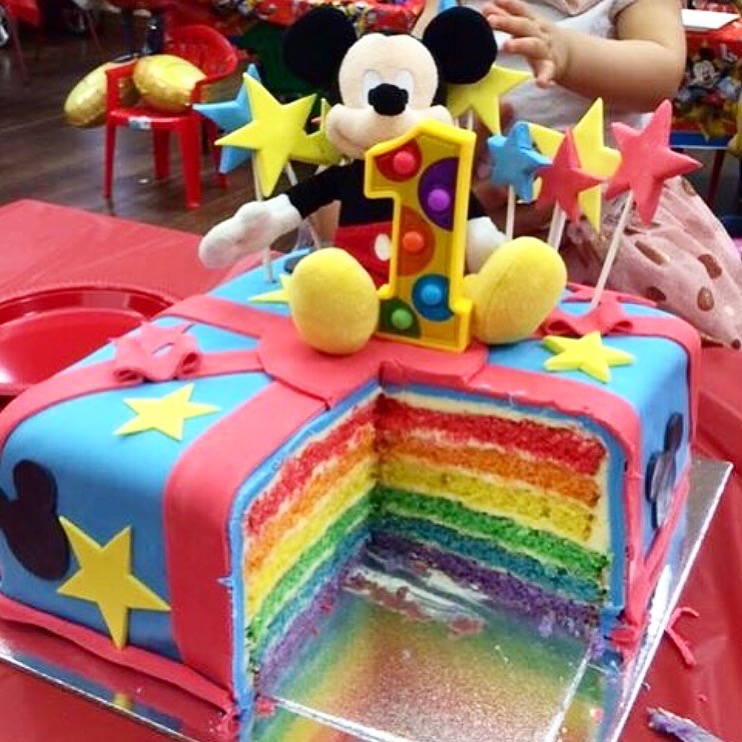
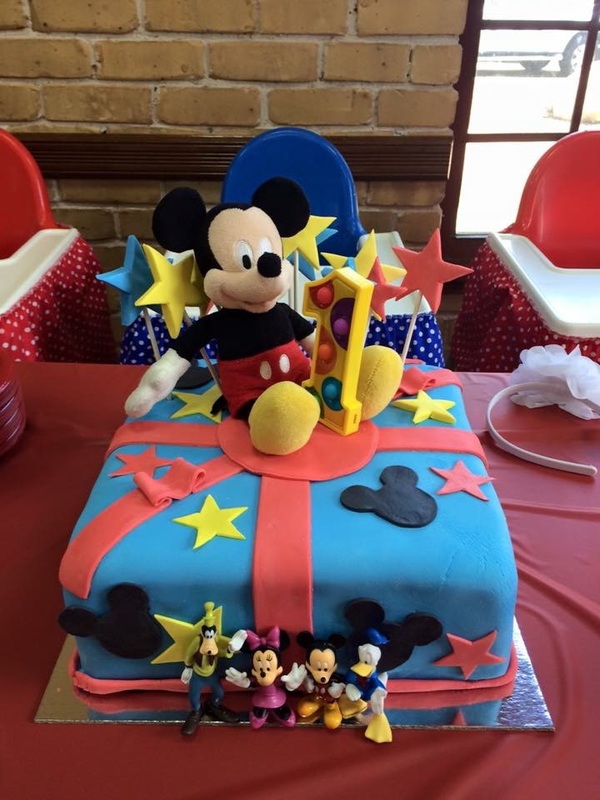
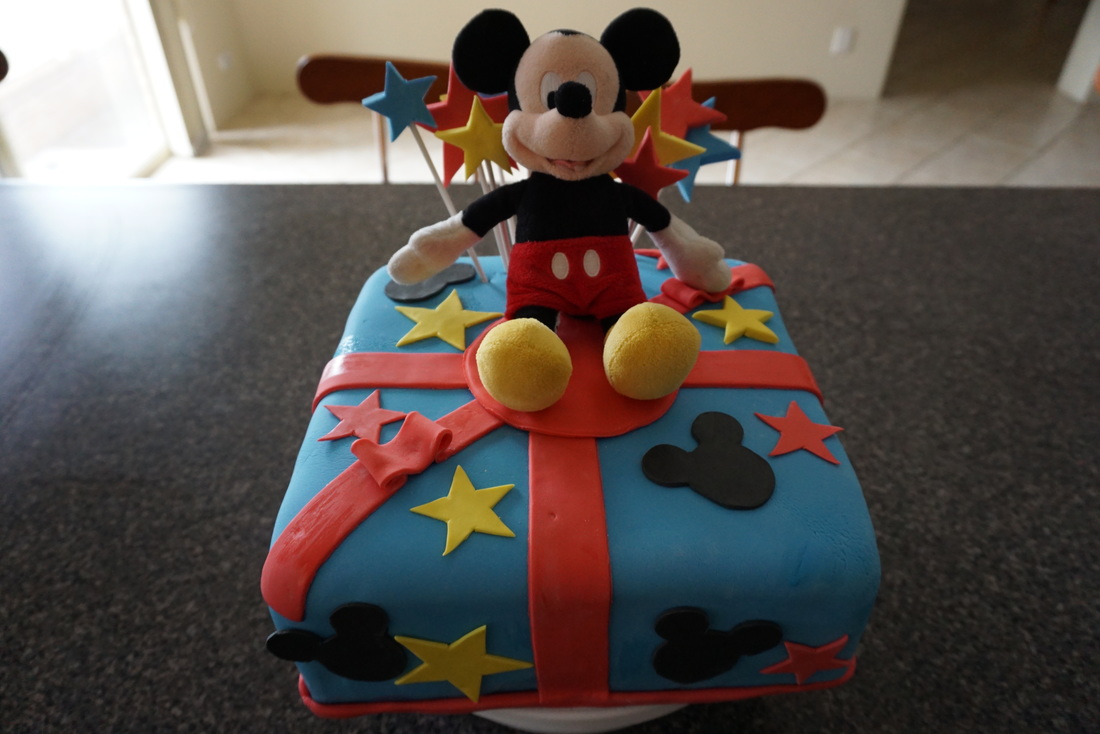
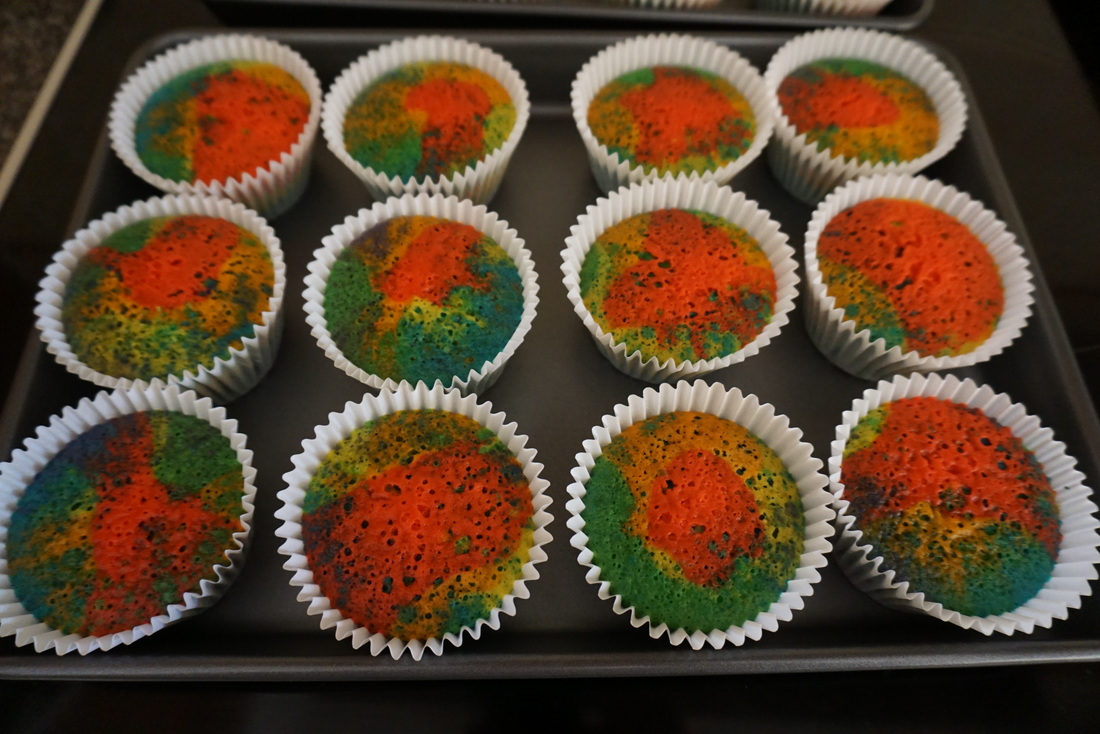
   First of all… sorry I haven’t blogged in a while, I have been caught up in adjusting to the transition into year 12 and have focused more on school work than anything else, BUT throughout last week, I had the pleasure of baking a first birthday cake for triplets!! It all started with the theme. Messaging here and there and getting sent photos, the final product was a Mickey Mouse themed cake as the party that was going to be held for these triplets was Mickey Mouse based. The lady I was baking for sent me a photo of a rainbow layered cake which was super exciting but the funny thing is, the guests at the party had no idea that it was going to be a rainbow cake so they had a shock of their life when the first slice was revealed! I managed to bake each layer of cake in a day so that was done and dusted and the only thing I had left was buttercream (a lot of it) and the fondant to both cover the cake and decorate. I was what I would call ‘perfect timing’ as just before I had to make this cake, I managed to create the perfect method on getting a smooth and creamy buttercream with no grainy residue and lets be real… I was jumping up and down with excitement when it happened. After making a ridiculous amount of buttercream, it was time to crumb coat and start decorating!! YAY!! I surprisingly found it easier to crumb coat this cake over other cakes I have made in the past and even covering it with fondant… but could be because it was a bigger cake? Don’t know but I loved decorating this cake and turned out just the way I wanted it to! If you know me… you know I’m not the biggest fan when it comes to fondant and with this cake I was trying to find a way to not use it but there was no getting away with it so I decided to use fondant as it gave a cleaner finish and just looked a lot better! After I completed this cake, I dropped it off to the lady’s house and when I brought it in, herself and her husband kept thanking me for baking the cake and how it looked just like the photo they sent me, which definitely put a smile on my face followed by the reviews I got the day after the party and the compliments I received honestly made it all worth it! So Thankyou to Daniela, Daniel and your triplets for letting me bake the cake because honestly… I didn’t think I would be able to accomplish it in the beginning… haha I also bakes smash cakes for them which will be in a separate blogpost but it was my first time making smash cakes and I fell in love! Stay tuned for that soon! Phoebe xx

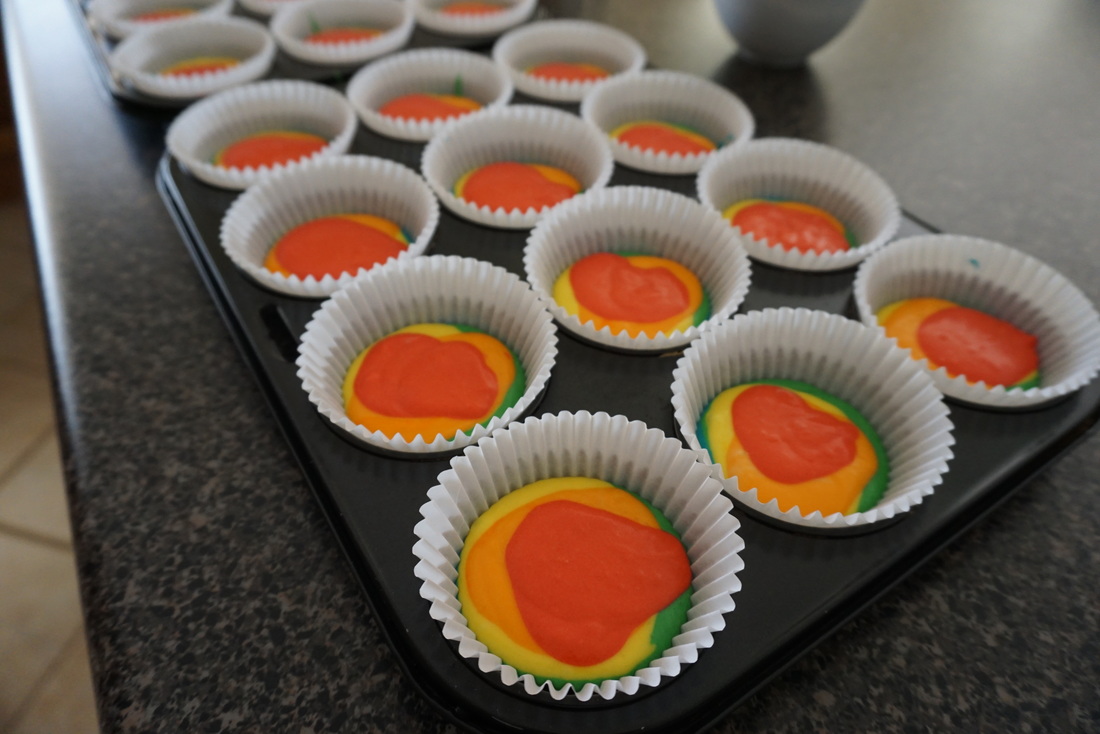
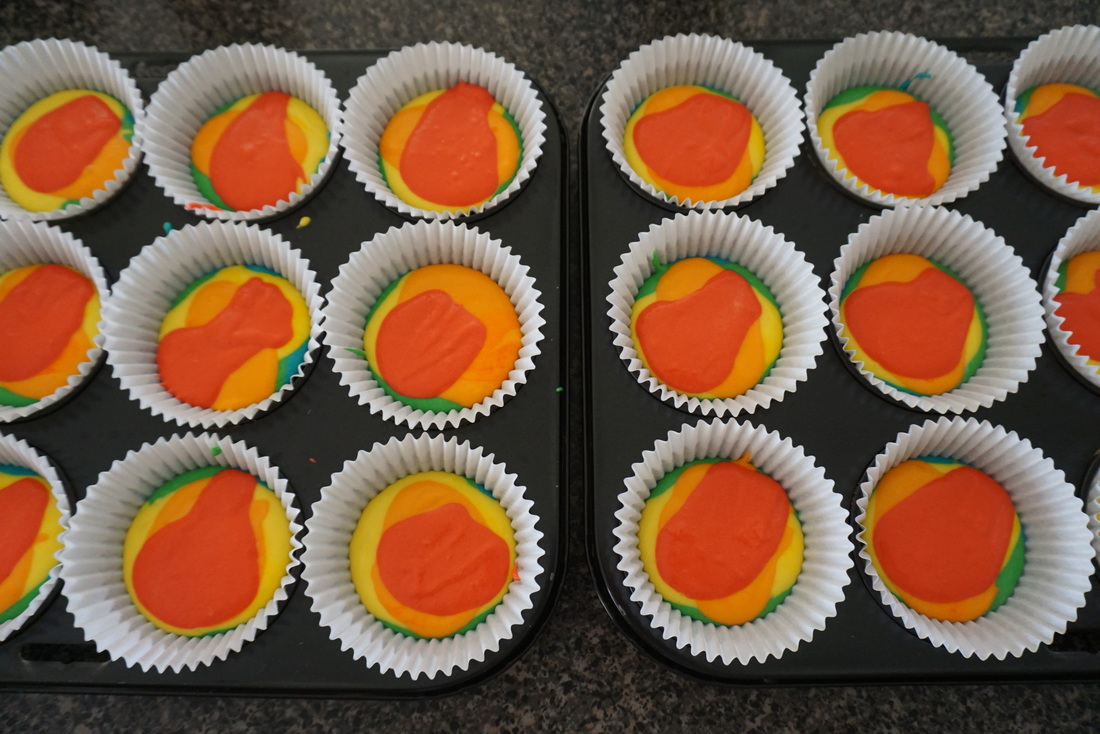
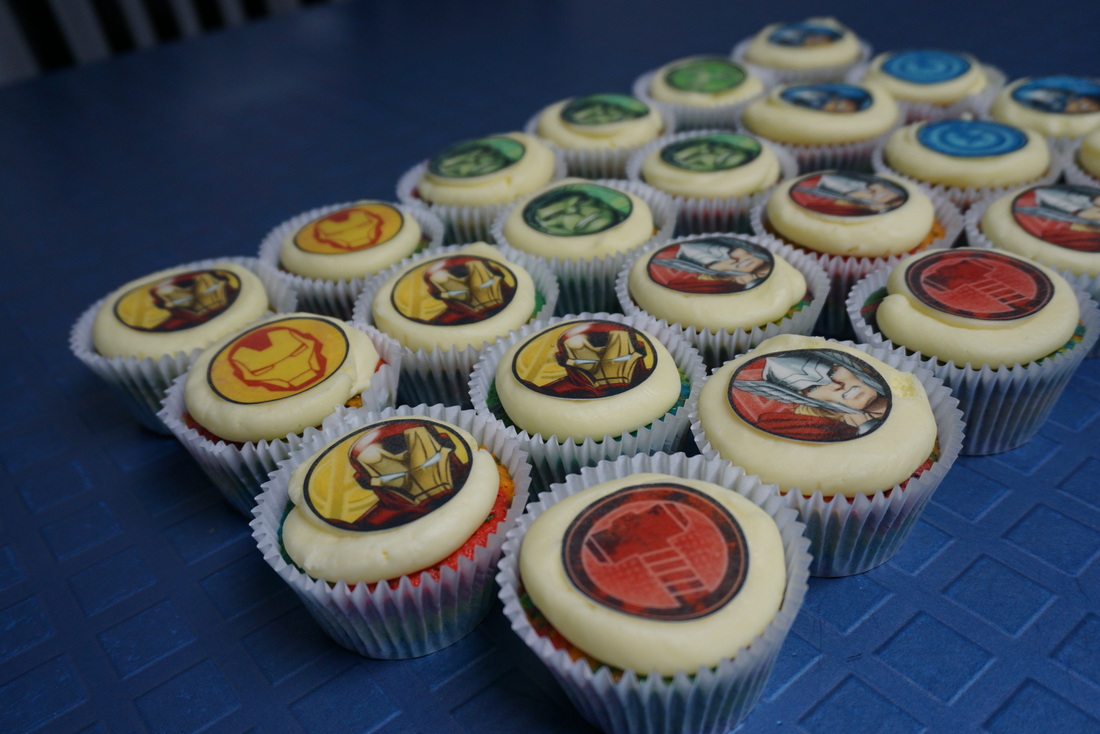
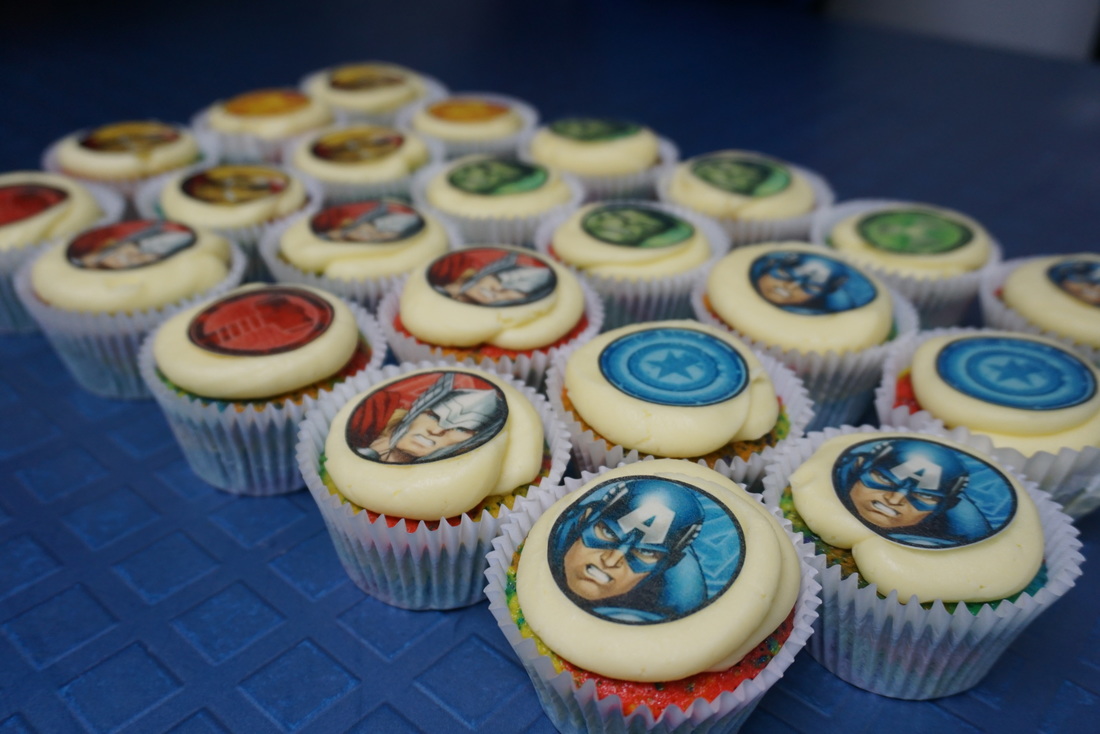
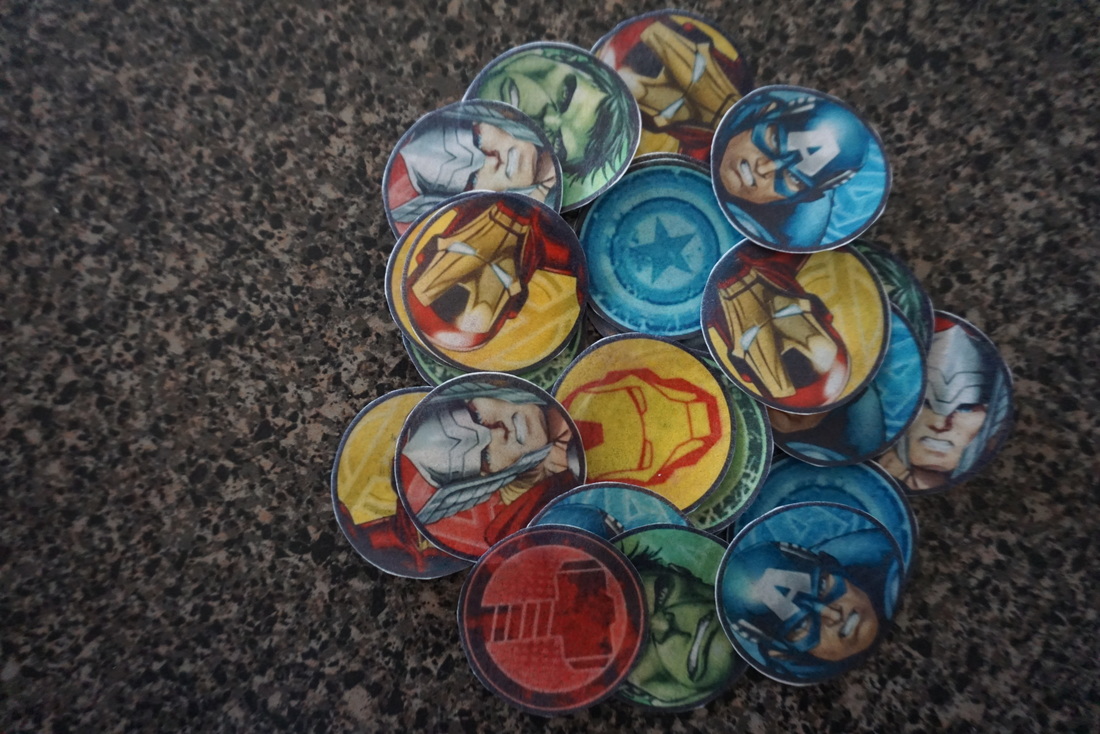
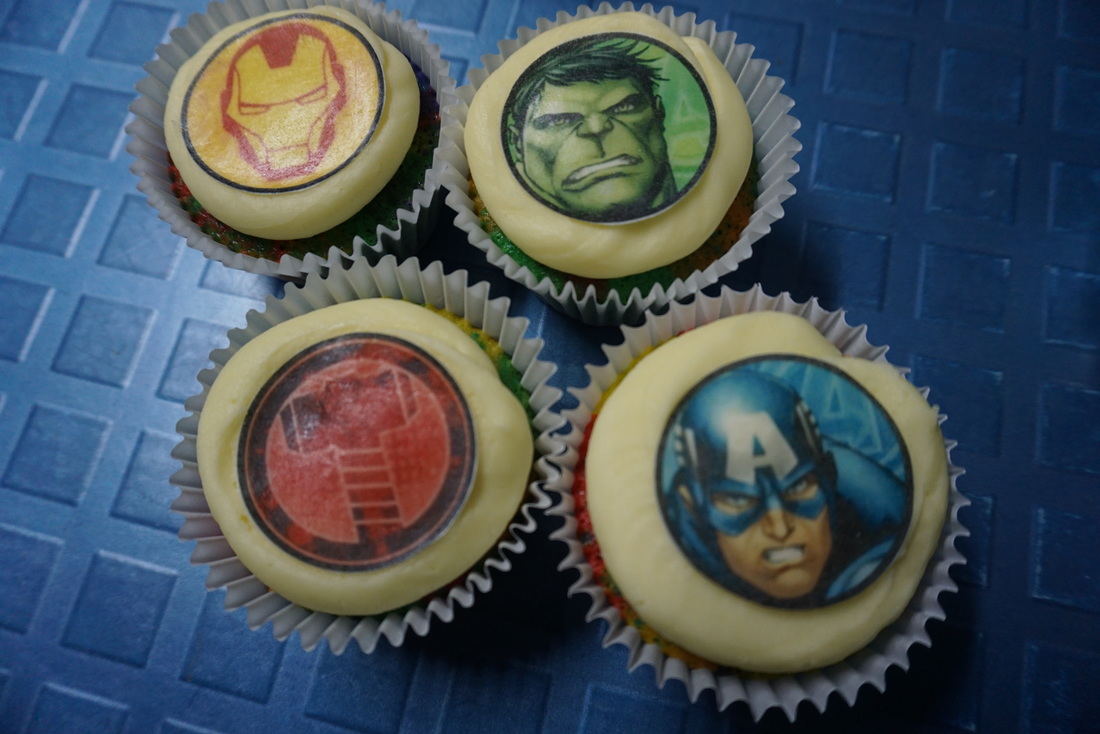
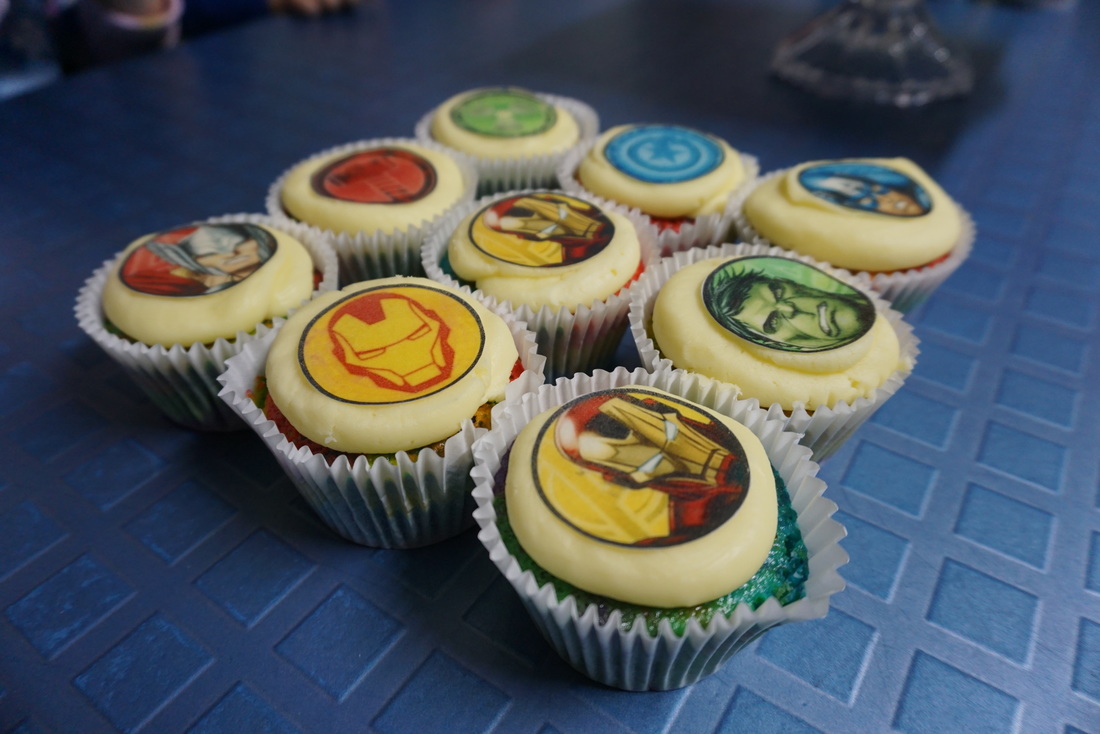
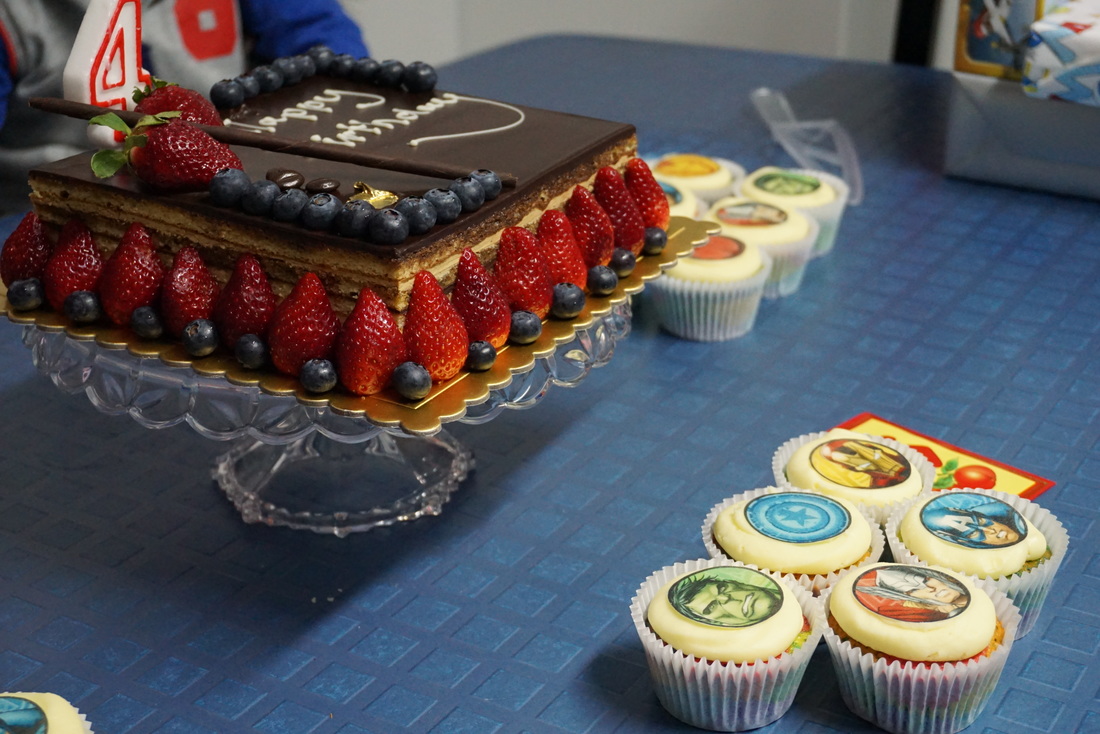
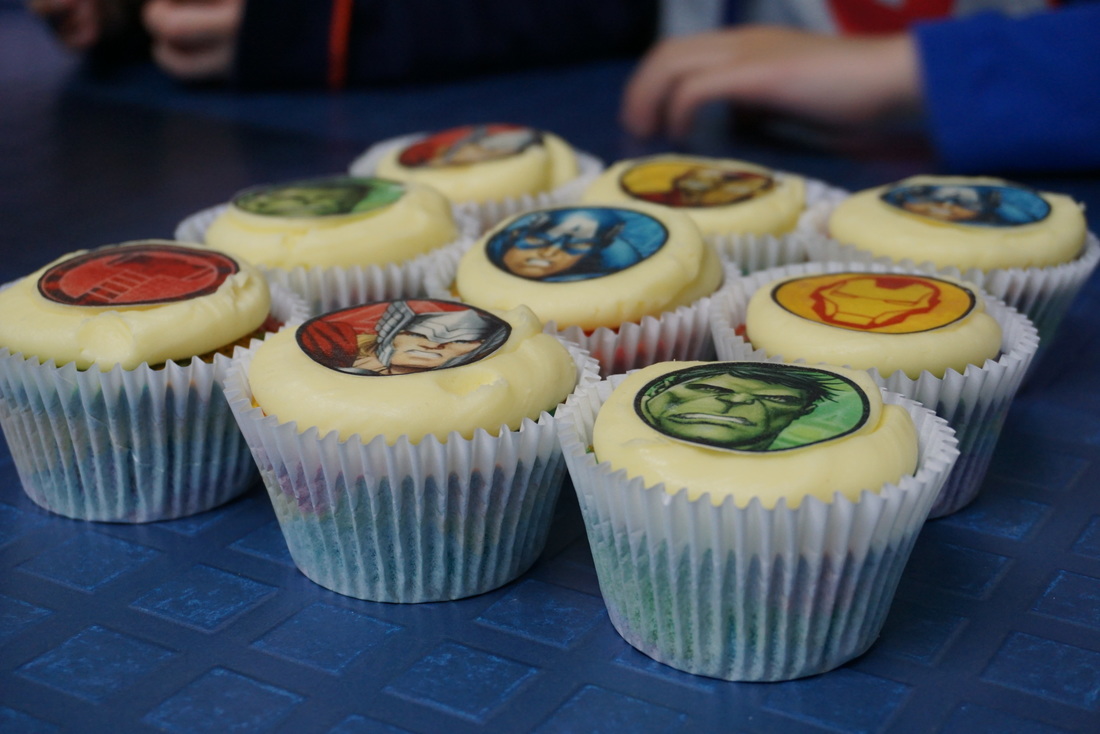
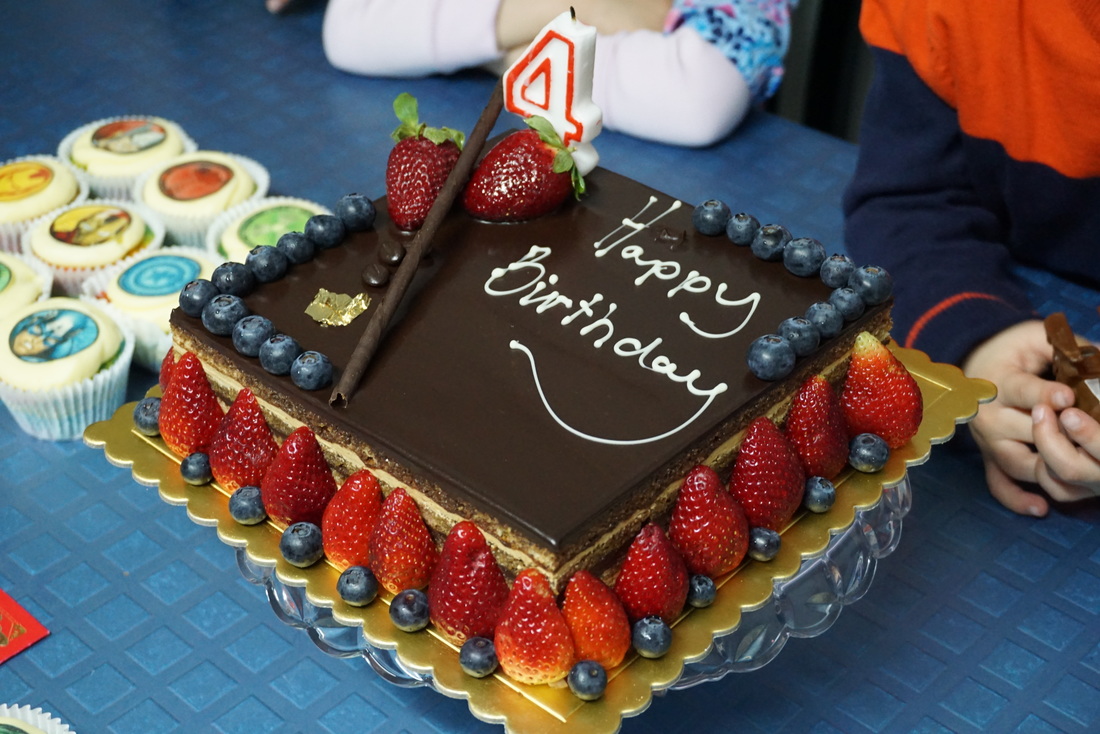
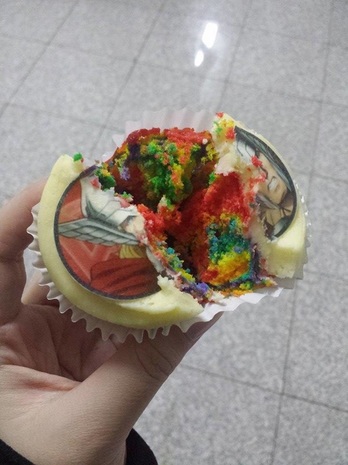
 Having it been holidays I knew I wanted to bake more and blog heaps, so getting asked to bake for my cousins 4th birthday party was super exciting! It all started with the theme, Avengers, which I instantly thought of purchasing edible cupcake toppers to decorate. After purchasing the cupcake toppers from eBay, it was time to figure out what flavor cupcakes my cousin wanted and after thinking for about 5 minutes I suggested rainbow cupcakes and he smiled and said YEAH!! So that was sorted… hahah I baked a day beforehand and made a simple buttercream on the day of the party, as it didn’t start until later in the afternoon. It all started with a basic vanilla cupcake mixture, which I then added gel food colouring for it to execute a vibrant colour, which I loved. So after mixing in food colouring, it was time to scoop in about a spoon of cake mix into each cupcake casing, which in my opinion is probably my favourite bit… don’t know why but each cupcake turns out differently after you bake it depending how you place the cupcake mix in and its so exciting because you just don’t know how the final product is going to look like until to bite into it! It remains a surprise!!!! The following morning I made a basic buttercream and decided to take it to the party and pipe it onto each cupcake as if I placed the cupcake toppers I was scared the colour would seep through so luckily when it was cake time, the cupcakes stayed in tact and remained the way I presented it. In the end I received such amazing feedback from the family and it made all the work all worth it! Phoebe xx 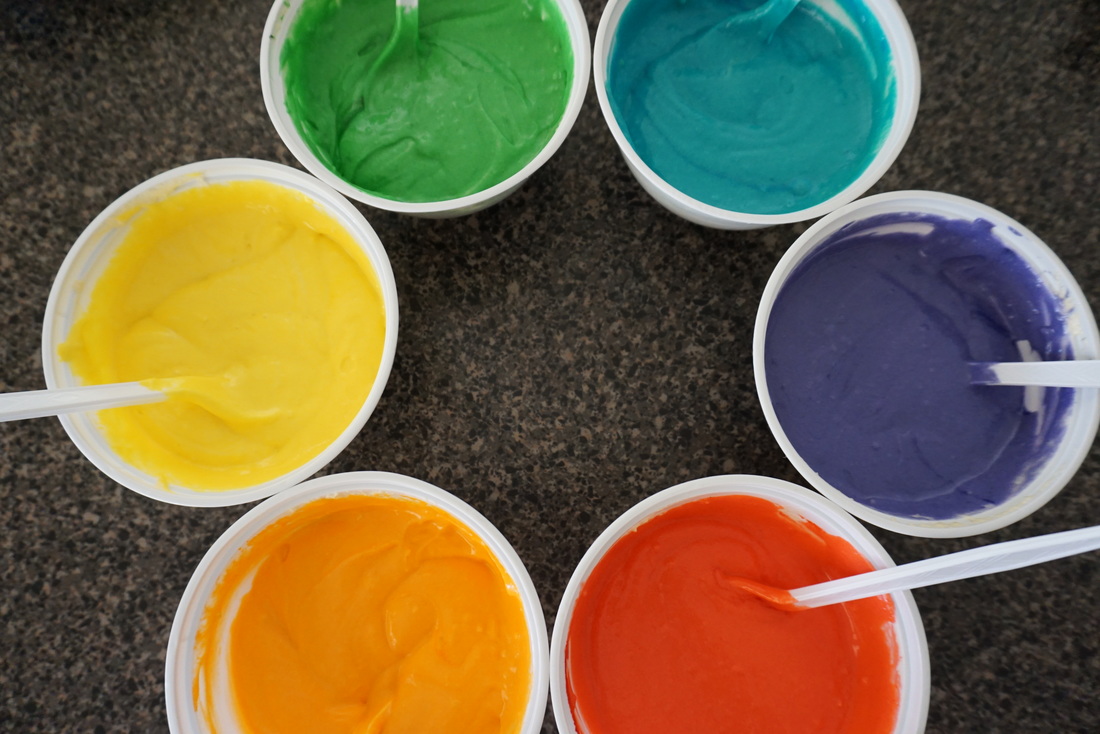
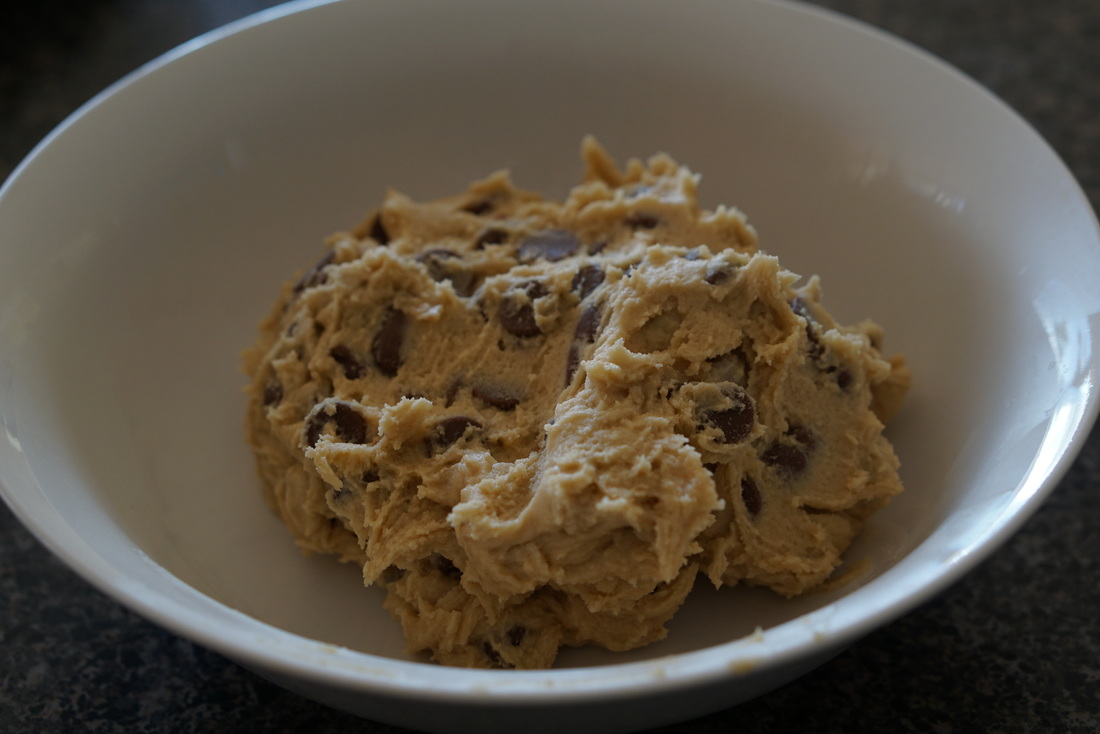
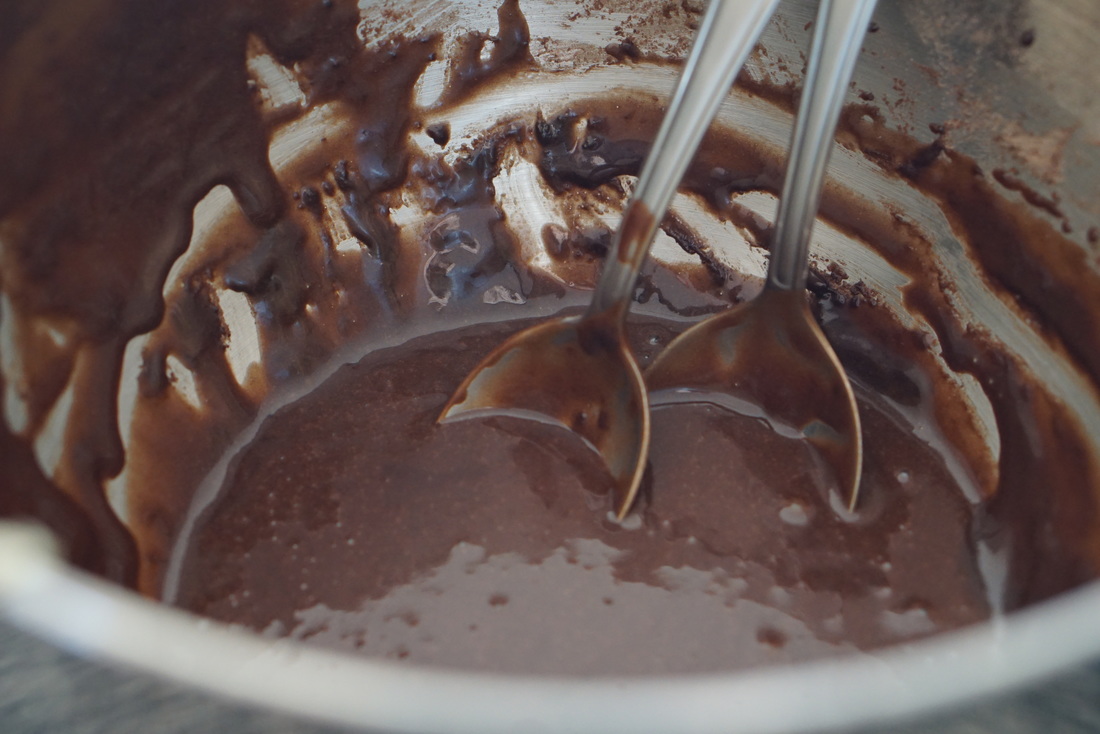
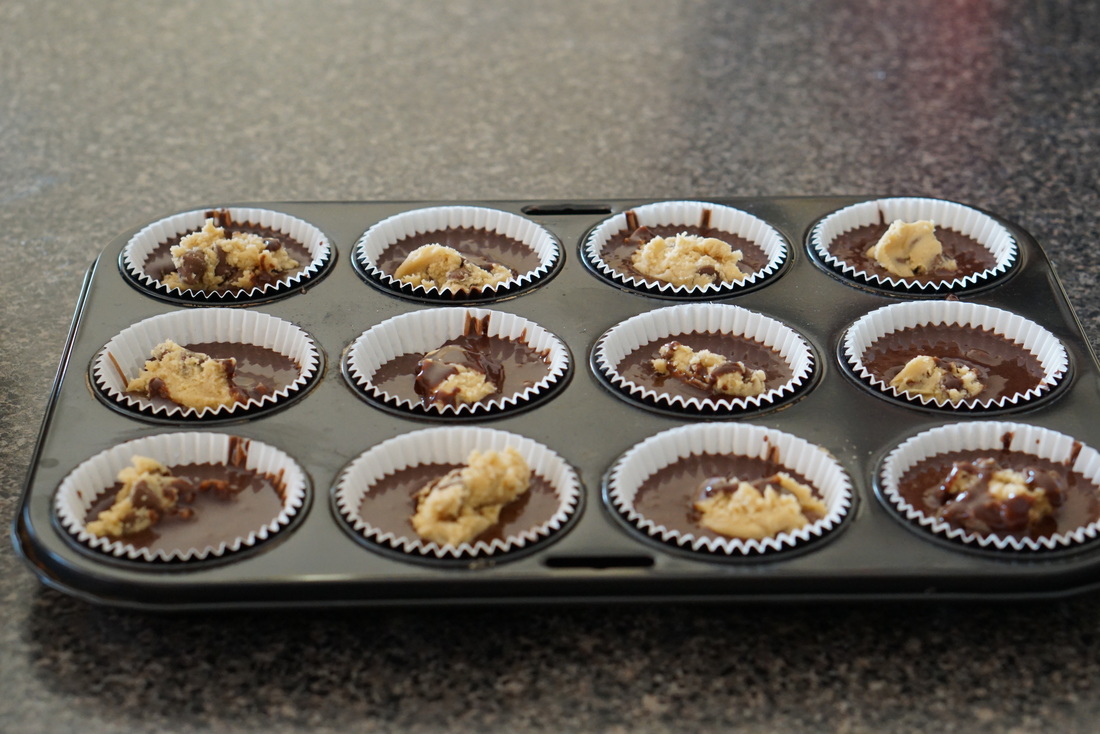
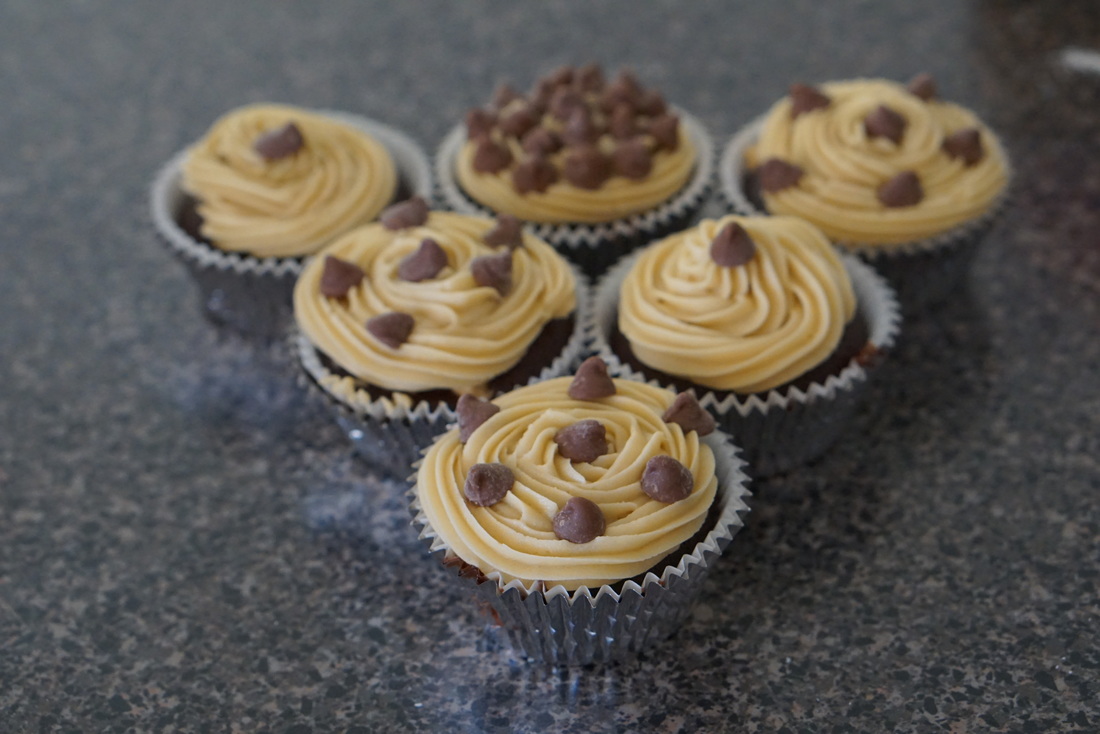
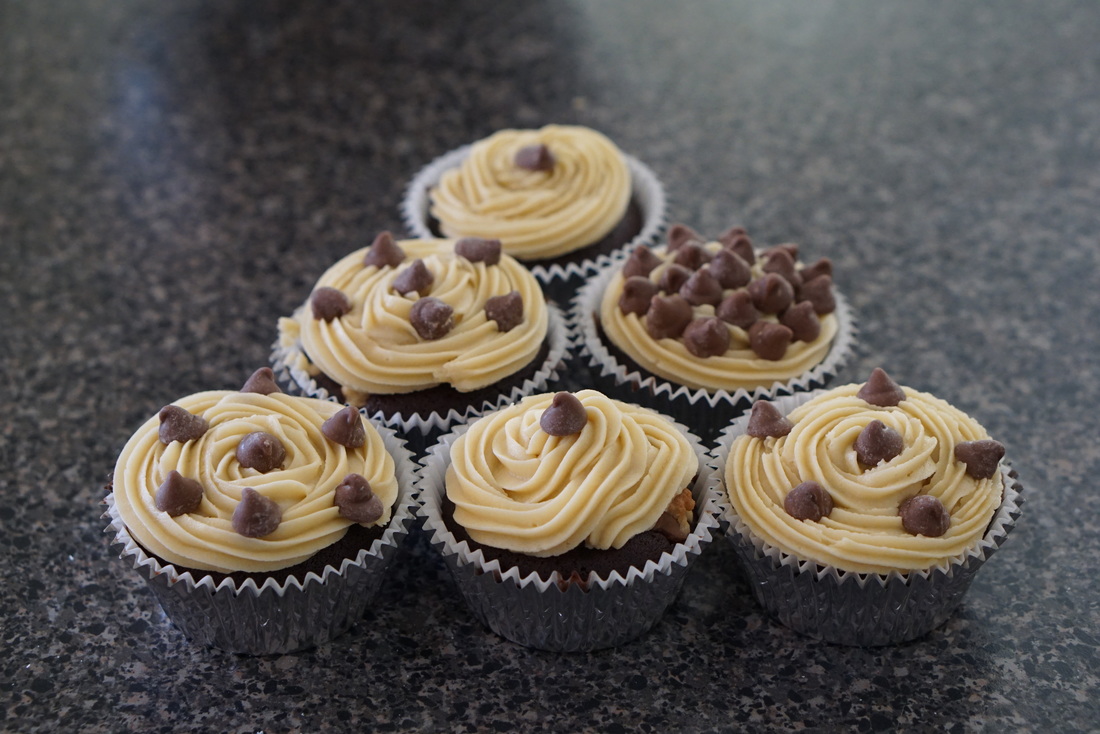
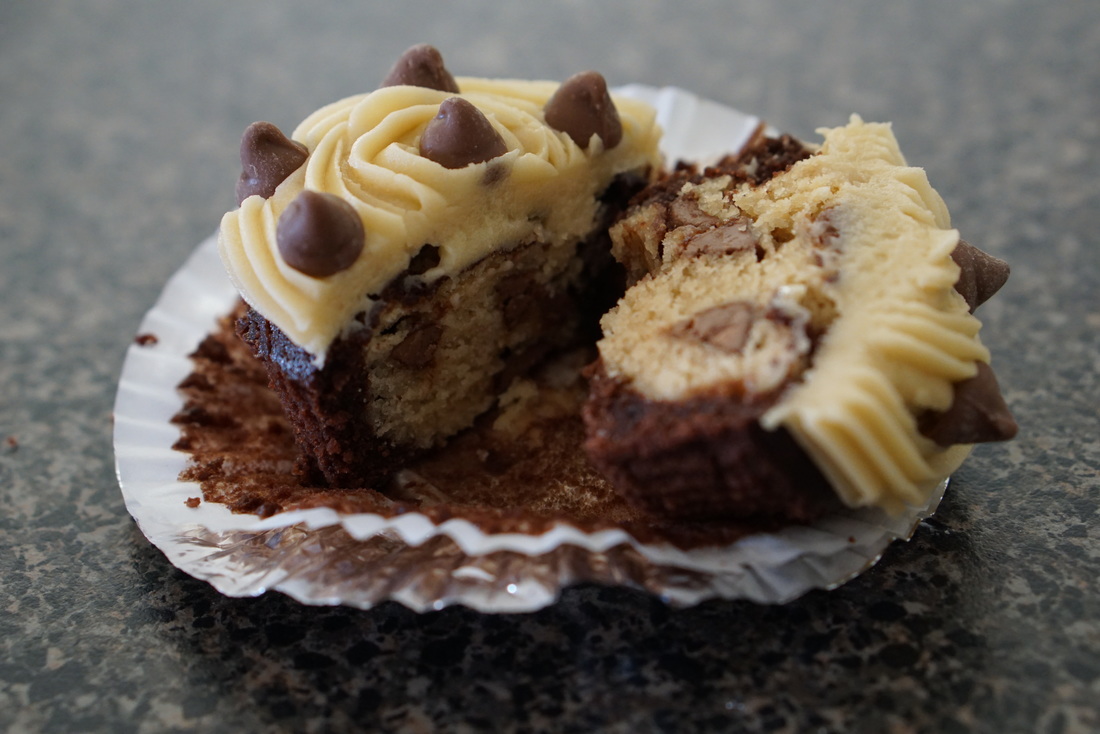
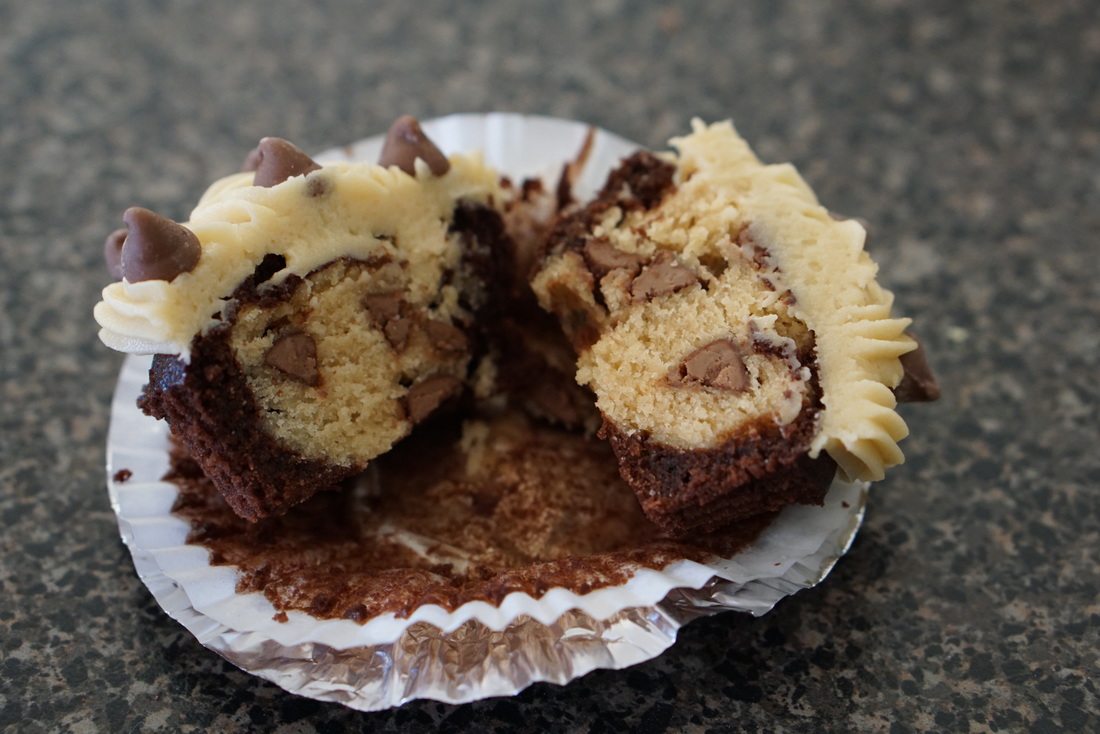
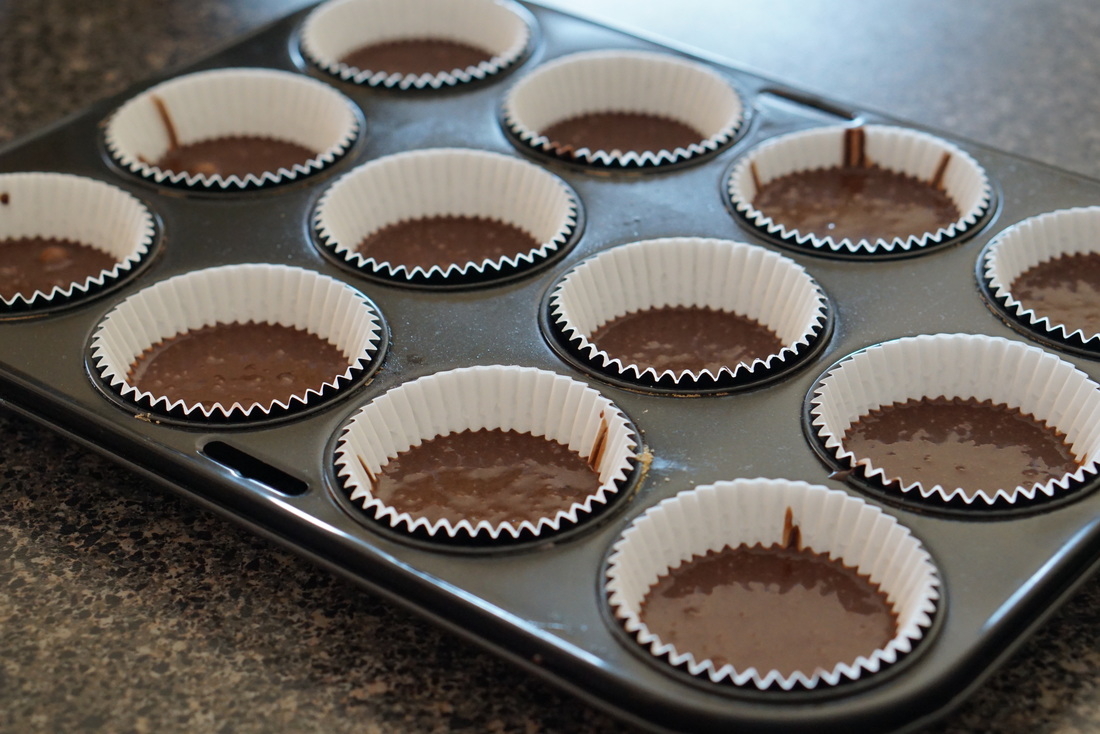
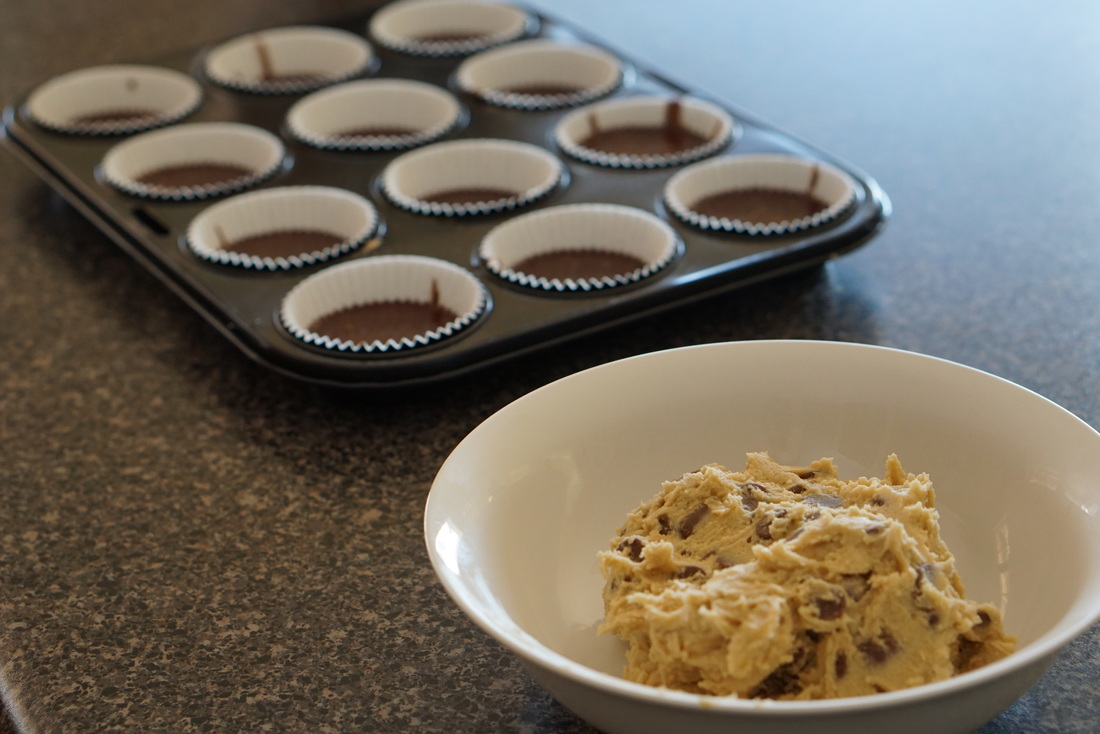
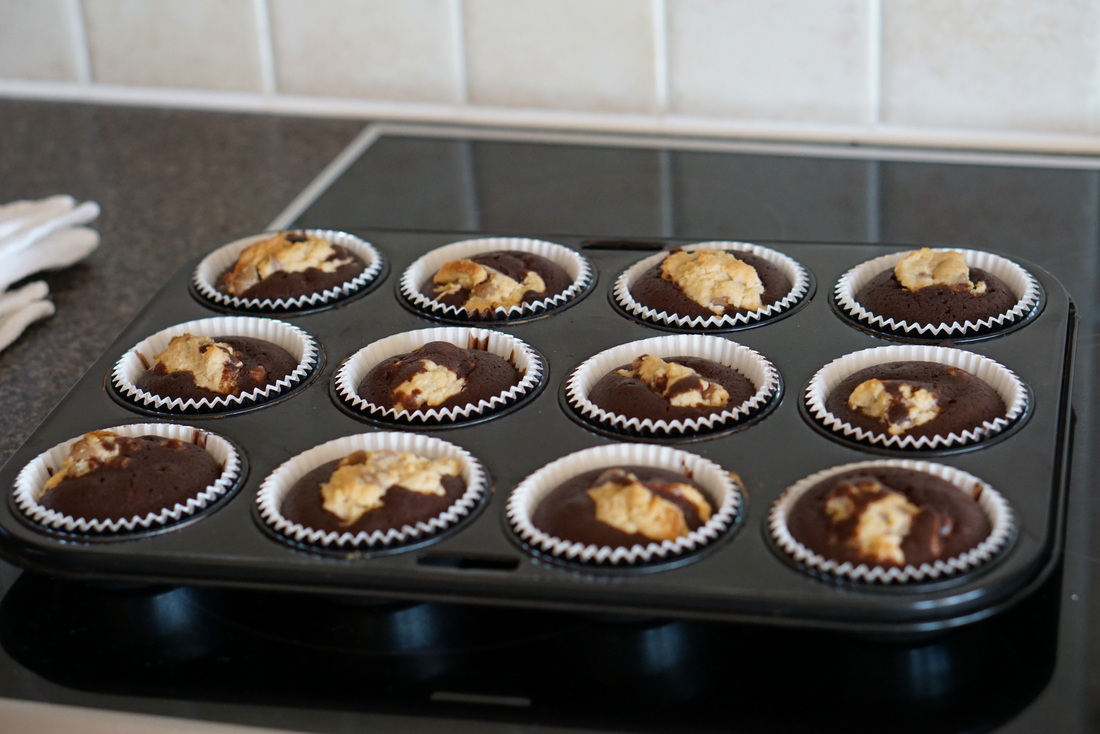
     A dream of mine in the future is to have my own bakery and business where I am able to make cakes and cater for customers but have always had second thoughts as I am still studying and don't have the time to constantly bake but it is still something I would love to do on the side and it started off as baking for family and friends who essentially knew I made cakes... until a few weeks ago I received a message asking me if I was interested in making cupcakes for someone (a) I didn't know and (b) was referred to me by a friend. So having only made cakes/desserts for family and friends I was shocked and honored to receive a job to do cupcakes that was for someone I didn’t know and treated as an actual client. It was for an 18th birthday and after discussing designs and flavors for weeks beforehand it came to the conclusion of vanilla cupcakes with buttercream as well as tiffany blue and black fondant cupcake toppers. Having had to juggle schoolwork and getting this job done in a span of a week I did little bits and pieces after school, which would all, come together to create these cupcakes! Discussing specifications and details of these cupcakes, I knew I had to work with fondant, which is something, I’m not yet completely confident in using but after researching tutorials and steps I managed to make a bow and cut a few strips of fondant to represent Tiffany and Co. boxes which I was honestly so so happy with. Flowers were simple as I purchased a flower cutter recently in the perfect size I just thinned it out a little and added a silver sugar pearl to the center, which gave it an elegant look, which I loved! Having the fondant have icing sugar been dusted all over it i took a paintbrush and a bit of water to paint over the fondant so it would give a cleaner look to the end product which is why some photos look glossy. Overall these cupcakes were easy but had a little challenge and I guess an expectation or a standard to them as they were for my first actual client but I’m super happy with them nevertheless and I hope the client loves it as much as I loved making them! P.S sorry I’ve been a bit MIA on the blogs lately. Have been catching up on schoolwork as yearly exams are fast approaching so I am working on another blog post that will be up in a week or so but hope you enjoy this one in the meantime! Phoebe xx 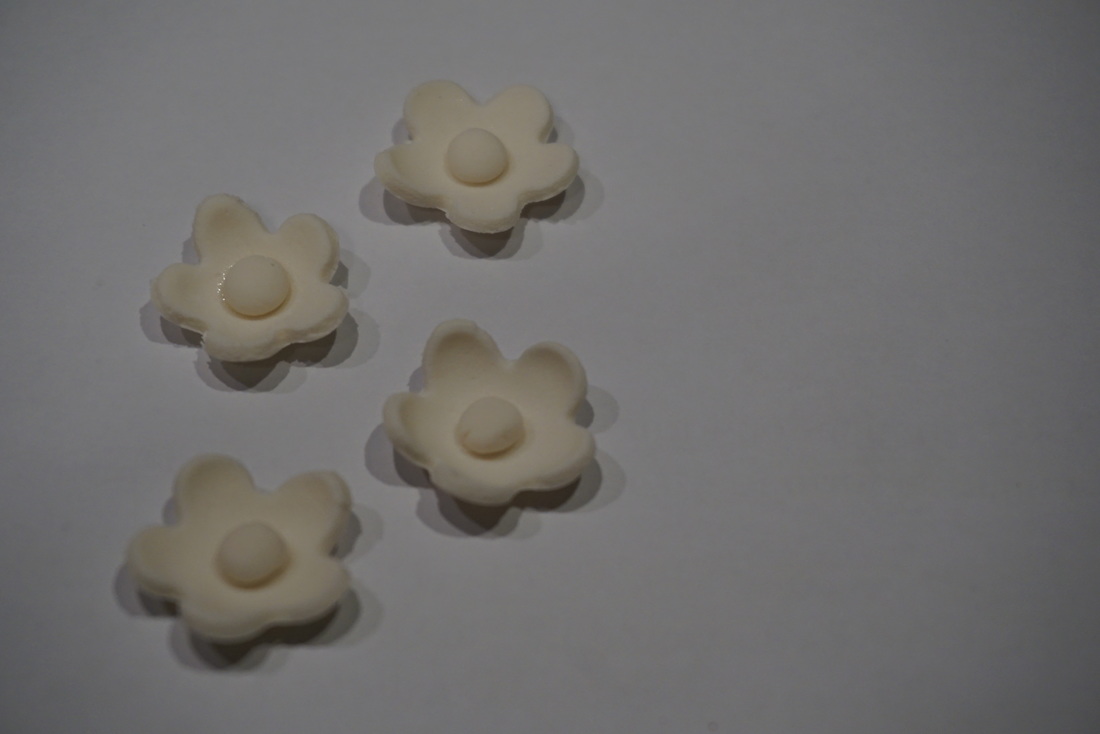 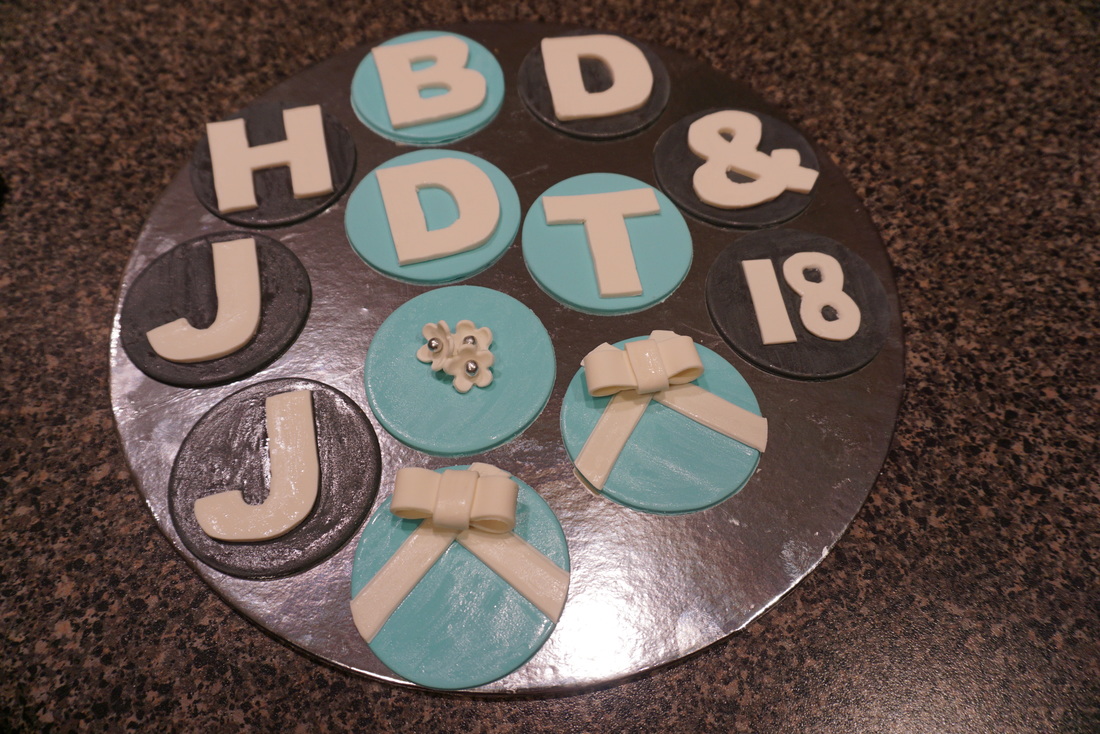 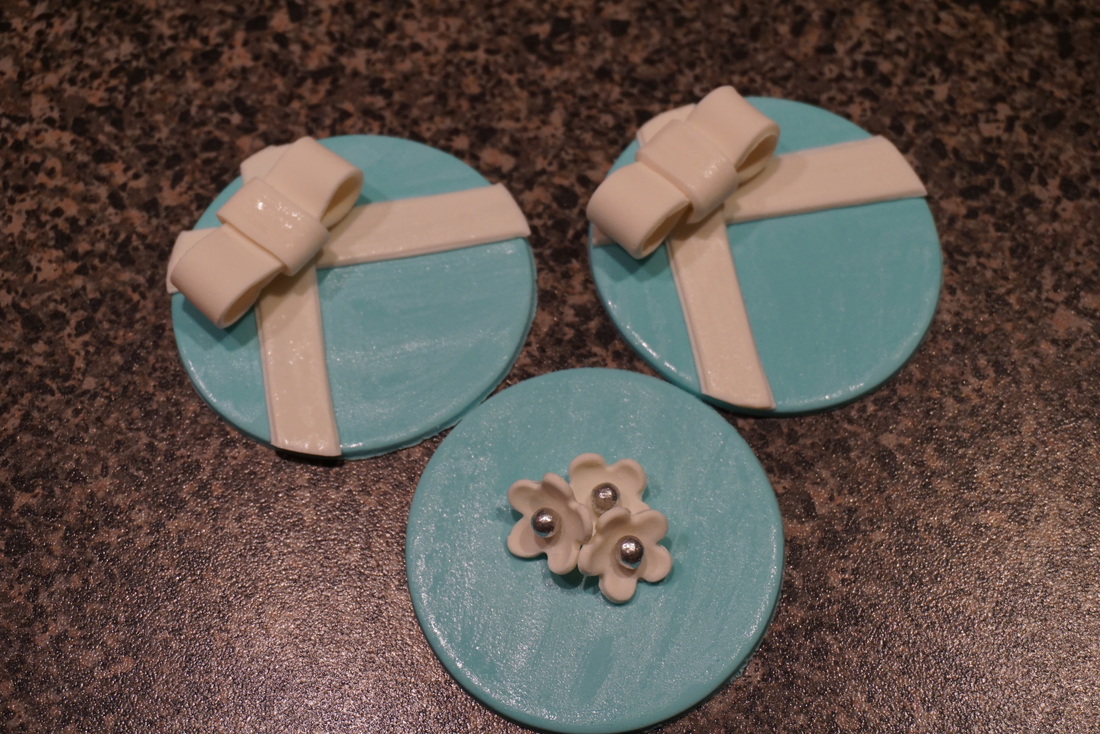 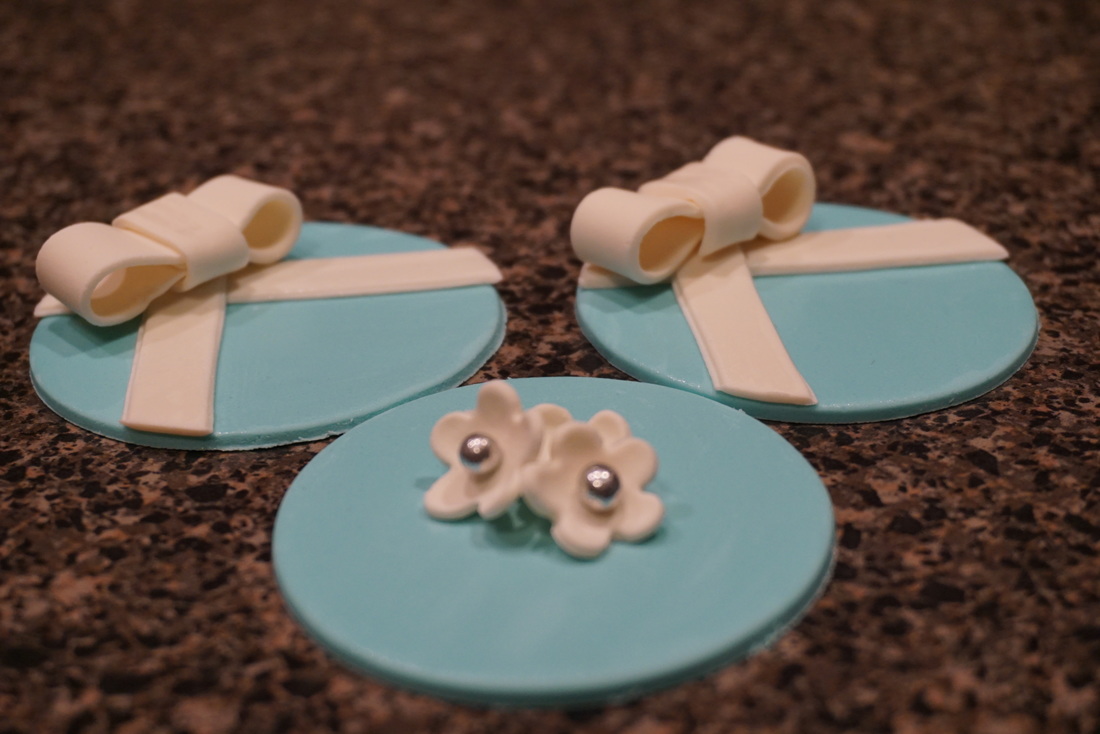 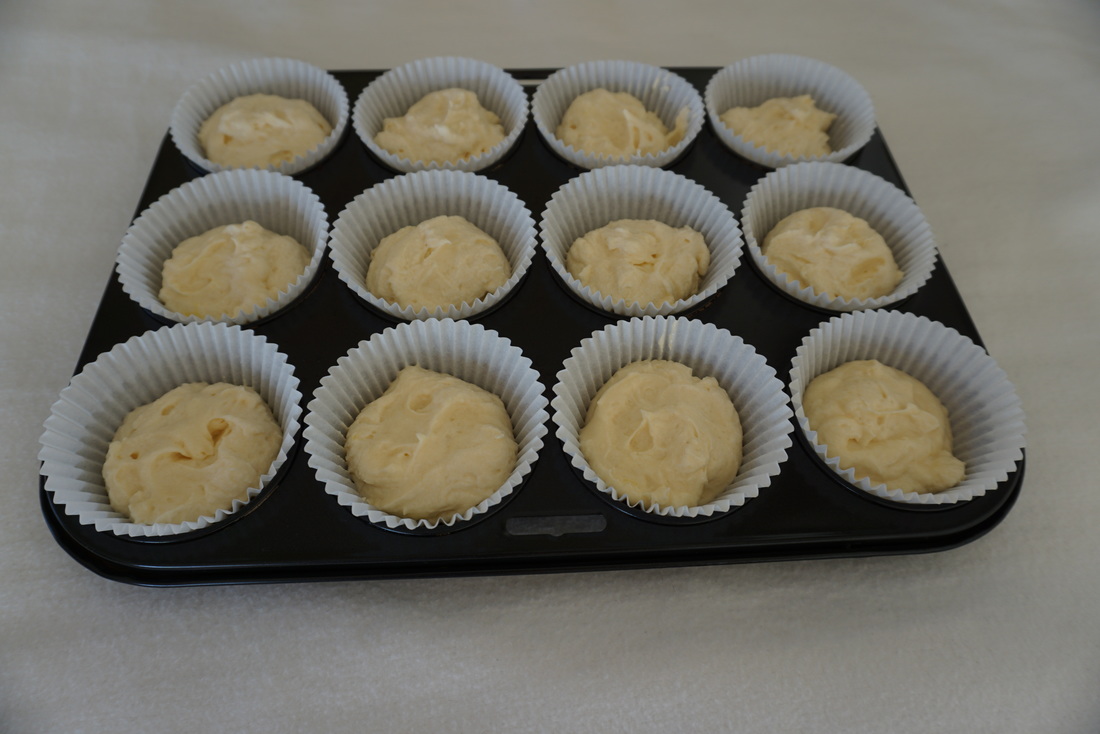  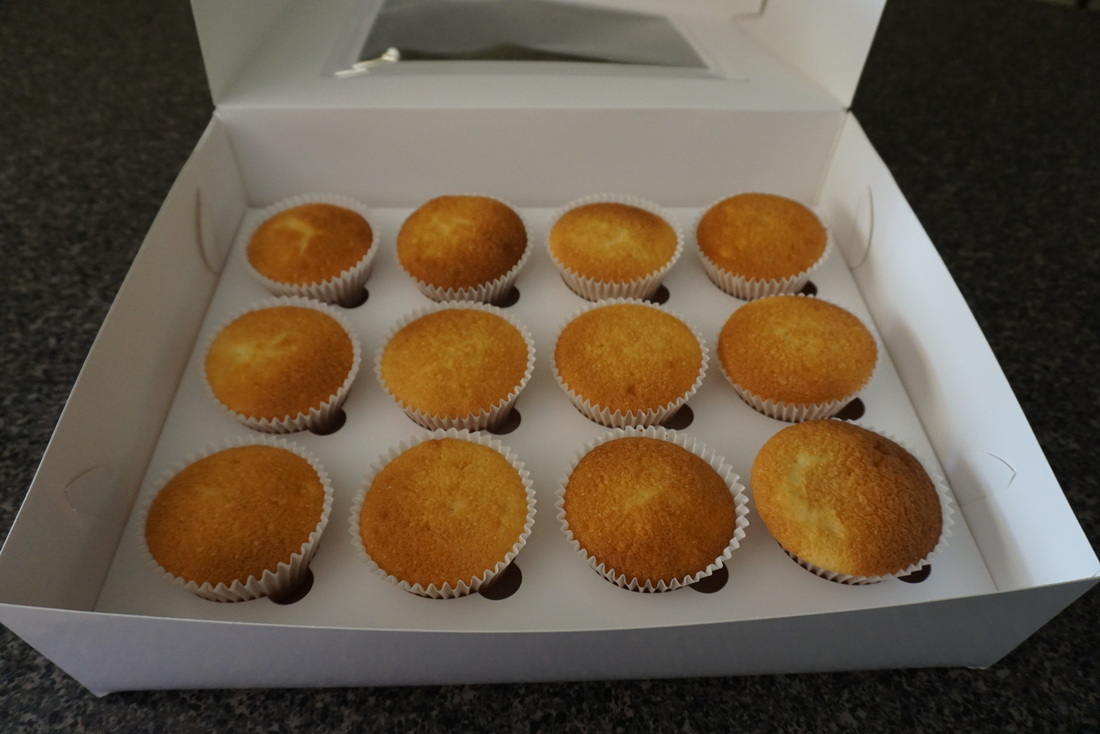 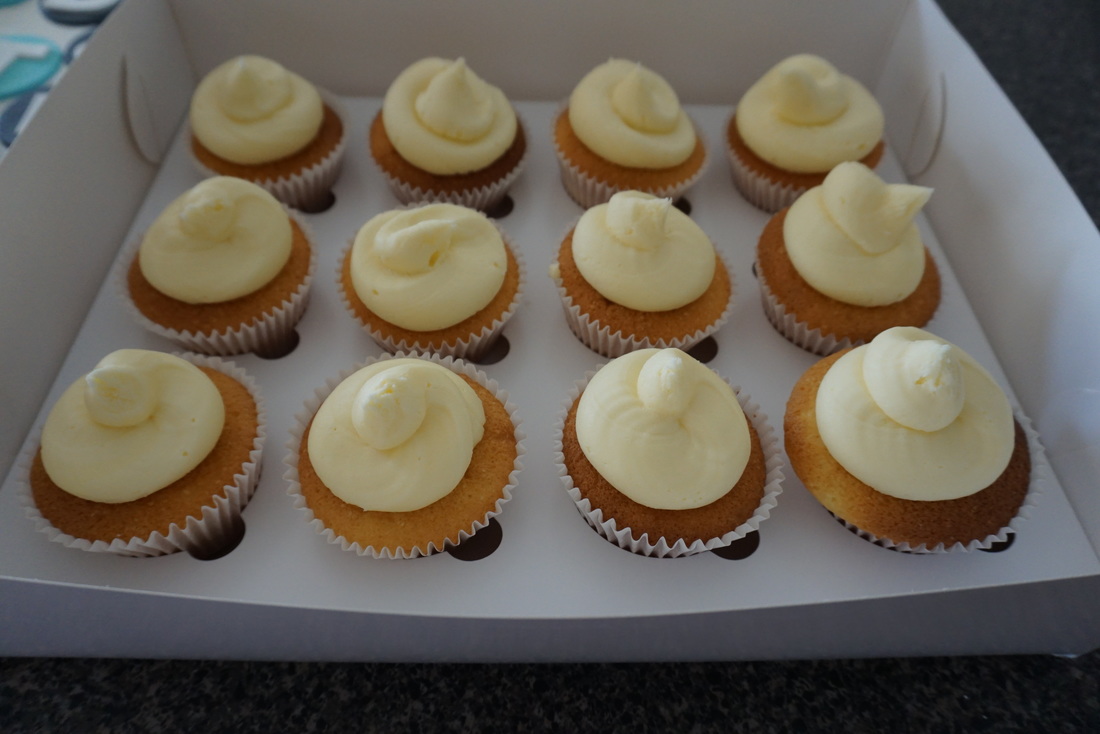 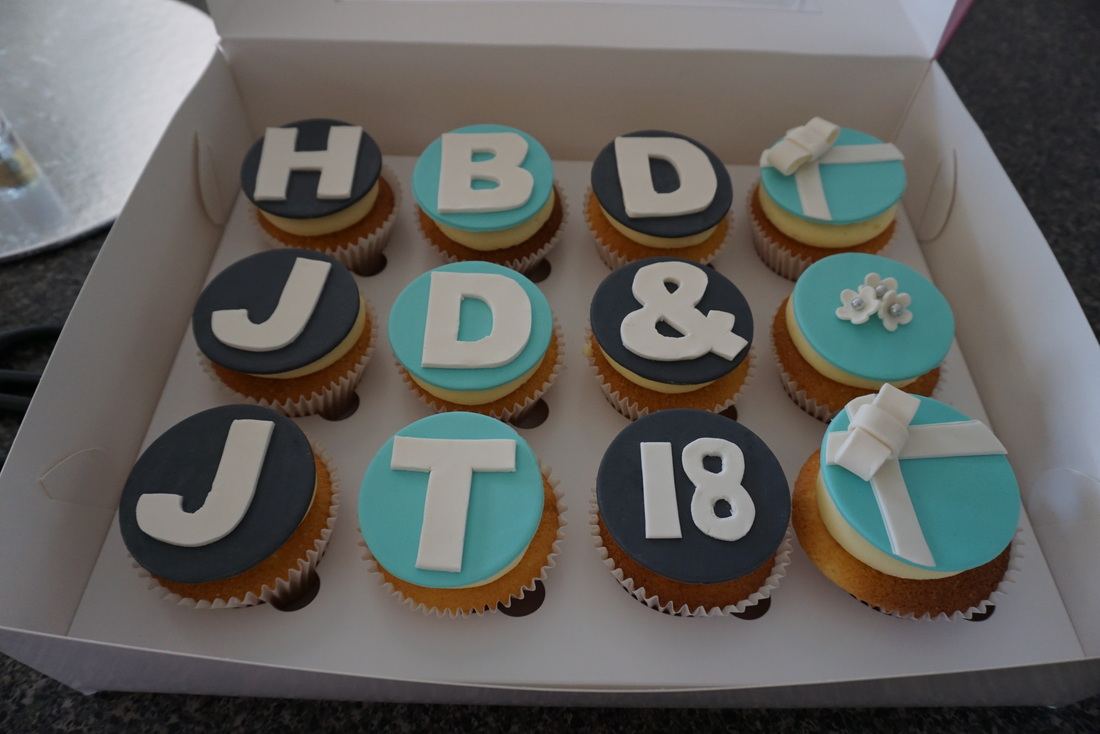 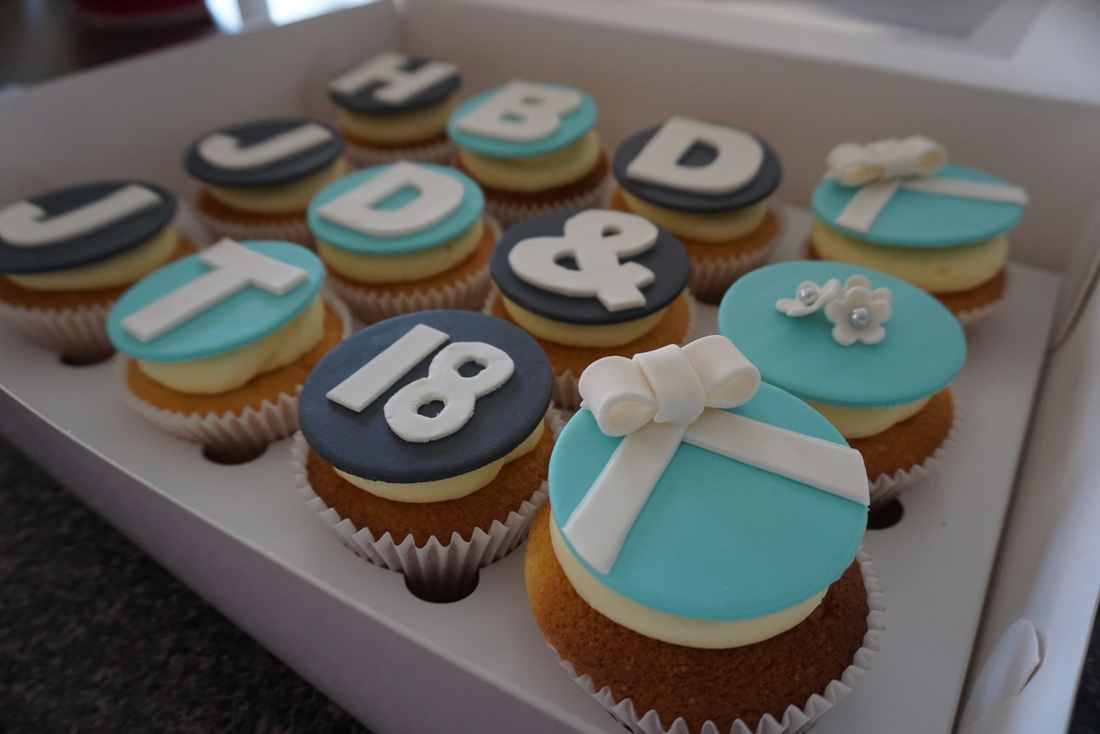 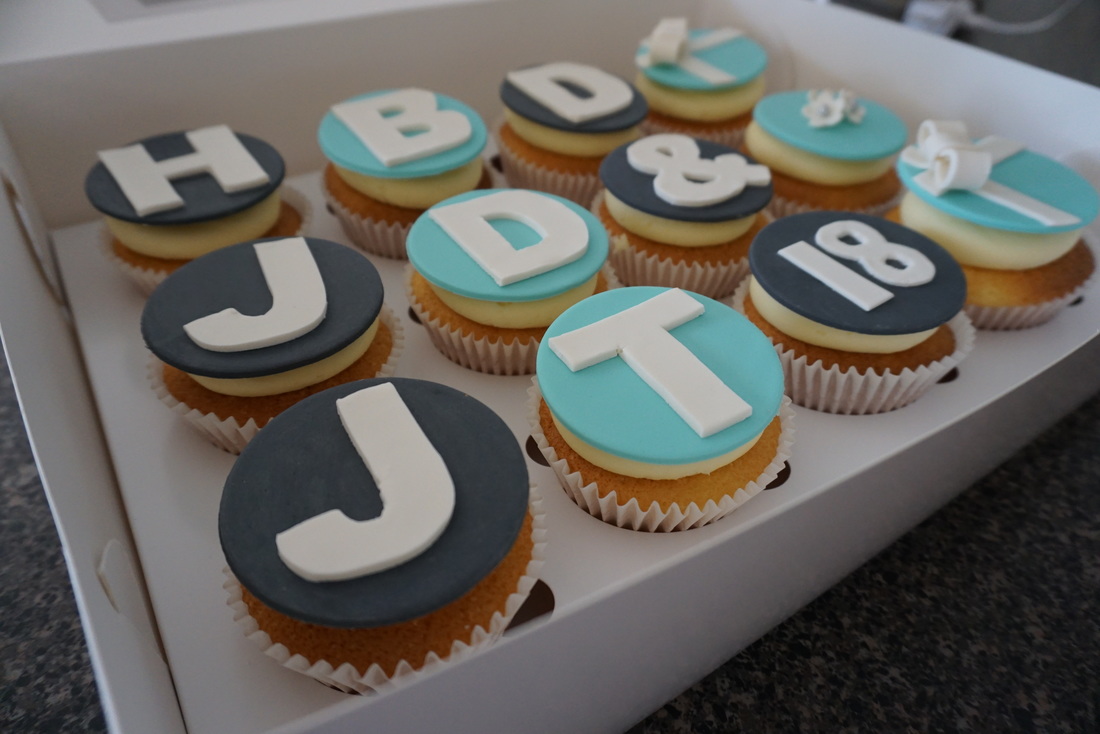 Over the past several months, Sarah and I have been talking about baking together and potentially collaborating with her YouTube channel and my blog but have never actually found the time to do so until these winter holidays! On Tuesday, we decided to film and blog a recipe we found online which were chocolate cupcakes with a cookie dough center and the minute Sarah and I saw this we fell in love and knew we had to bake it. It all started with the ingredients and preparing ourselves to film it. We had to measure out all the ingredients so the filming process didn’t drag on forever haha. Once we had finished doing so, it was time to film and not gonna lie I prefer to be behind the camera not in front so it was a little bit of a challenge for my to stand in front of a camera and be filmed on my every move but after a while it kind of got used to the idea and just went along with it. Once we had finished making the cookie dough, we had to refrigerate it and by then we were already in the process of making the cupcake batter. Going to be completely honest though, the cupcake side of this recipe did turn out a lot denser than we thought but regardless still tasted amazing! By the time the cupcakes finished baking it was time for the icing!!! Now I love decorating so this was kind of up my alley but nothing prepared me for the amount of strength I needed to get the icing through the piping nozzle! But again was all worth it in the end! If you want the recipe of these cupcakes I will leave the link to it below and also please check out the video Sarah filmed on the day because this was one crazy experience and something I haven’t ever done before but hopefully there will be more in the future?? And don’t forget to subscribe to Sarah because her voice is out of this world… hahah links down below! Phoebe xx Recipe : http://www.recipegirl.com/2012/04/09/chocolate-chip-cookie-dough-cupcakes/ Sarah's Video: https://www.youtube.com/watch?v=P13GDisHL6g 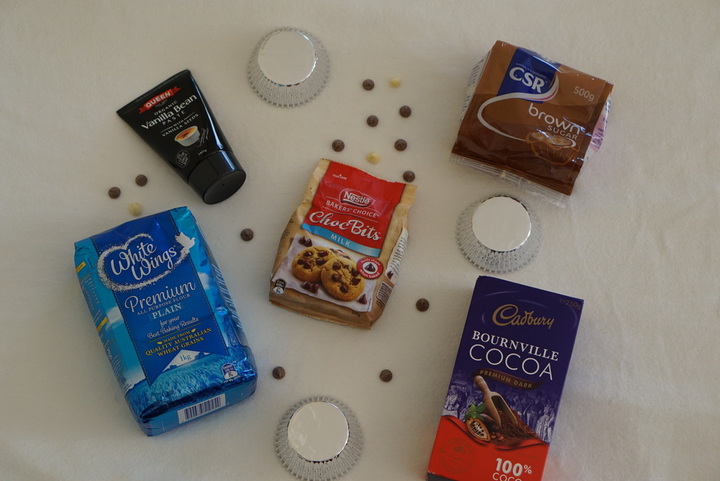 
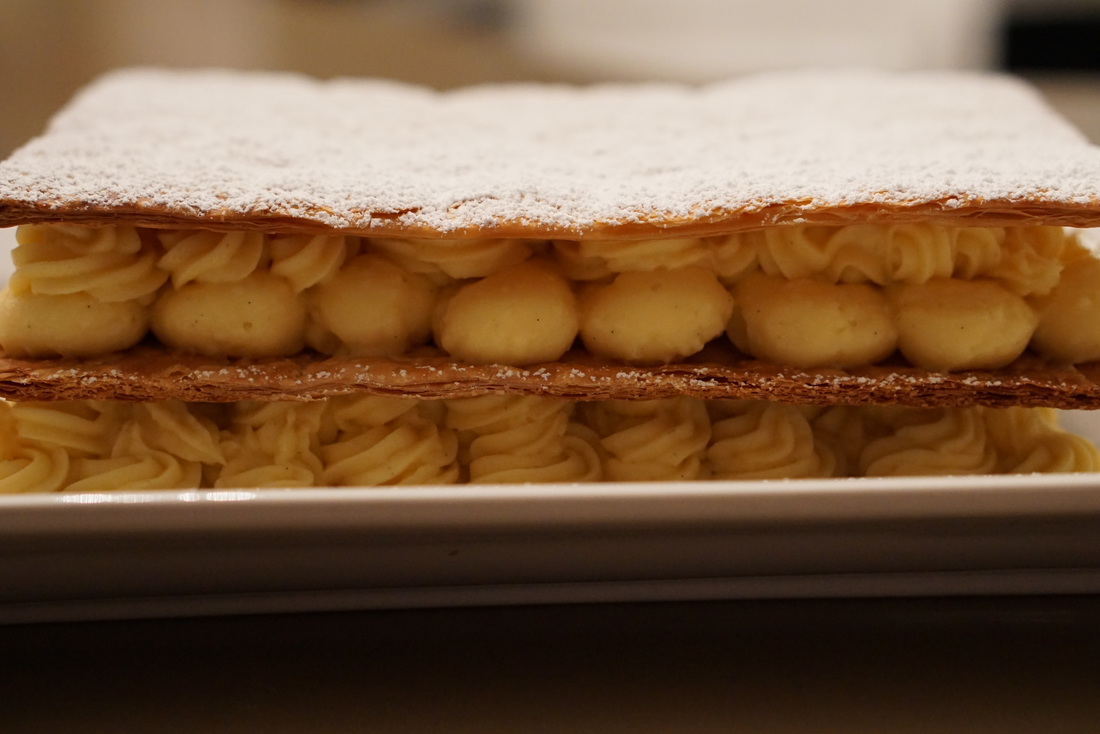
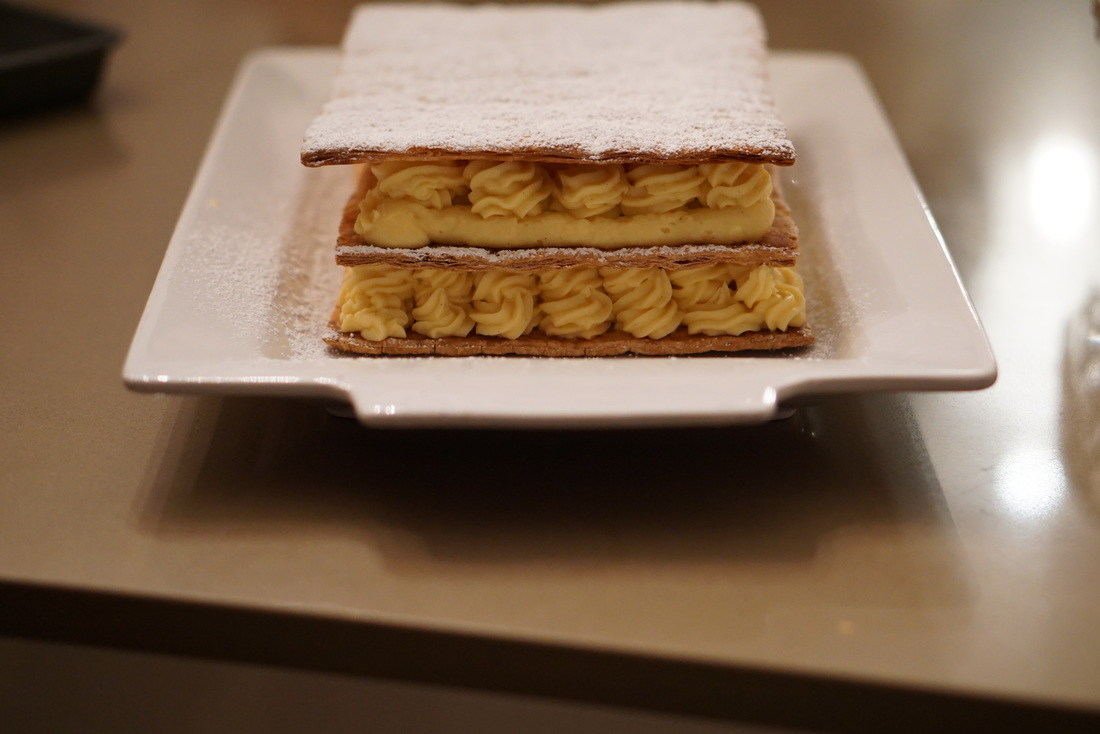
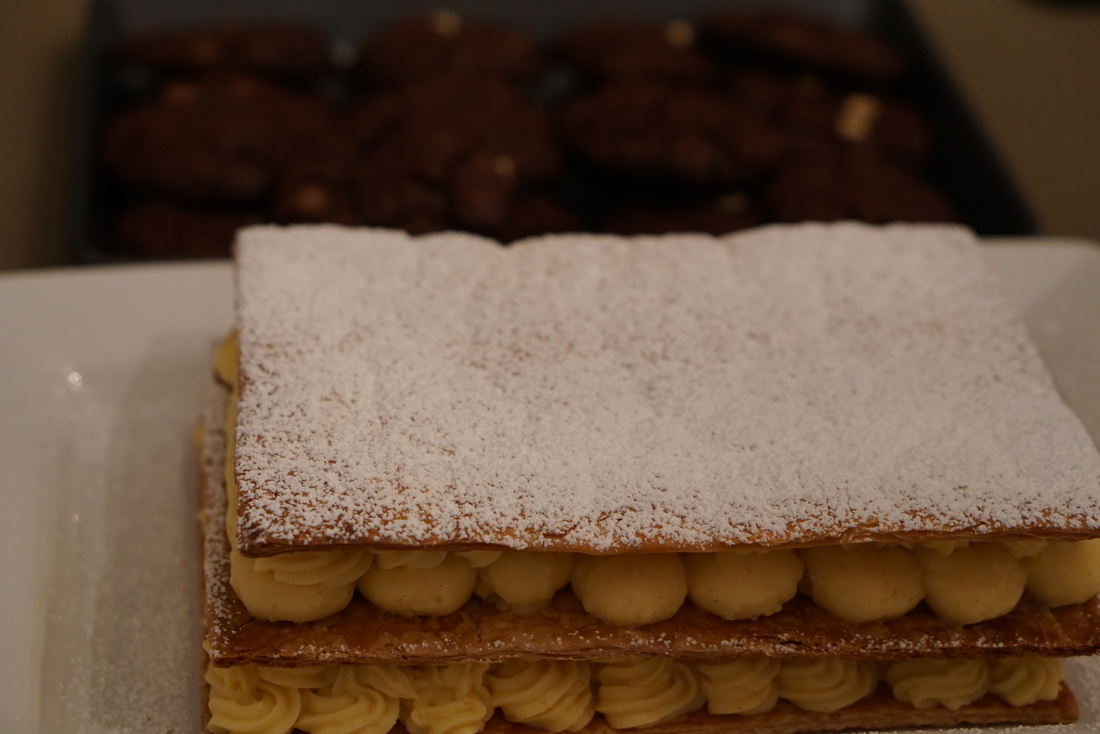
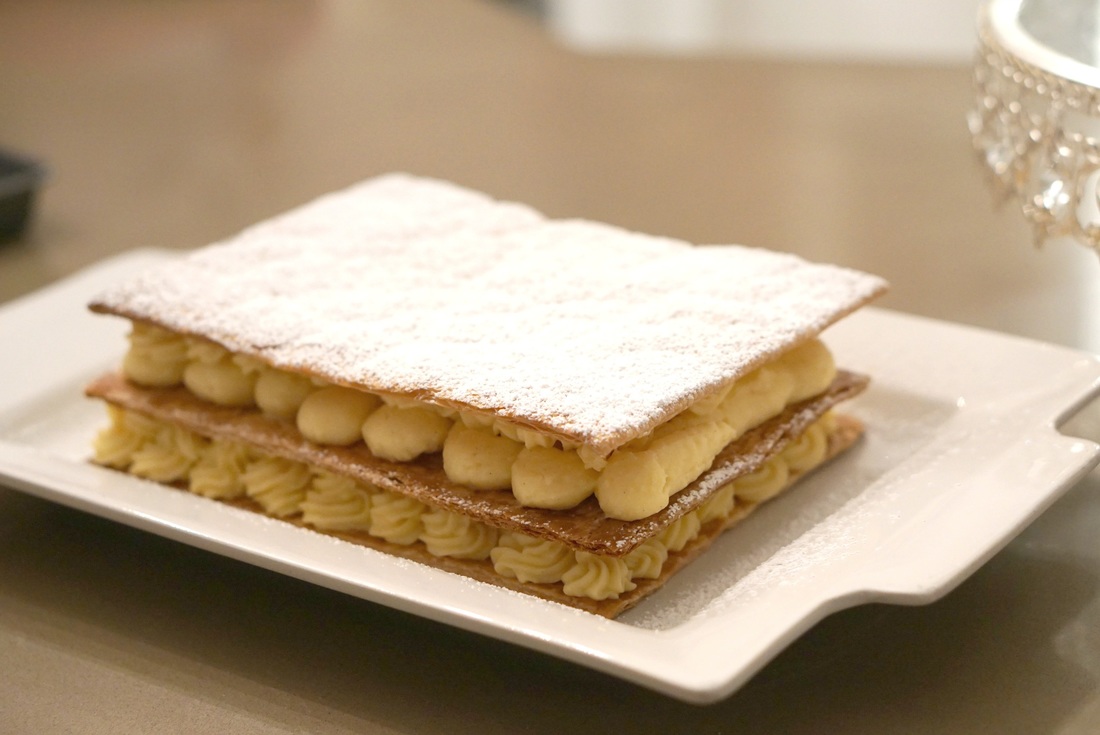
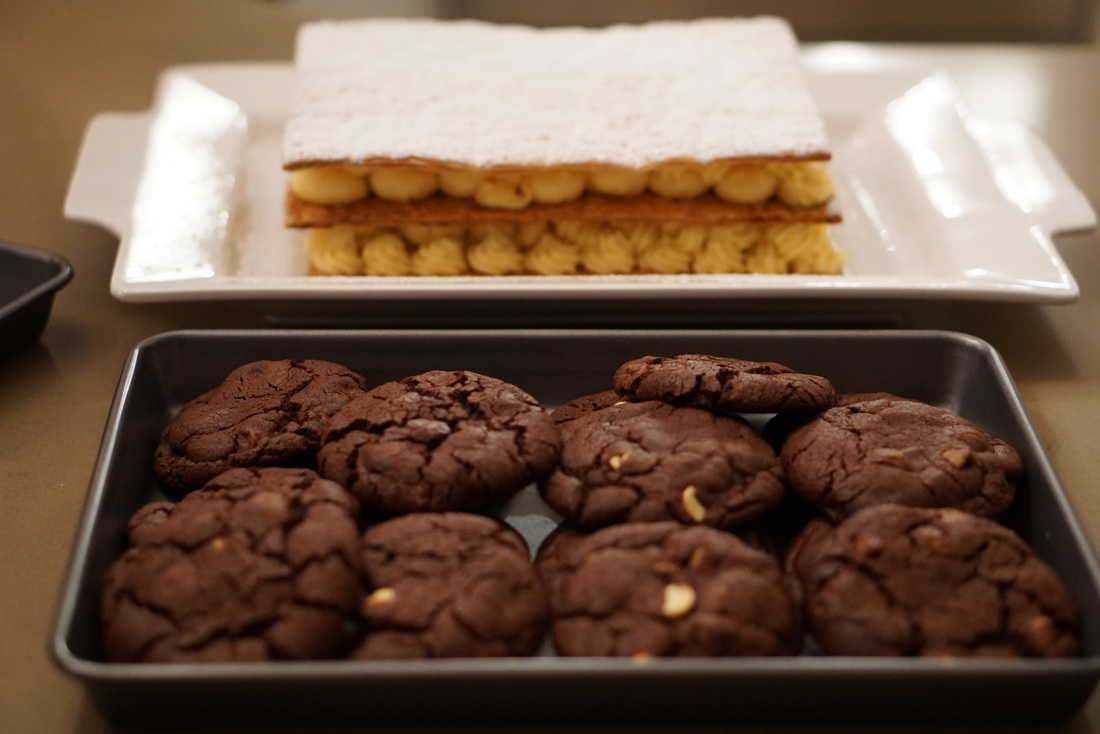
Over the weekend I had a get together with a bunch of friends and off course I wanted to make dessert so I offered and they said yes! I honestly didn’t know what to make… there were suggestions from crème brulee to tiramisu and even the chocolate cookies I have made before, so I tried to think what dessert incorporates components of tiramisu and crème brulee. It took me a while but I came to the decision of making a vanilla slice. Custard from the crème brulee and the richness and creaminess from the tiramisu. I also decided to make the chocolate cookies as they were simple to make and I had extra time on my hands. The vanilla slice recipe I used is from masterchef contestant and one of my huge inspirations Justine Schofield and I have always wanted to make this but just have never had an event where I knew people would like it. It was my second time making custard from scratch and I for one could not be happier on how it turned out. It all started with the puff pastry… once all three layers were baked I then started on the custard, as it didn’t take too long. I personally think that the hardest part of making the custard was constantly stirring it with a whisk while it was on the heat. It took about 10 minutes or so of constant stirring to get it thick and smooth. Hard work pays off because it was honestly a hit at this gathering despite the fact that we had way too much food. I made the chocolate cookies the night before and the previous blog post was on them so go check it out! Overall the gathering and the night itself was amazing and it was so good to spend it with people who I loved catching up, having a laugh and watching movies! This was definitely a good way to start the holidays and without a doubt I am definitely going to make this vanilla slice again. Phoebe xx Justine's recipe : http://everydaygourmet.tv/recipe/vanilla-slice/
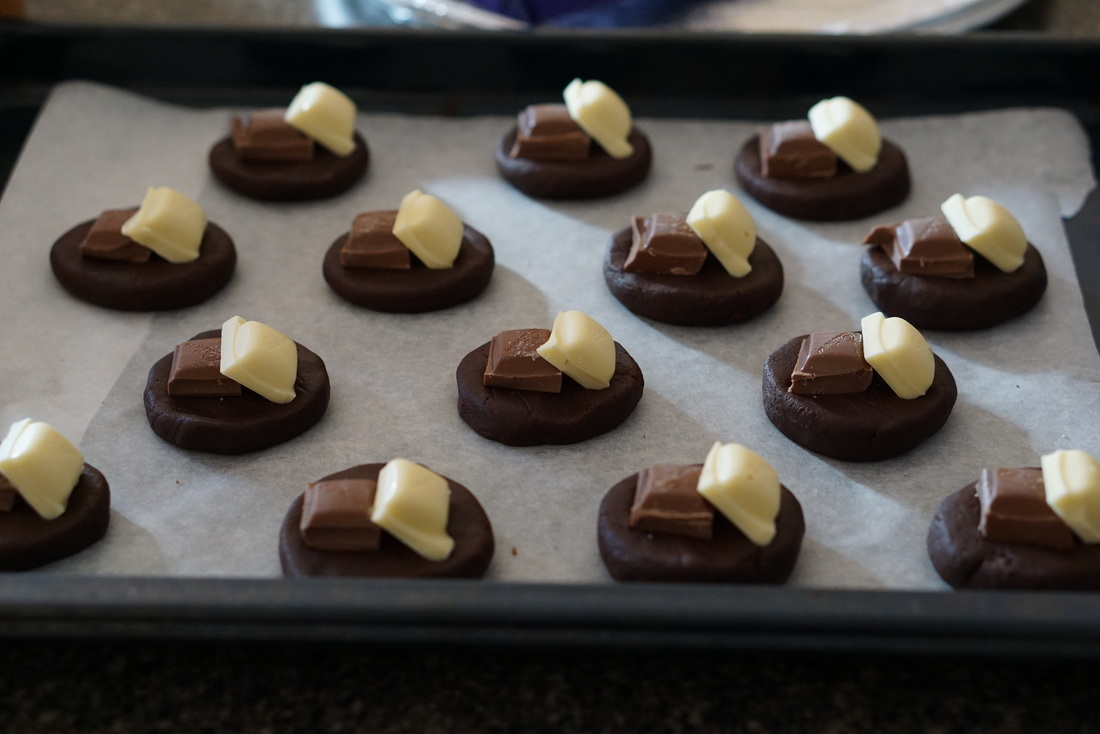
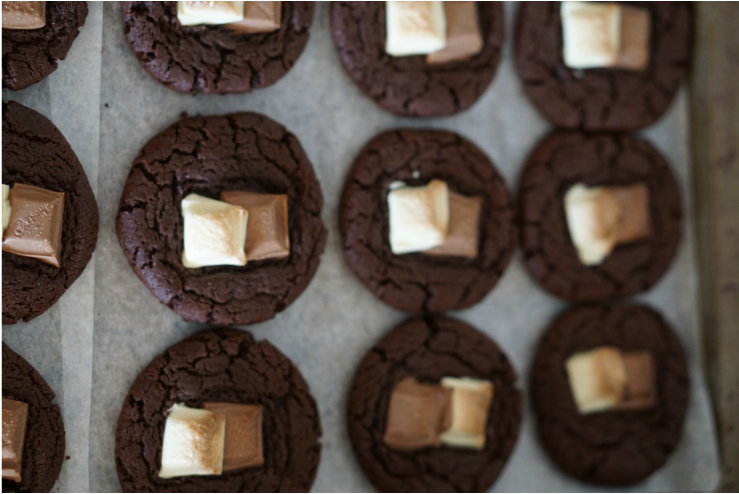
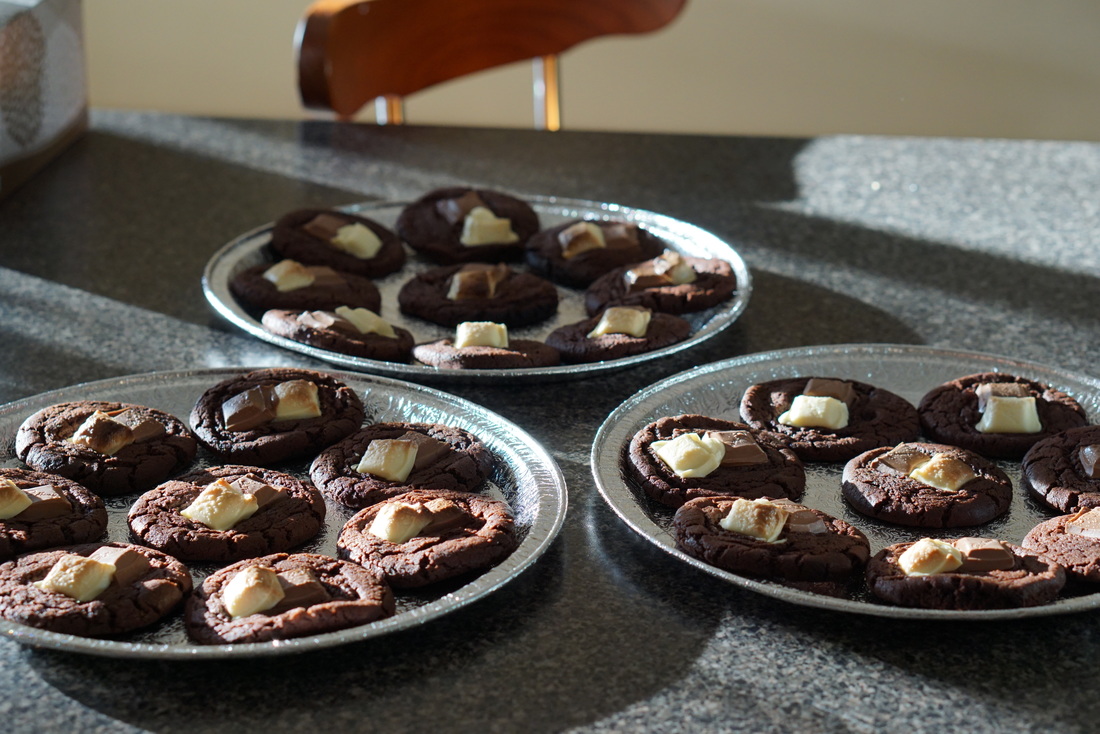
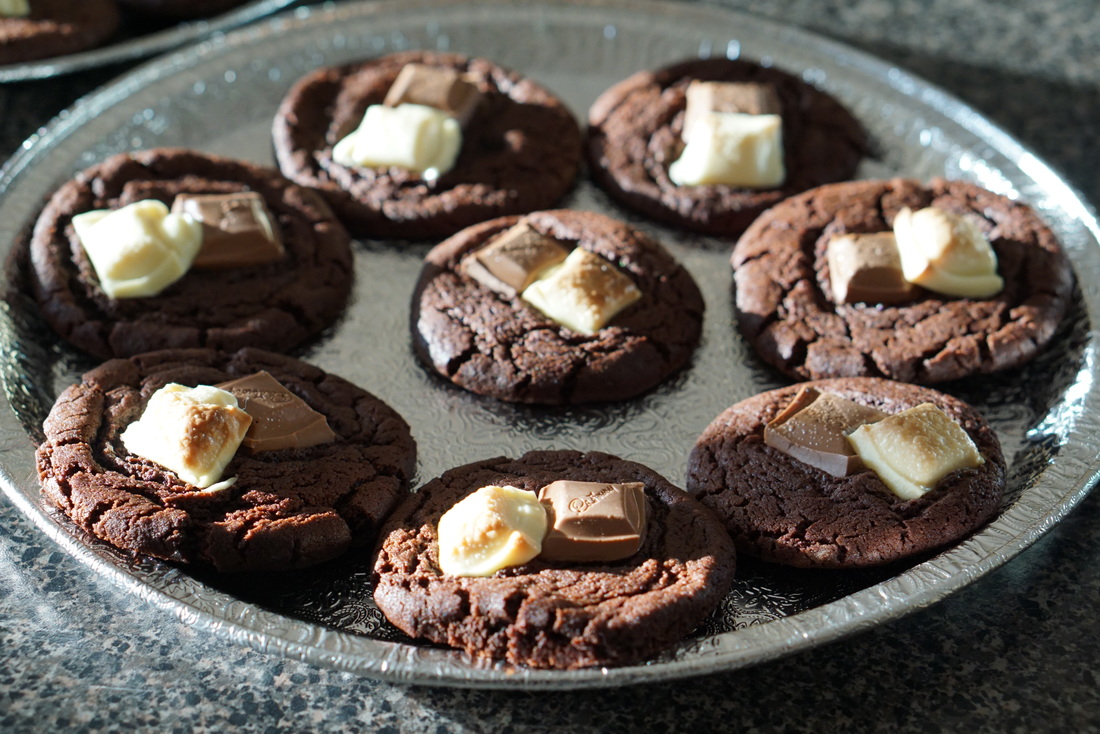
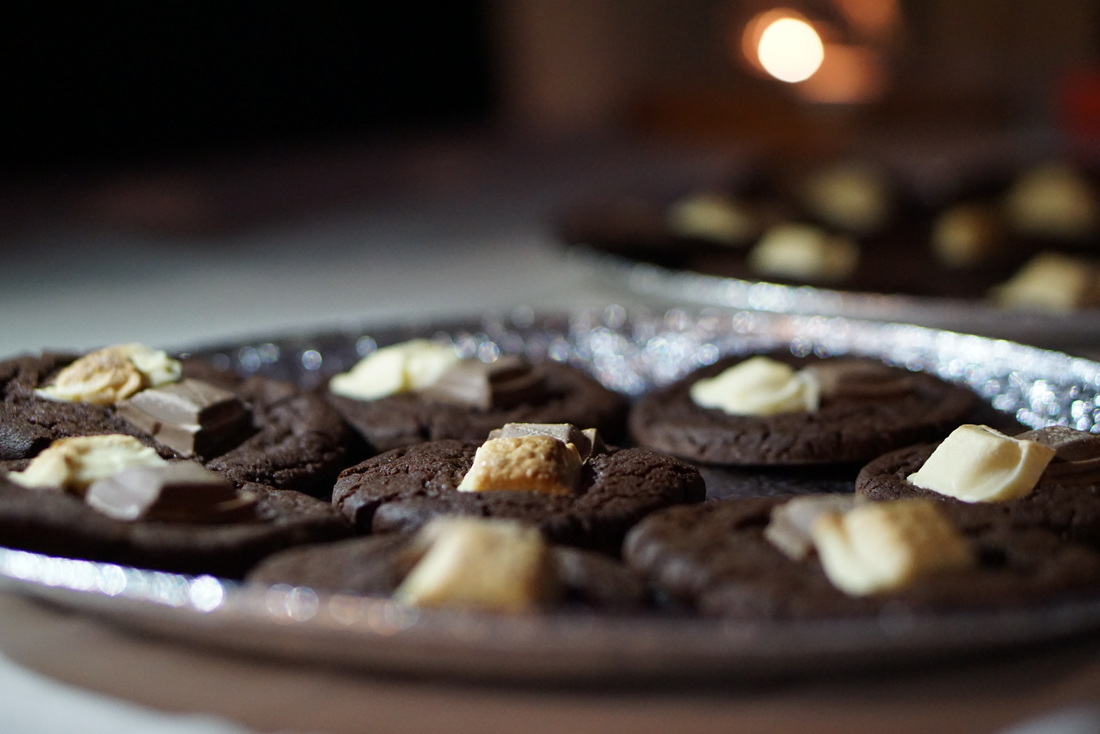
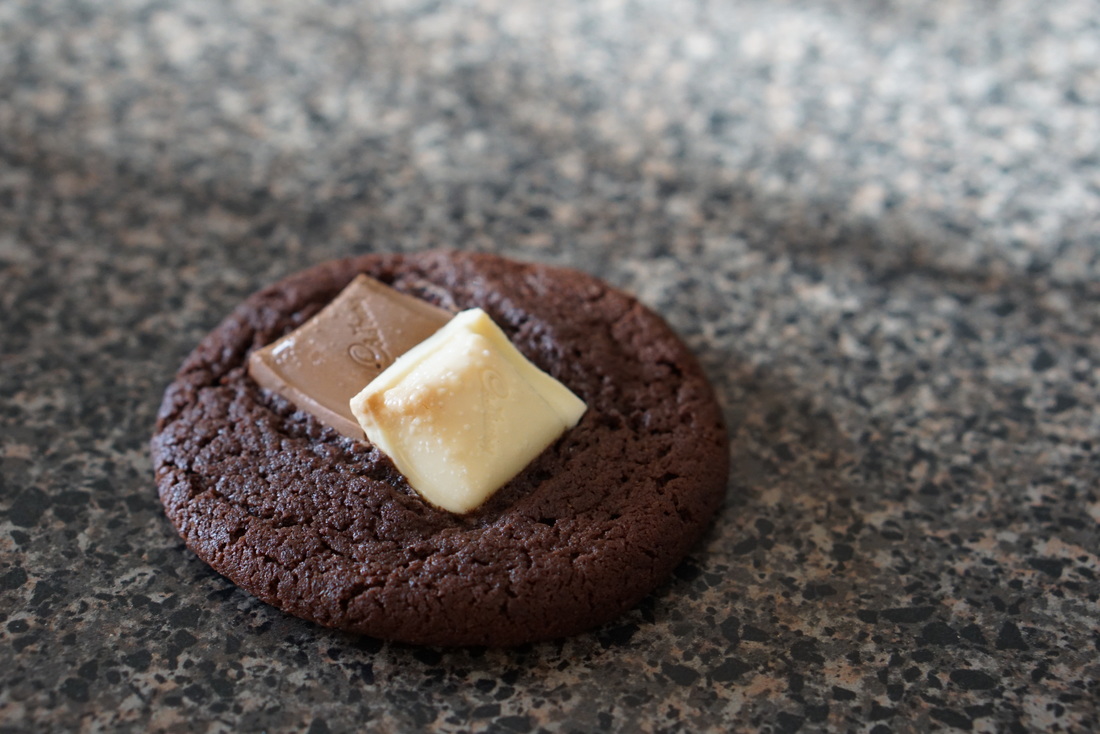
       Who doesn’t love chocolate cookies? At this point in time I don’t know anyone who doesn’t like them and after searching and searching I have finally found a chocolate cookie recipe that I am honestly so happy with and were definitely a hit at my best friends 16th birthday party. I was asked a few weeks ago to make something for my best friends 16th and at the time I had no idea what I wanted to make. I knew I wanted something simple but still tasted amazing and I guess seemed like I put in a lot of effort into. Despite these cookies looking really basic and simple they tasted absolutely amazing. I got this recipe off one of my favourite blogger and youtuber Tanya Burr who has amazing recipes and is just an inspiration in general. Not gonna lie I tweaked it ever so slightly and instead of mixing in the chocolate bits I placed them on top but nonetheless they tasted incredible. When they first came out of the oven they didn’t look cooked but after about 10 minutes of cooling they were soft in the middle and slightly crunchy on the outside and I for one love these types of cookies. So if you’re ever in need of a good chocolate cookie recipe, I highly recommend Tanya’s recipe! Phoebe xx Tanya's Blog : http://www.tanyaburr.co.uk

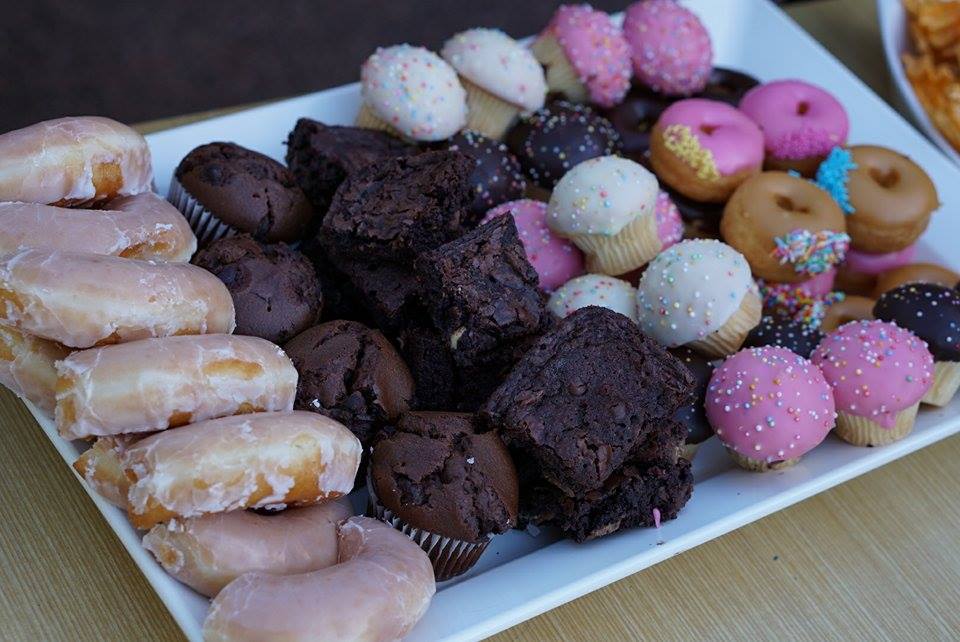
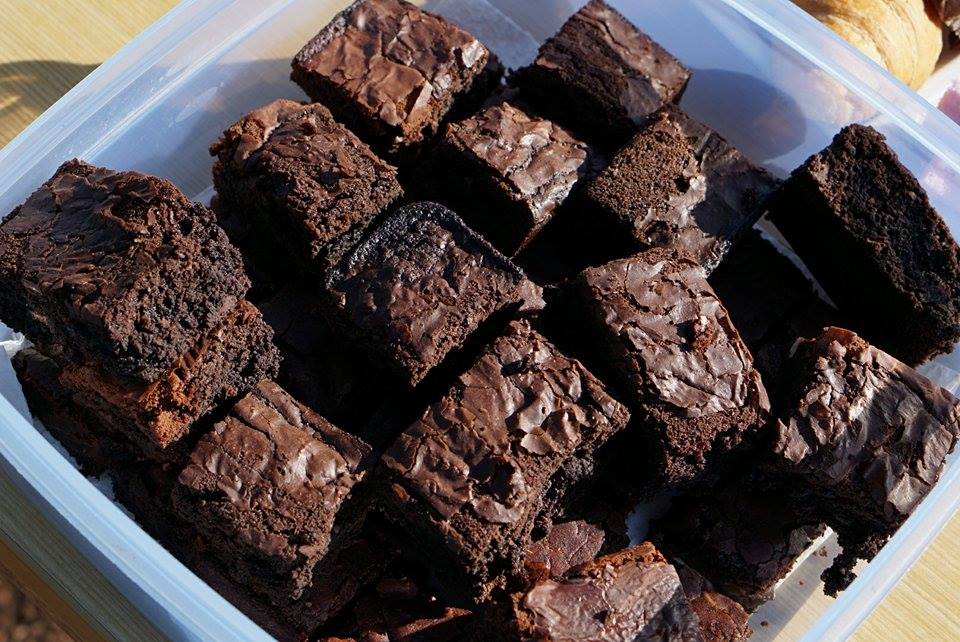
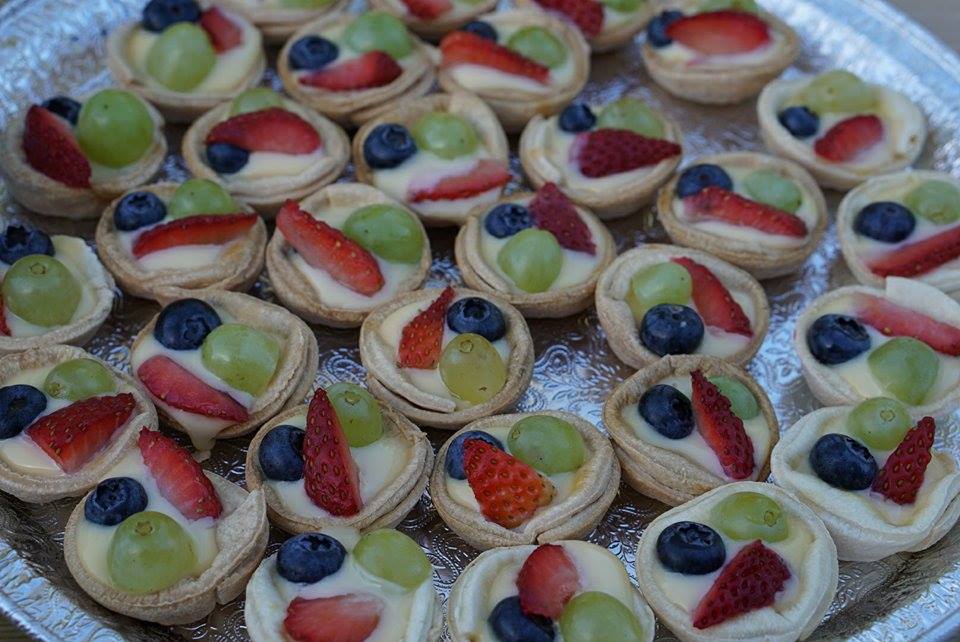
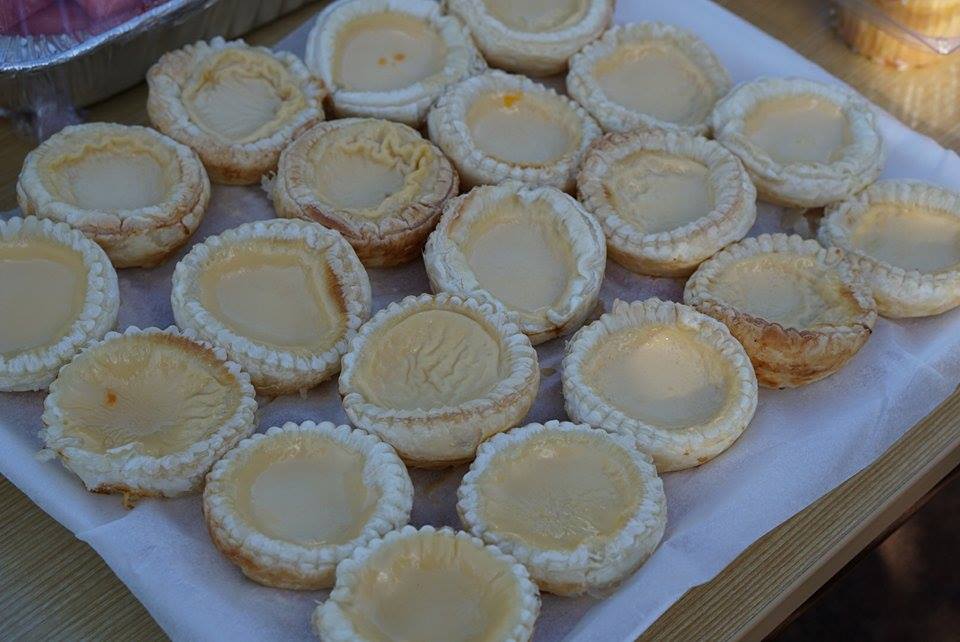
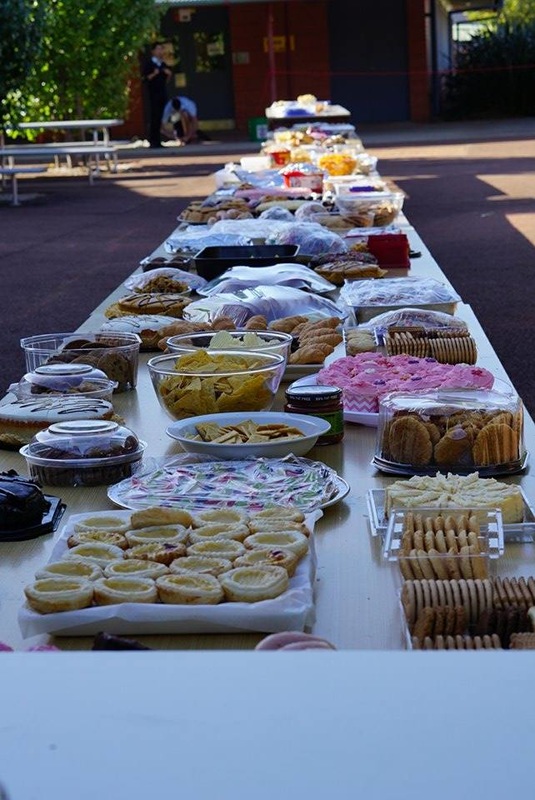
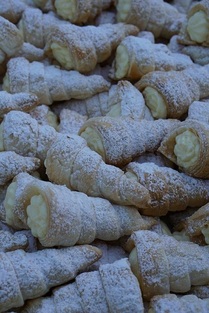
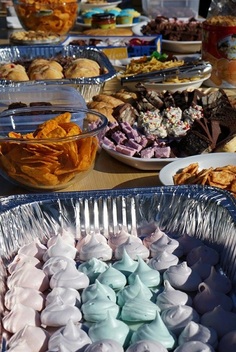
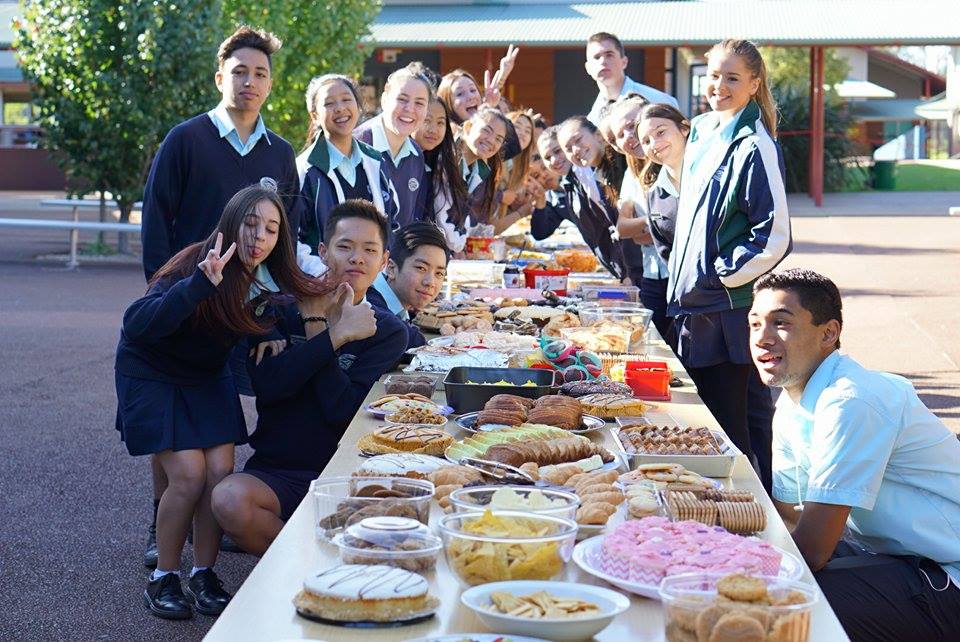
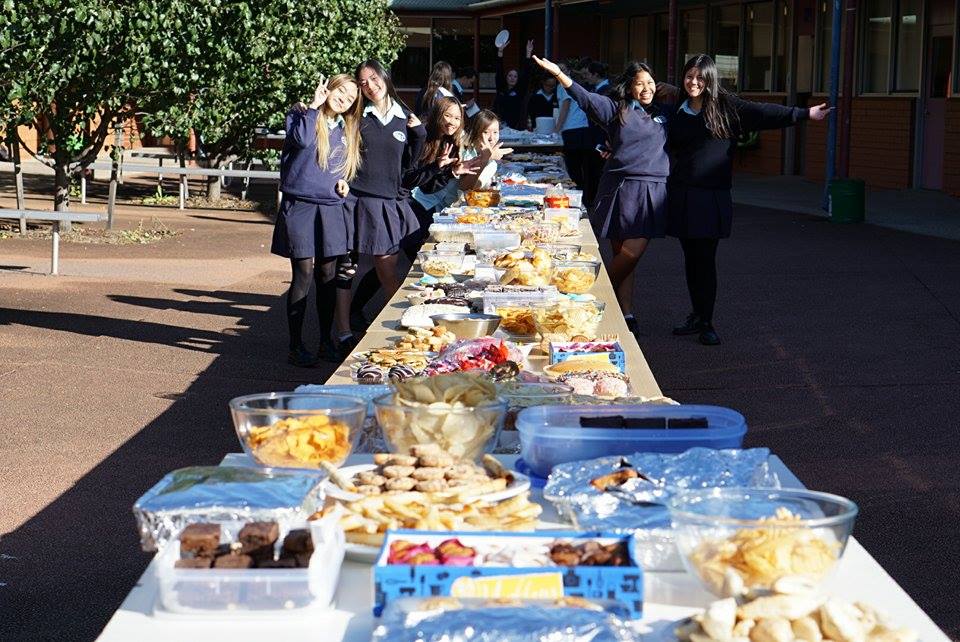
  So celebrating a 16th birthday means a lot to a lot of girls and having asked to make these cupcakes for a friends 16th party I was honestly privileged and when she told me her colour scheme I had an even better time creating them. If you don’t know I absolutely love this colour and pretty much any tone of blue. It started of with a basic vanilla cupcake and the highlight of this was off course the icing. I prepared the buttercream using simply unsalted butter, icing sugar and a splash of milk just to thin it out. I then used gel food colouring to dye the buttercream the desired colour which in this case is aqua blue and then I placed it into a piping bag with a Wilton rose tip and piped out a rose. I don’t know if its just me but there is something so satisfying about decorating a cake or cupcake especially with a rose tip! Is it just me? I hope not… Anyway this job was such a success and the cupcakes were a hit! I received such good feedback from them and in all honesty that’s what drives me to bake more! Not gonna lie this was a fairly easy job but it made it just that extra special having it being made for a 16th Party. Phoebe xx 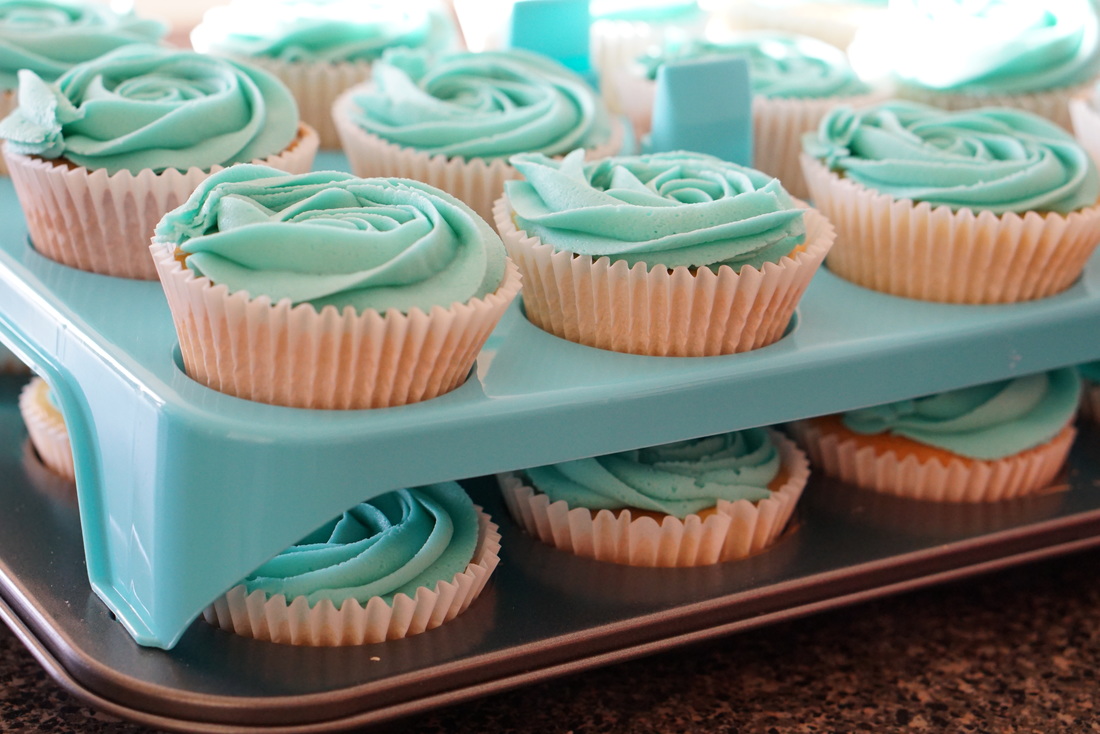 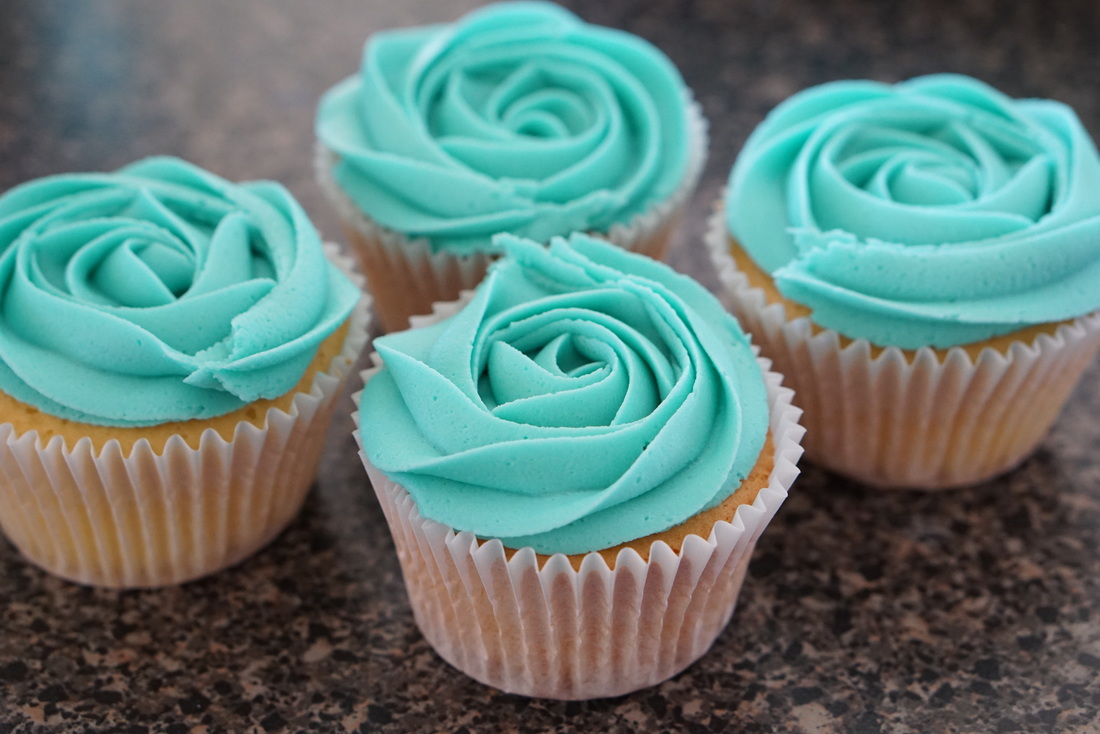 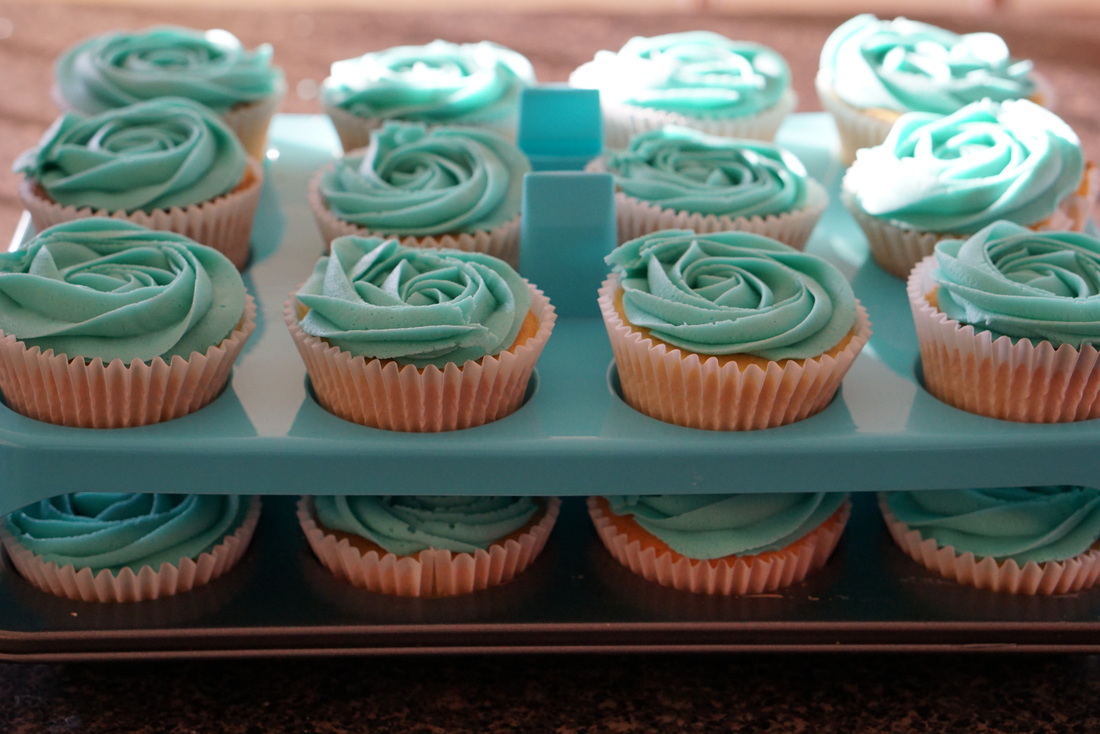  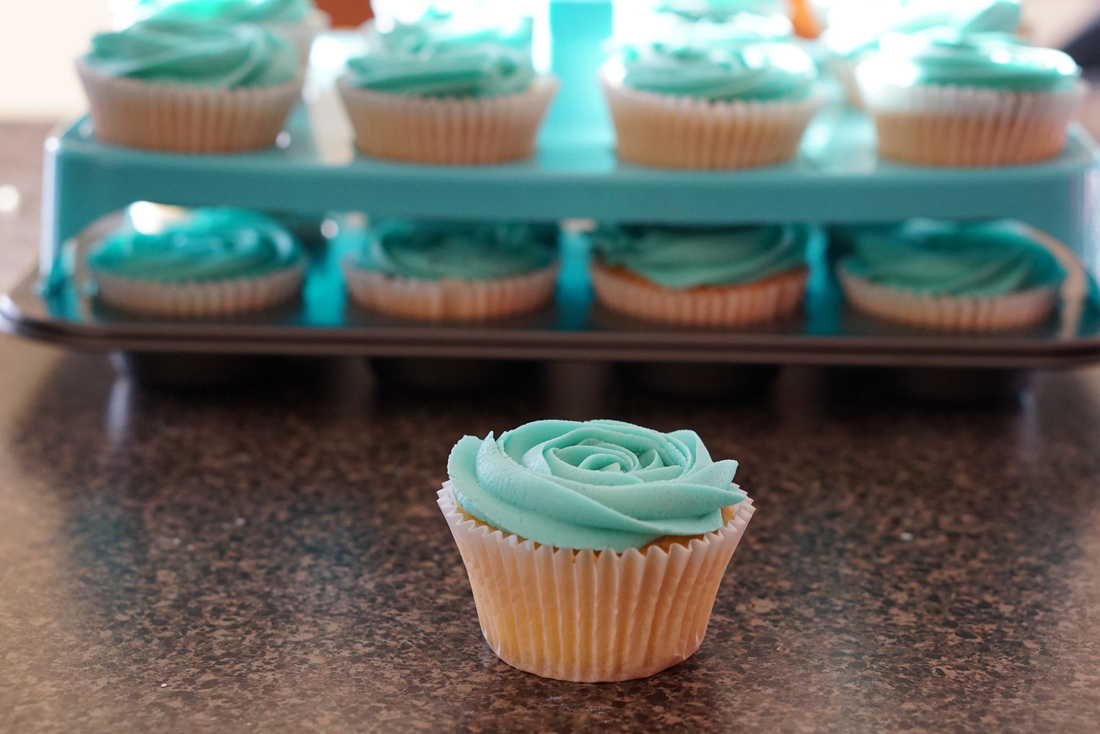 On the 13th of May 2015 I had the honor of helping to organize a Biggest Morning Tea at school. There was about 400 people expected to attend which consisted of senior students and teachers. Not expecting how big of a job it actually was to plan this event, my friends and I with the help of our year advisor managed to organize this event within only a few weeks. Everyone in my grade was asked in to bring in some food that they would have at a morning tea. There was a range of party pies, cakes, cupcakes, lots of brownies, cookies and so much more! I decided to go for something simple and easy so I went for pastel meringues. Not only were they simple but were definitely a hit at this event! I made pink, purple and blue bite sized meringues. They fit perfectly for the weather and looked perfect on the long line of tables filled with food! 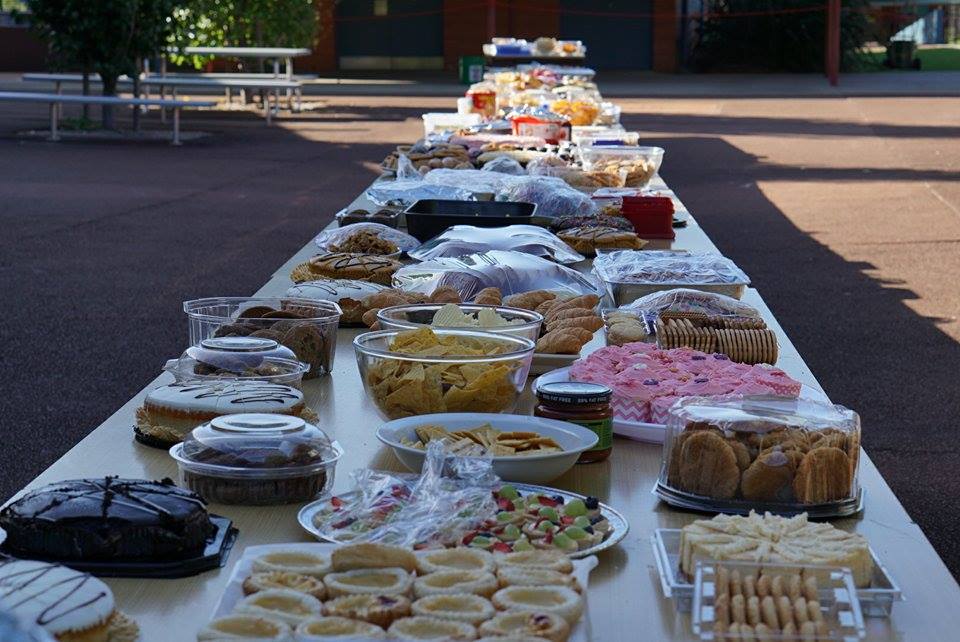 Very long row of tables filled with the massive range of foods. 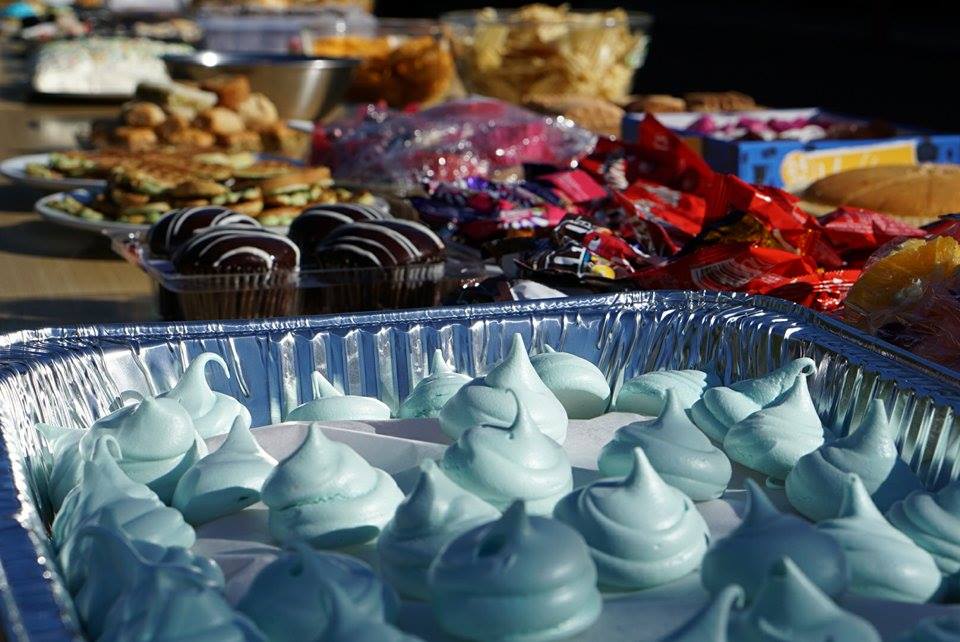 Just one tray of meringues I made with the tables of food.
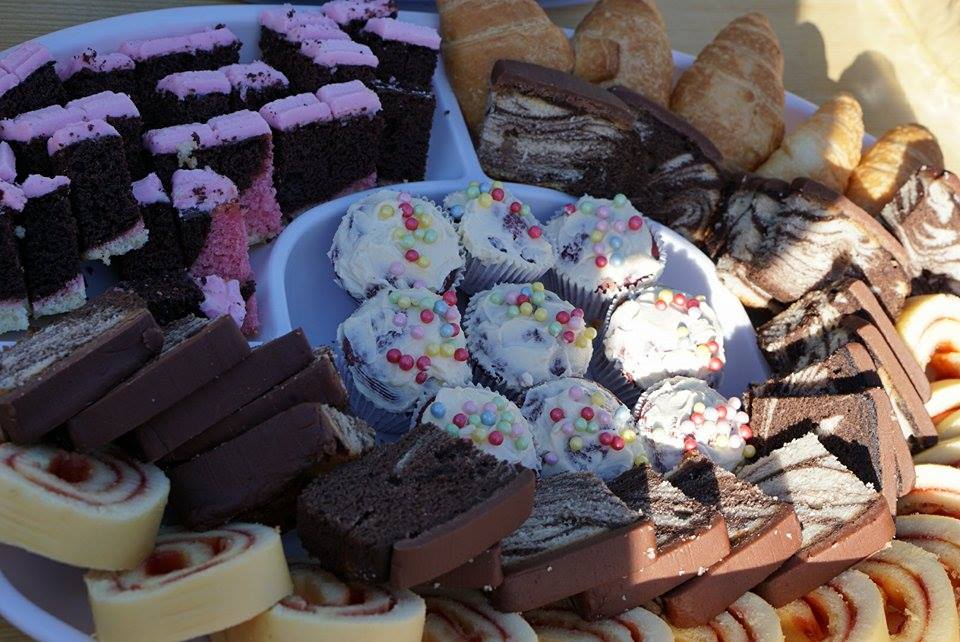
Only some of the other foods people brought in. There was a lot more.
 Overall this was a huge success having raise about $1000 which was so overwhelming and we hope it helps the cancer council because every dollar counts! Once again a massive thank you to all these volunteers for helping set up on the day and thank you to everyone who contributed into making this event such a success!
Phoebe xx This cake was a cake that (a) I had no idea what I was doing and (b) didn’t know what to expect, but it honestly turned out better than I expected and everyone at the party gave such amazing feedback! I started off by baking 2 square shaped chocolate cake slabs and then one I completed that I made a chocolate ganache to ice the entire cake and use as a base for the fondant. While waiting for the ganache to slightly set I started rolling out and cutting the fondant squares needed for the outer layer of the fondant. I kneaded some red and black gel food colouring into the white fondant . After about an hour I covered the cake with a thin layer of white fondant and then mixed some icing sugar and water to stick the mini square pieces to the outside of the cake representing a minecraft block. In all honestly I didn’t know how I wanted to stack the black squares but I knew I wanted it to act as a border so all I did was put 2 rows of them all around the cake then placed some more random little ones so it had different heights. After finishing that I placed the red squares randomly on the top of the cake and then made a royal icing with red food colouring and wrote Happy 8th Birthday! Overall this cake turned out great considering I knew nothing about minecraft and had no initial plans for the decorating. 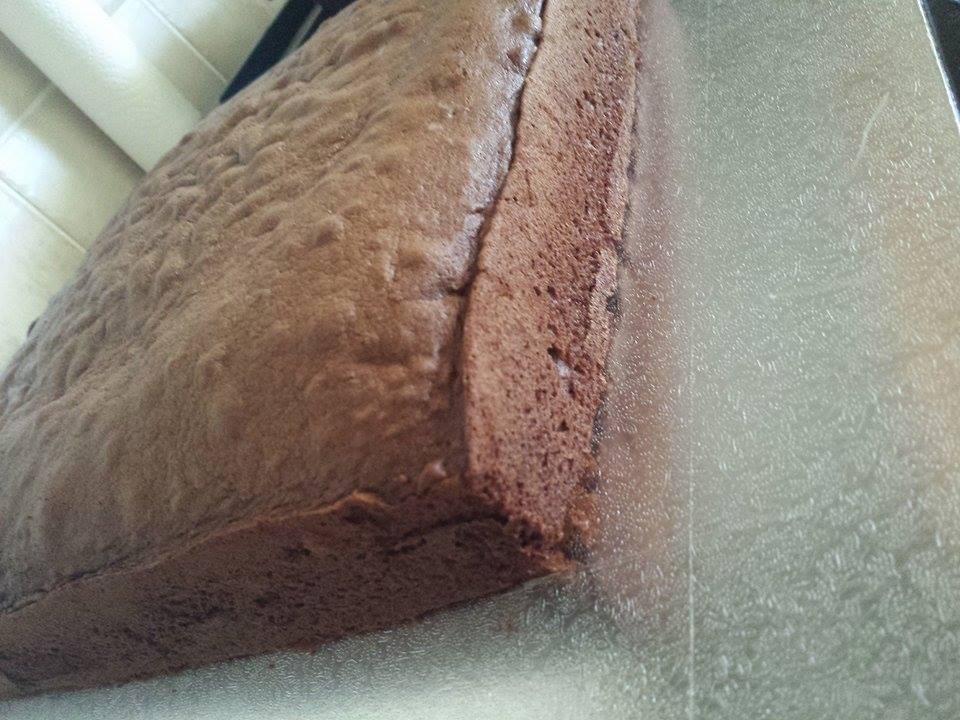 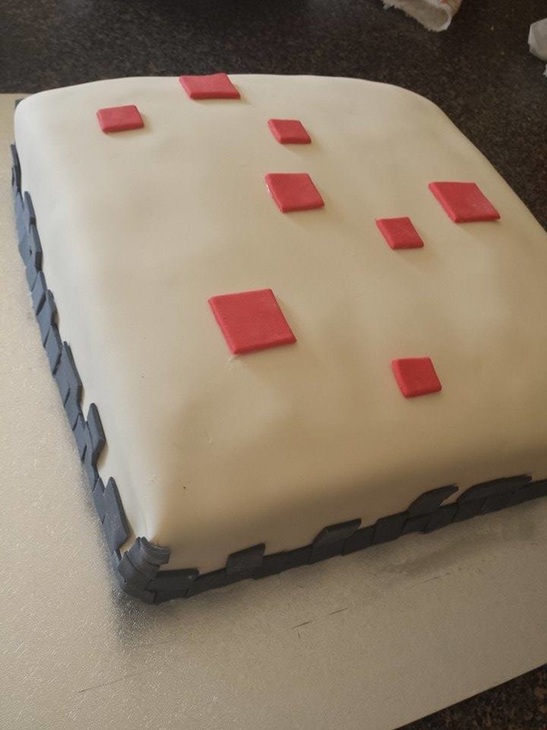  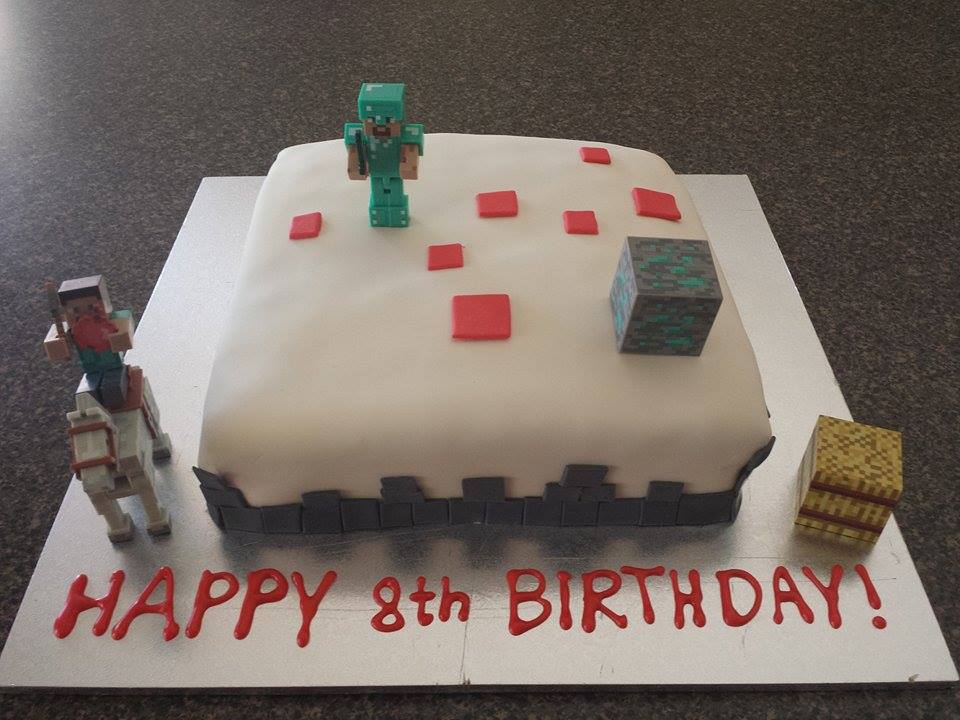 This cake was made for my cousins boyfriend as a surprise and honestly it was so much fun to make despite probably all the kneading of fondant to get the colour we wanted. The first thing I did was bake the cake and as usual, this was just a plain vanilla sponge cake with buttercream sandwiched in between the 2 layers. I then made 12 vanilla cupcakes as an extra which was also decorated with buttercream with silver pearls. The second task was to knead and roll out the fondant to cover the cake, and also make the letters, numbers and transformer face. Now this was a mission in itself seeing as the fondant came in white so luckily with the help of my cousins and a whole heap of gel food colouring we managed to get the desired colours that were required to create the cake. Third task was to cut out the shapes, letter and numbers that topped off this cake and luckily we managed to find a stencil online so we traced that on paper then cut it out and used that as a guide to cut out the fondant pieces The final task of this cake was assembling and it started with covering the cake with black fondant and cutting a long strip of yellow fondant to outline the cake. After this was done I created a glue using icing sugar and a few drops of water to stick the transformer on top of the cake as well as the letter on the cake board. 4 hours worth of kneading and baking and cutting and everything else involved, we finally had a complete cake which my cousins and I were super proud of! Phoebe xx  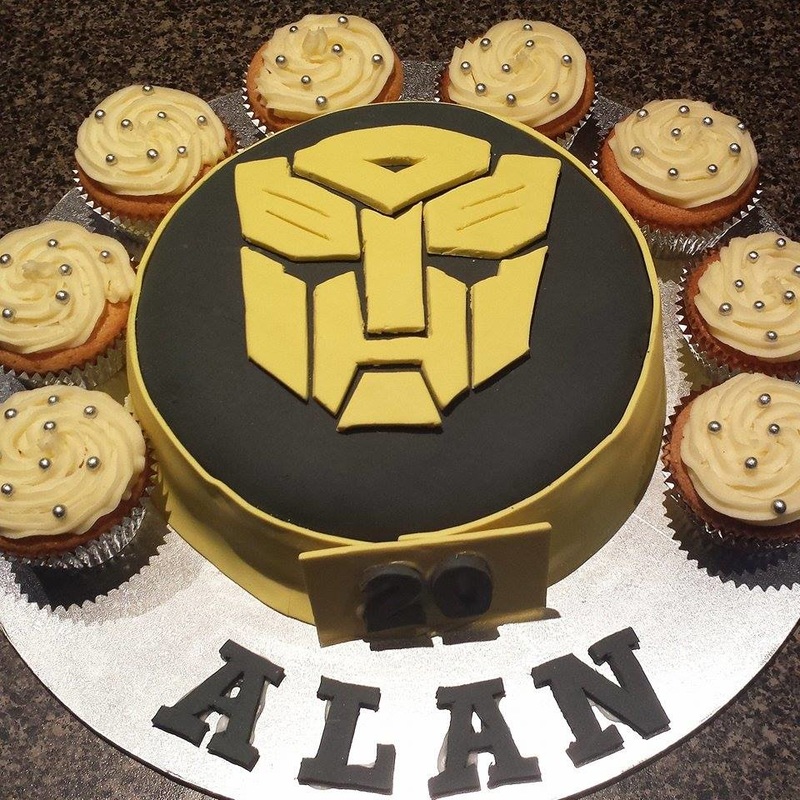  This was a last minute cupcake idea I was asked to make for my cousins 5th birthday. I asked her what she wanted and immediately she asked for something red (ironic really because her name is Ruby) so off course I gave into her and thought of something I could do that was red. My initial thought was to make red velvet cupcakes which I did but I knew there was something else I needed to do to show a vibrant red so I made a basic buttercream which consisted of unsalted butter, icing sugar and a splash of milk and added a touch of red food colouring. Once I finished piping the icing onto the cooled red velvet sponge it looked a bit bare and needed something to lift it up and add some sort of texture so I asked her again what else she wanted to have on her cupcakes and she said her name. This was a challenge because I wasn’t sure what to write her name with whether I would use royal icing or melted chocolate. I came to the conclusion of using melted milk chocolate piped onto a sheet of baking paper (also known as parchment paper) and allowed that to set hard before I transferred it onto the cupcake. The end result was 24 cupcakes which everyone loved but most importantly the birthday girl was beyond ecstatic with how it turned out and in all honesty I was too. Phoebe xx 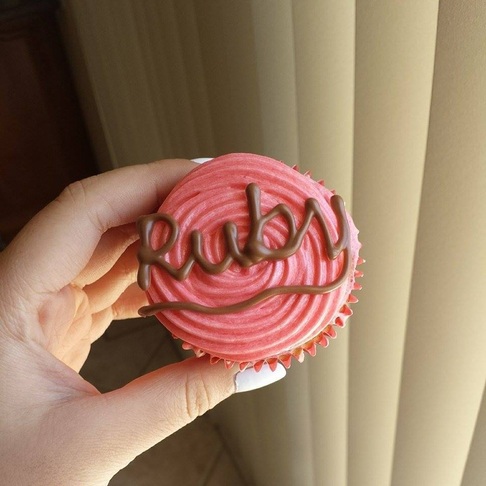 I don't know about you but one thing I would love, is to be taken away to a tropical island far away from urban destinations like the city and just relax and drink fresh coconuts. Well making this cake thats what I imagined myself doing and hopefully you can agree with me that this cake has some tropical vibe to it as well as the cake table setting. This cake was something I made for a first birthday party over the weekend. It took about 2 days to make and was also my first time making a 2 tiered cake. It turned out just the way I wanted it and I received such amazing feedback from family and friends who attended this first birthday. Whichever way you see it first birthdays are extremely special and I was truly honoured to make this cake for this purpose. 
It was a plain vanilla sponge cake that was covered in buttercream. Each tier contained 2 cakes sandwiched together with a mango icing I made which gave it that tropical vibe. The mango icing contained butter, icing sugar and mango puree all mixed together in a stand mixer for about 3 minutes. 
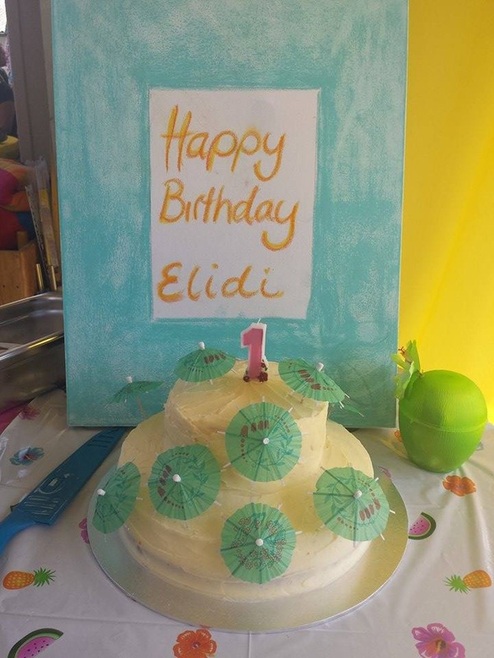
Final product! I simply placed mini umbrellas all around the cake which gave it a simple but tropical feeling to it! Less is more. 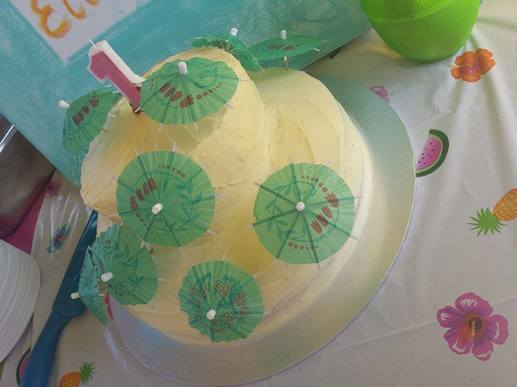
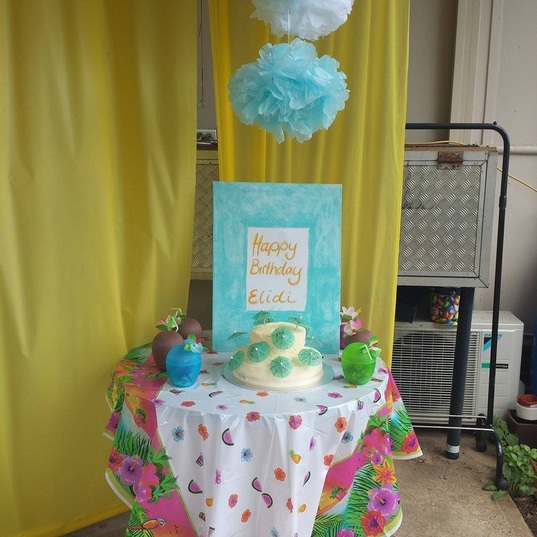
Phoebe xx
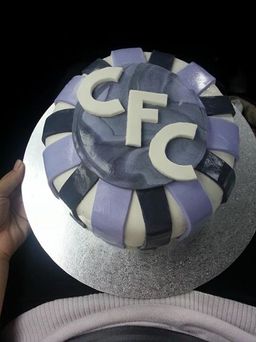
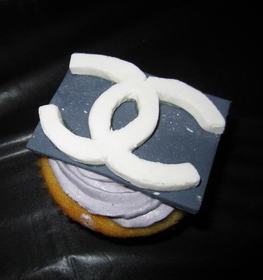
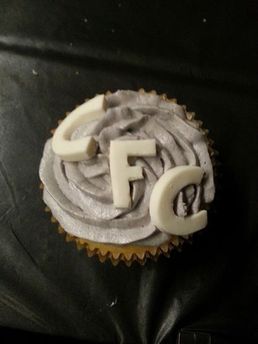
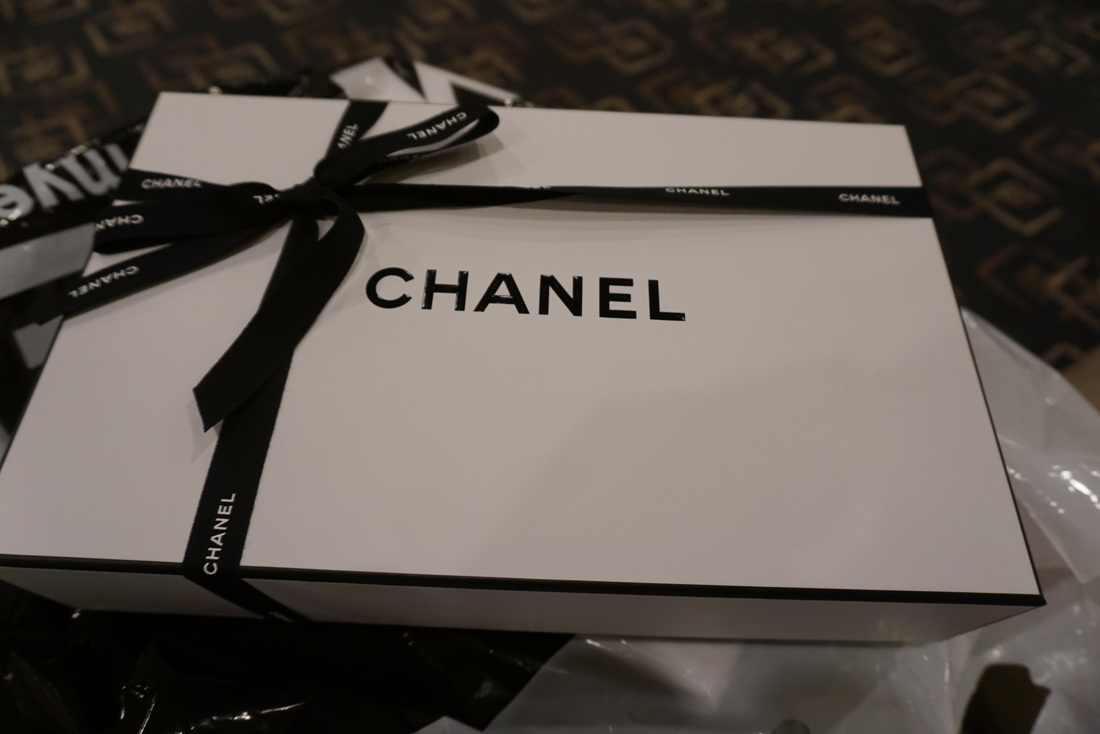
I have baked a fair bit of sweets and desserts in my life but nothing could have prepared me for the amount of chocolate that went both into and onto this cake. This cake was made for my cousins 4th birthday and it consisted of a chocolate swirl cake with chocolate frosting. This was then decorated with a whole heap of Kit-Kat bars and an entire bucket of m&m’s. It took a full day to make it and honestly everyone loved the end result and so was I. This cake all started with the sponge cake, which in my opinion was the easiest, but at the same time the hardest part of the cake. It was a simple chocolate sponge but had vanilla cake mix swirled throughout it. Once I had baked it, it was time to ice it. I simply used a spatula to spread the frosting all around the cake. I then melted some milk chocolate to use as a glue to stick on the mini Kit-Kat around the cake! The last step of the construction of this cake was pouring the m&m’s all over the top of the cake. Finishing touches of this cake included a colourful ribbon and off course a candle! Overall if you know a chocolate lover, I highly recommend making this cake for them! Simple but decadant! Phoebe xx 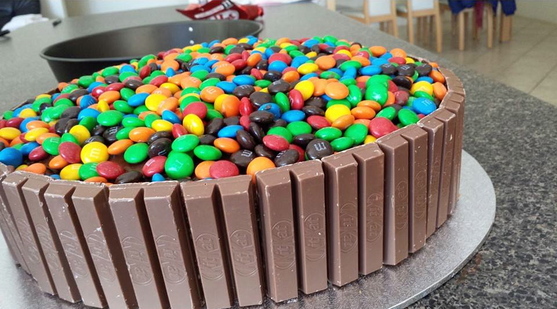 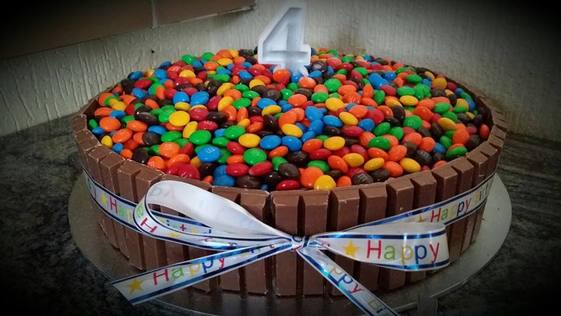 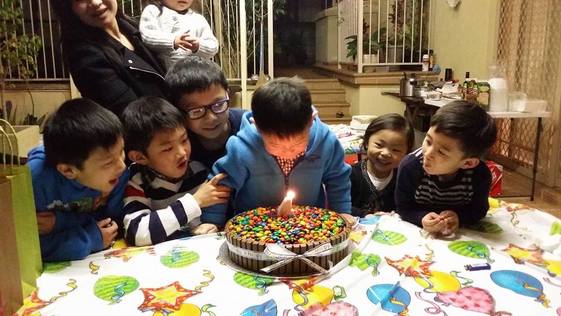 A macaron is a french sweet that is a meringue based sweet consisting of egg whites, icing sugar, granulated sugar, almond meal and food colouring. The filling generally consists of ganache, buttercream and/or jam sandwiched between two biscuit pieces. They are a technical dessert to make but the end result is exceptional. Personally I love macarons! I see them as a sweet treat from time to time. I mean yes they are difficult to make but I think once you get the hang of it you will be making macarons on a weekly basis! Don't get me wrong I really enjoy making them but sometimes its great just to buy a few and enjoy them with a cup of tea. My favourite place to purchase macarons is either Adriano Zumbo Patisserie or Laduree in the city. They have a large variety of different flavours for you to choose from and each and every one of them is delicate and delicious. These ones I have made are Salted Caramel flavoured and whenever I make them they will disappear within about 2 minutes. A crucial part of making the macaron is off course the meringue. Egg whites need to be at the right peak and once you have piped them out onto some baking paper or a silicone mat, it's setting time determines whether your macaron shell/biscuit have feet or not. Setting time is important because it sets a thin layer on top of the shell which when you bake it it then creates feet on the bottom of your macaron shell. It also leaves a smooth finish on the top of your shell so it looks appealing. If you have a sweet tooth but haven't tried a macaron… I highly recommend trying it at least once in your life! Phoebe xx 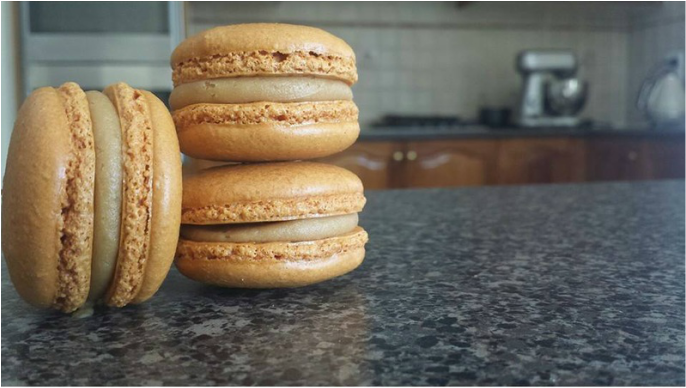 Don't you love a surprise? Well this surprise was planned a good month in advance! This cake was for a dear friend and also zumba instructor, Christian for his 22nd birthday! On a zumba night, he hosted a theme night and the theme evolved around the 90's seeing as he was born in this decade and everyone was pumped up for it and so was he! Little did he know that everyone was going to rock up to his classes earlier dressed up with balloons shouting SURPRISE as he walked onto the stage from backstage. I had the role of making the cake and cupcakes that represented him so I decided to go for his initials (CFC) and the Chanel logo because he loves Chanel! (I mean who doesn't love Chanel?) I prepared this design a week in advance and started making letters and logos out of fondant for the cupcakes first so they they could hold its shape once I placed them on the cupcakes and cake. Once these were done which took about 2 days it was time to start baking. It may not seem like it but this cake contained four layers of cake and I decided to colour them Yellow, White, Blue and Purple. It took me an entire day consisting of about 6 hours straight of baking to complete all 4 layers and to begin to assemble the cake. I made a basic buttercream to decorate the cupcakes, fill between each layer and to use it as a base for the fondant to stick when I covered the entire cake. On the day of the party I then added finishing touches to the cake which involved placing the charcoal and purple strips of fondant onto the cake as well as the round base for his initials. I transferred buttercream into a piping bag and had the cupcakes and logos I made in a box and brought it to the venue to pipe and decorate there. It was a huge rush getting things into place and placing everything onto the cake table but the reaction we all got out of Christian was what we all hoped for and he seemed to love the cake and cupcakes so hopefully that was one birthday to remember even though he has heaps more adventures coming at him in future birthdays! So whenever in doubt of what to do for a party… throw them a surprise party! Phoebe xx
 One way or another first birthdays are special. Its a child hitting their first milestone! I made this cake with some help from my aunties for my little cousins 1st Birthday! The first thing we had to do was was make flowers from fondant. I learnt how to do this in a cake decorating class I attended early last year. Next was to actually bake the six layers of this cake. Even though this was just a simple vanilla sponge it still took about 2 days to complete all six layers. On the second day I started preparing buttercream to cover the cake while I had to wait until all the cakes were completely cooled down and this simply consisted of unsalted butter, icing sugar and some milk. Assembling this cake involved three people… I had to spread a layer of buttercream in-between each layer of cake and then once I have finished that it was then time to ice the entire cake and make it look precise and smooth all around before adding streaks to it to make it look a bit more rustic. Once I had finished icing the cake it was then time to add the finishing touches. This included bunting which was made by my aunty so it would fit to size and off course a candle! We wanted to keep the cake simple because the inside was already so colourful. The cake was complete! The guests at this party had no idea what to expect seeing this cake. It was a tall cake covered in a lot of icing… It was time to cut the cake! First slice was cut and surrounding the cake table everyone gasped! They were all amazed and the feedback we got was incredible! In my opinion thats what makes the process of making a cake so worthwhile! We made some other desserts to add onto the cake table and this ranged from cupcakes to friands and even canoli! Despite the weather on this day it was an amazing turn out and making this cake definitely topped it off! So if your day isn't going so well… add a pop of colour and trust me it will lift your mood instantly! Phoebe xx 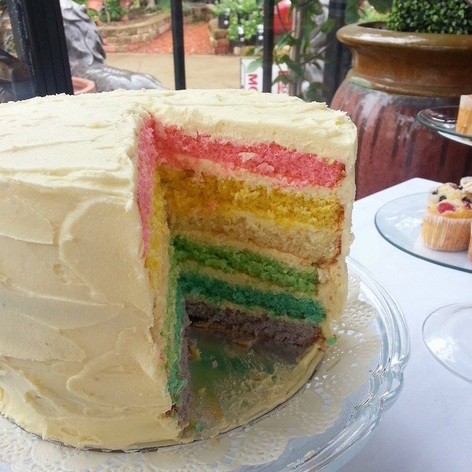 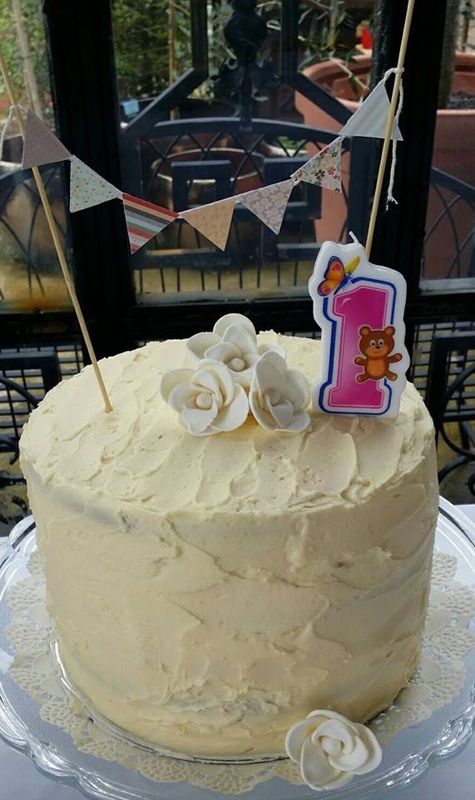 Aloha means Hello in Hawaii and with this cake I created, I feel like its perfect for a Hawaiian themed birthday. Putting this cake together took about a week and by the end I was extremely happy on how it turned out. The first thing I had to get done were the flowers so that they could set on time and hold its shape without falling everywhere. Once that was done which went for a time period of 2-3 days it was now time to make the actual cake. This cake consisted of Red Velvet sponge with a cream cheese frosting to bind the 2 cake slices together. After I had covered the entire cake with frosting it was then time to cover it in fondant. This I think was the hardest bit. Kneading food colouring into it then rolling it out flat and then having to cover and smooth out the fondant onto the cake was a bit of a mission but I got there in the end. To bake and cover the cake took me about 2 days. By this time I had a day left until the party and still needed to put on the flowers so I created a bit of a glue using icing sugar and a little dash of water and used that to stick on the flowers all along and on top of the cake. I had finally finished this cake and I was so very happy on the result and all the guests at the party seemed to love it. Mahalo Phoebe xx 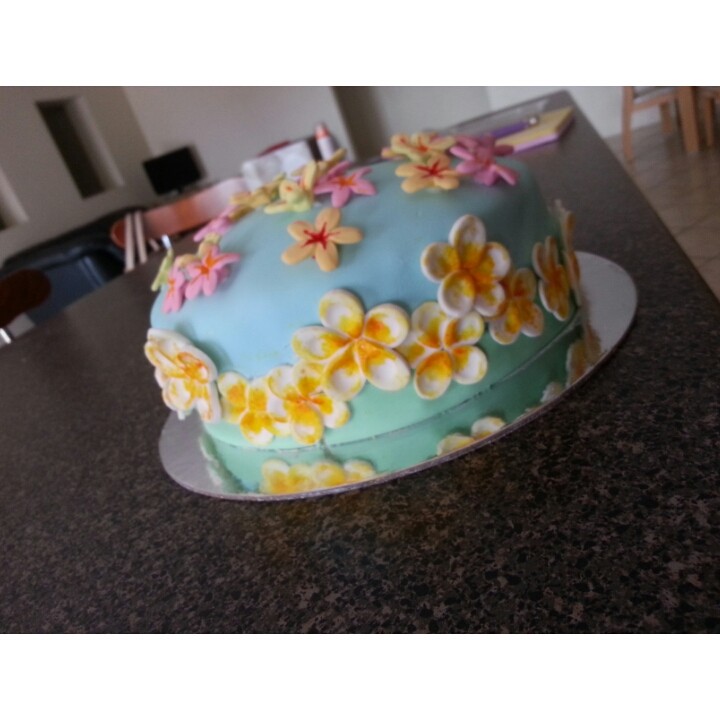 |